I like the sound of the word – YOU-TRO-FIH-KAY-SHON, though
it’s a pretty hideous thing.
Large scale farming requires large scale amounts of inorganic fertilisers. Inorganic in Chemistry means not containing carbon, which basically means not derived from living matter. Inorganic fertilisers are cheap and easy to transport. You can see how inorganic fertilisers are made in ‘Fertilisers’ and why their production is worrisome. Of course, fertilisers are required now for most of our farming methods – to provide cheap accessible food. The ions (atoms or molecules with a charge) in the fertilisers are water soluble (dissolve easily in water) which is great as it means the plants are able to take them up through their roots. However, water soluble also means they can be washed away (leached) from the soils. This means that the ions go into the waterways and end up in lakes, rivers and ponds. This increase of nutrients in water is called eutrophication.
Hey, that doesn’t sound so bad right? Fertilisers in water
means more plant growth, which means more food in the food chain, right? Afraid
not:
The most soluble ions are the nitrates (NO3–). Fertilisers are high in nitrates as these are required by the plants to make plant proteins and needed to make chlorophyll (required for photosynthesis). Nitrates encourage large amounts of leafy growth. In ponds this includes surface algae. If you see a pond that looks green on top, this would be the algal bloom. The algae covering the surface stops light from reaching the plants below the surface. These plants can no longer photosynthesise and will therefore die. No photosynthesis means that oxygen is no longer being produced. The decomposing bacteria then break down the dead plants and reproduce rapidly. The decomposition of the plants gives off more nitrates, compounding the problem. The respiration of any organisms in the water, along with the increasing number of bacteria uses up the oxygen. As oxygen is used up, life in the water dies. Fish and everything else go belly up. The algae will also eventually die.
With the surface covered, any plant life below the surface will not get enough light to photosynthesise
This tends to happen to ponds. Moving water will constantly
be diluted so the effects of the nitrates are less damaging. As water moves it
gets aerated and therefore oxygen levels increase (basically things like
waterfalls, fountains, rushing water, etc allows for more oxygen to dissolve in
the water).
Here the water was fed from a stream so there is water movement and therefore less algae
In hot weather all the metabolic processes are sped up and
water can evaporate (which increases the concentration) so everything happens
quicker.
Organic fertilisers (like manure) has nitrogen containing
compounds that are less soluble so leach more slowly.
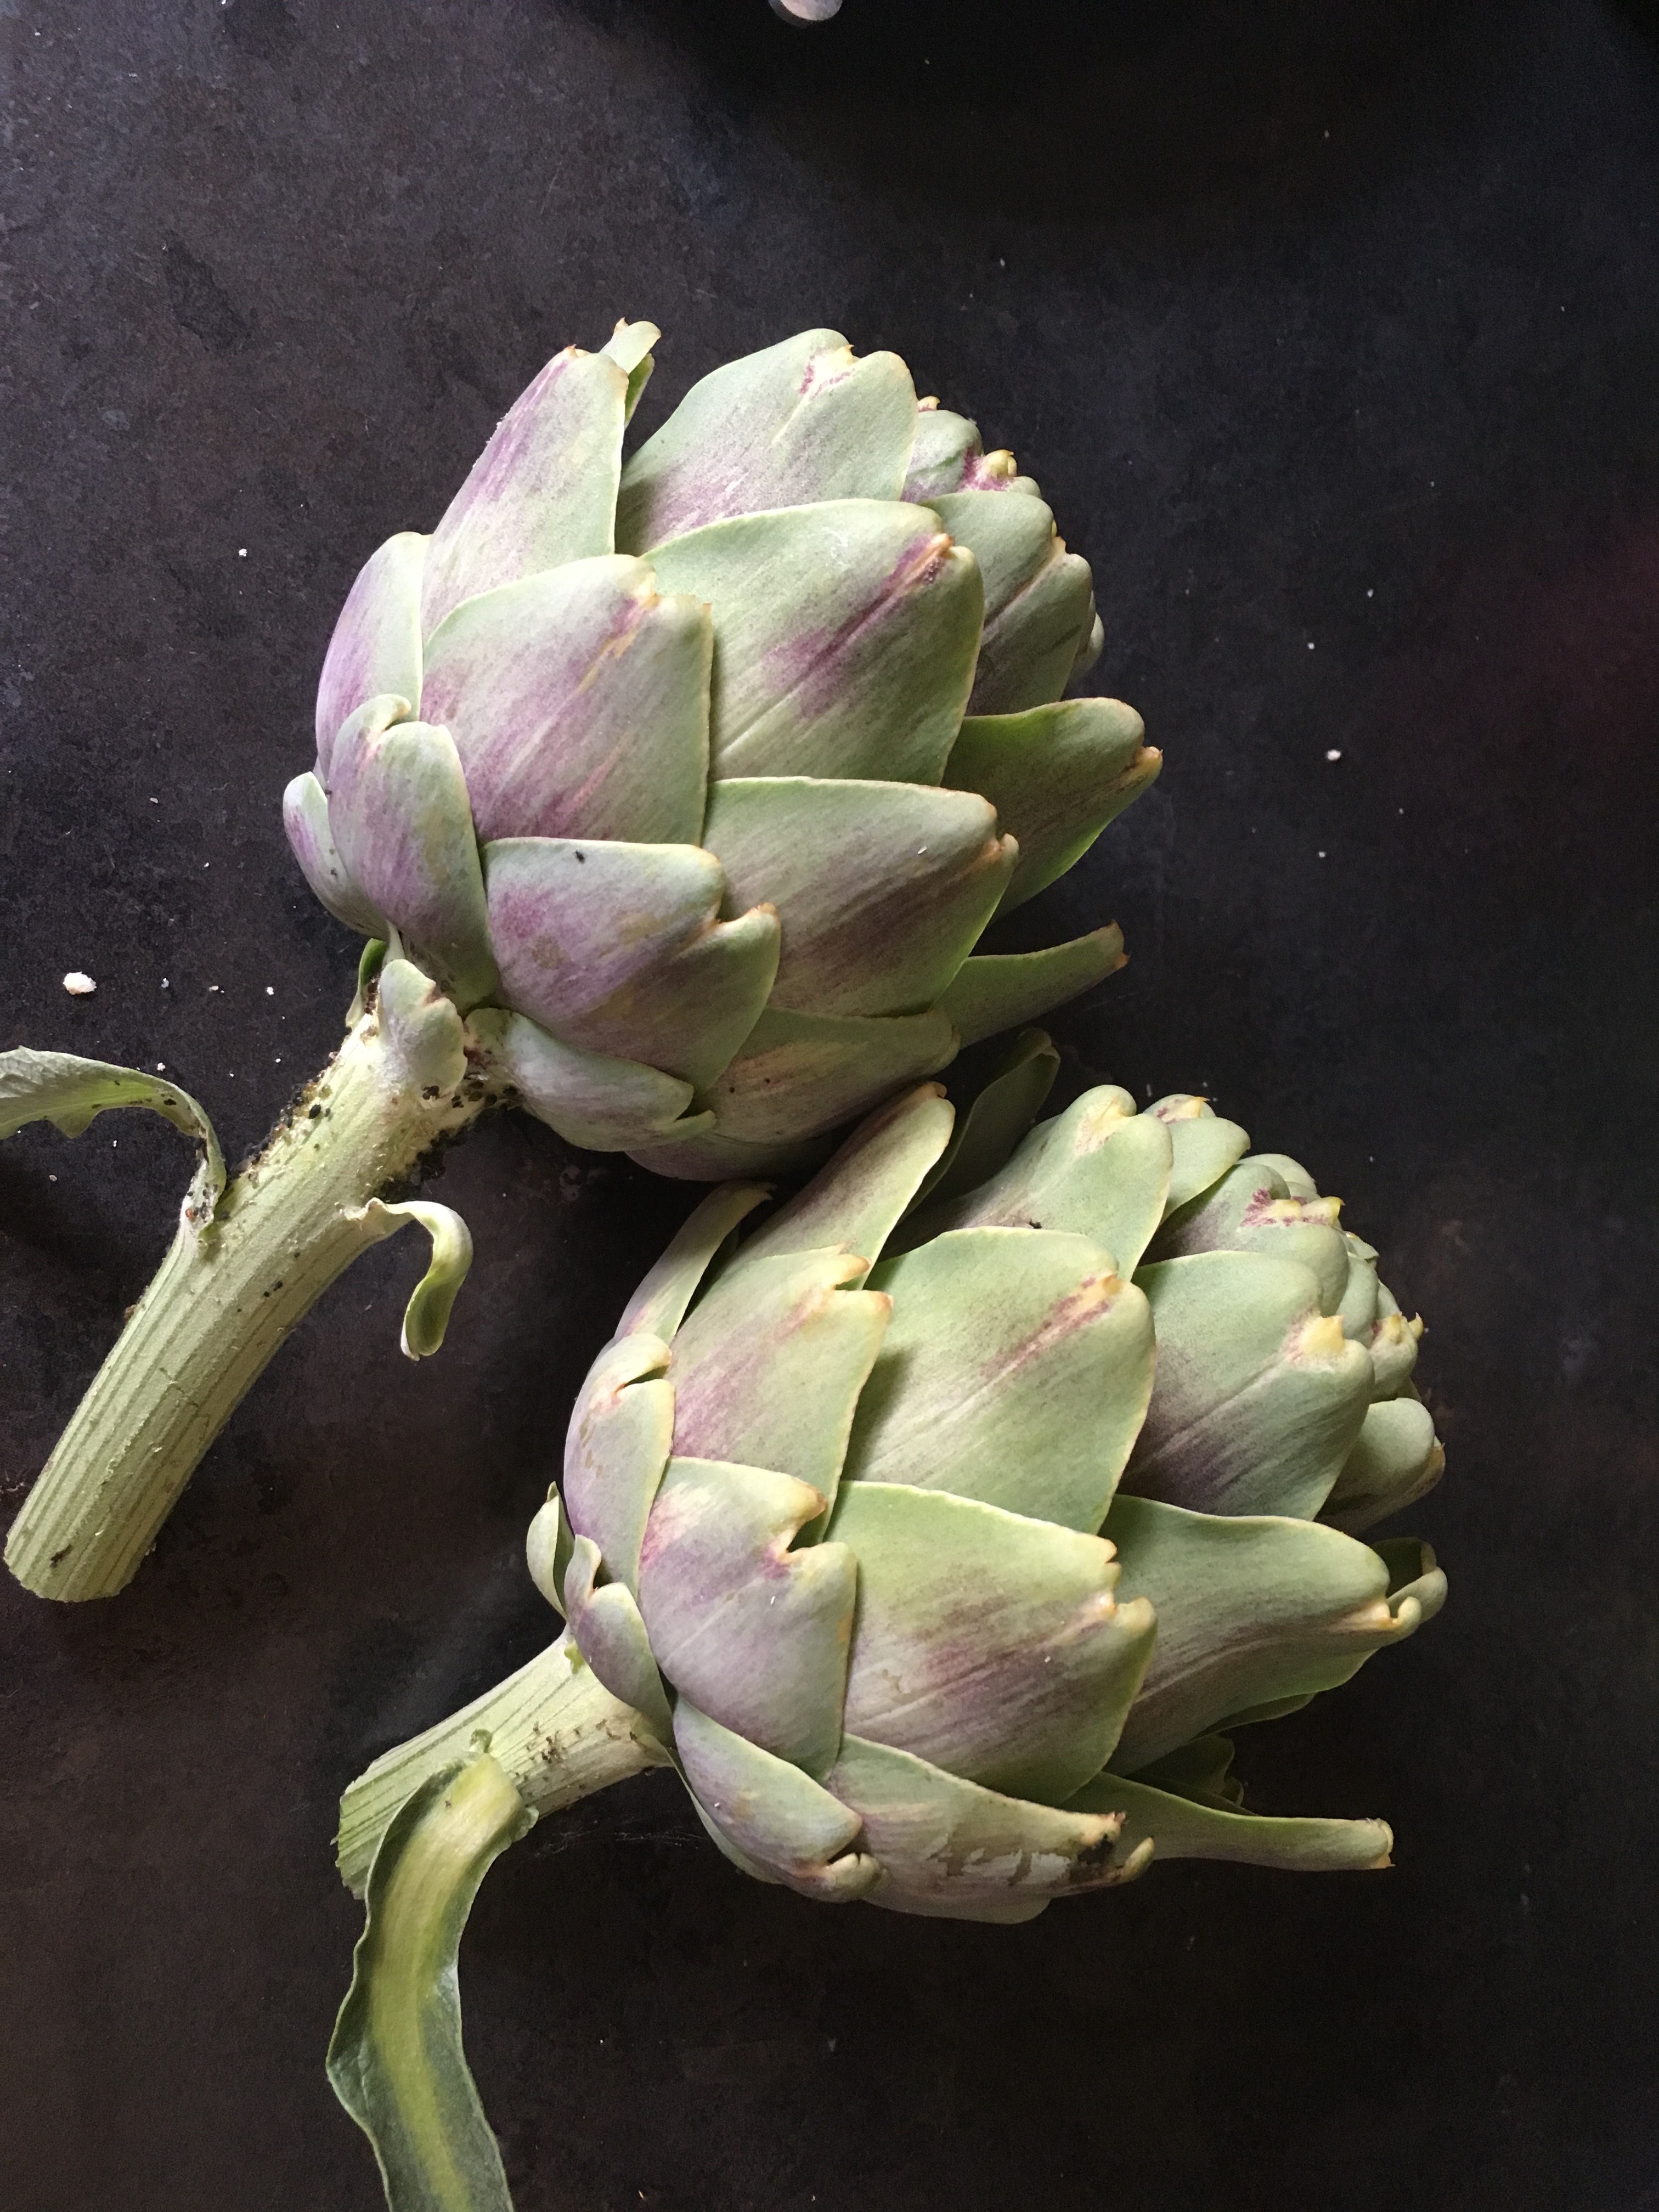
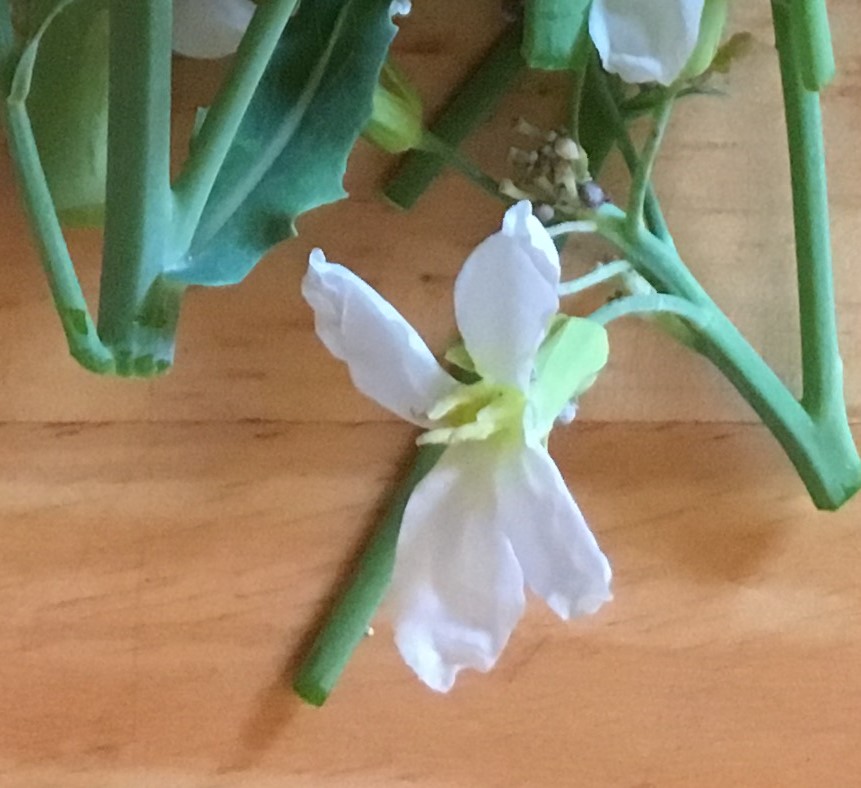
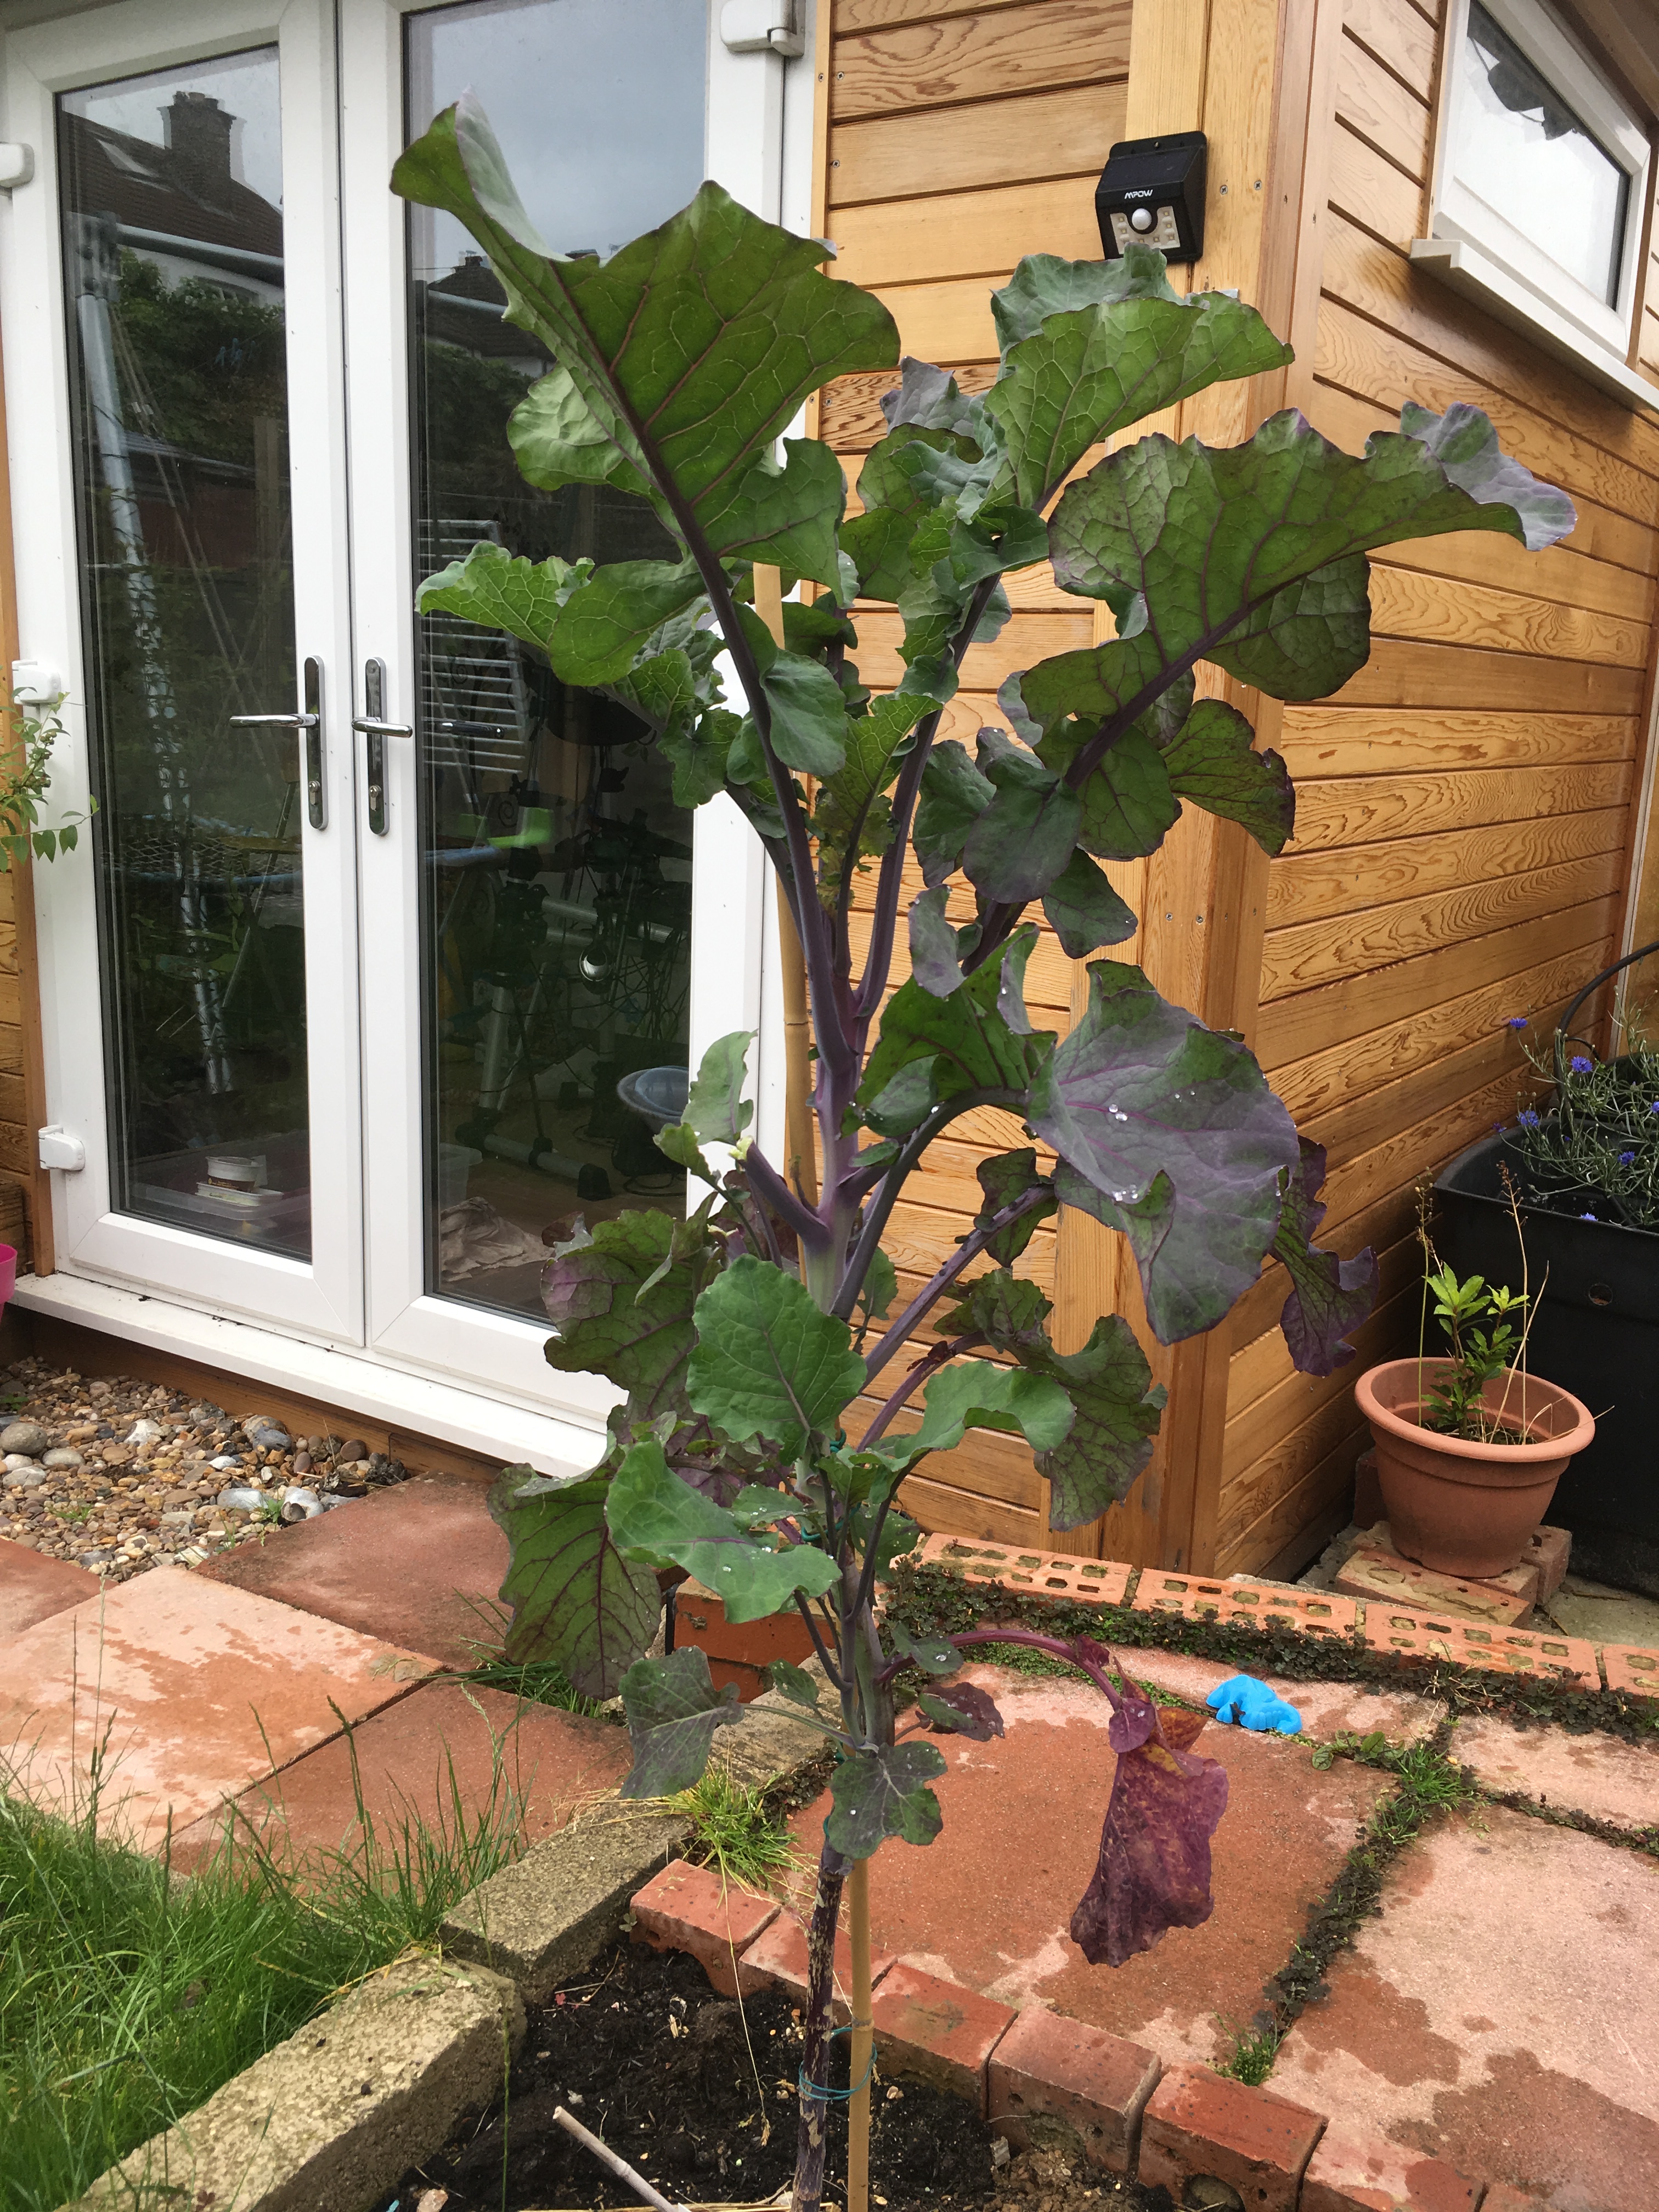
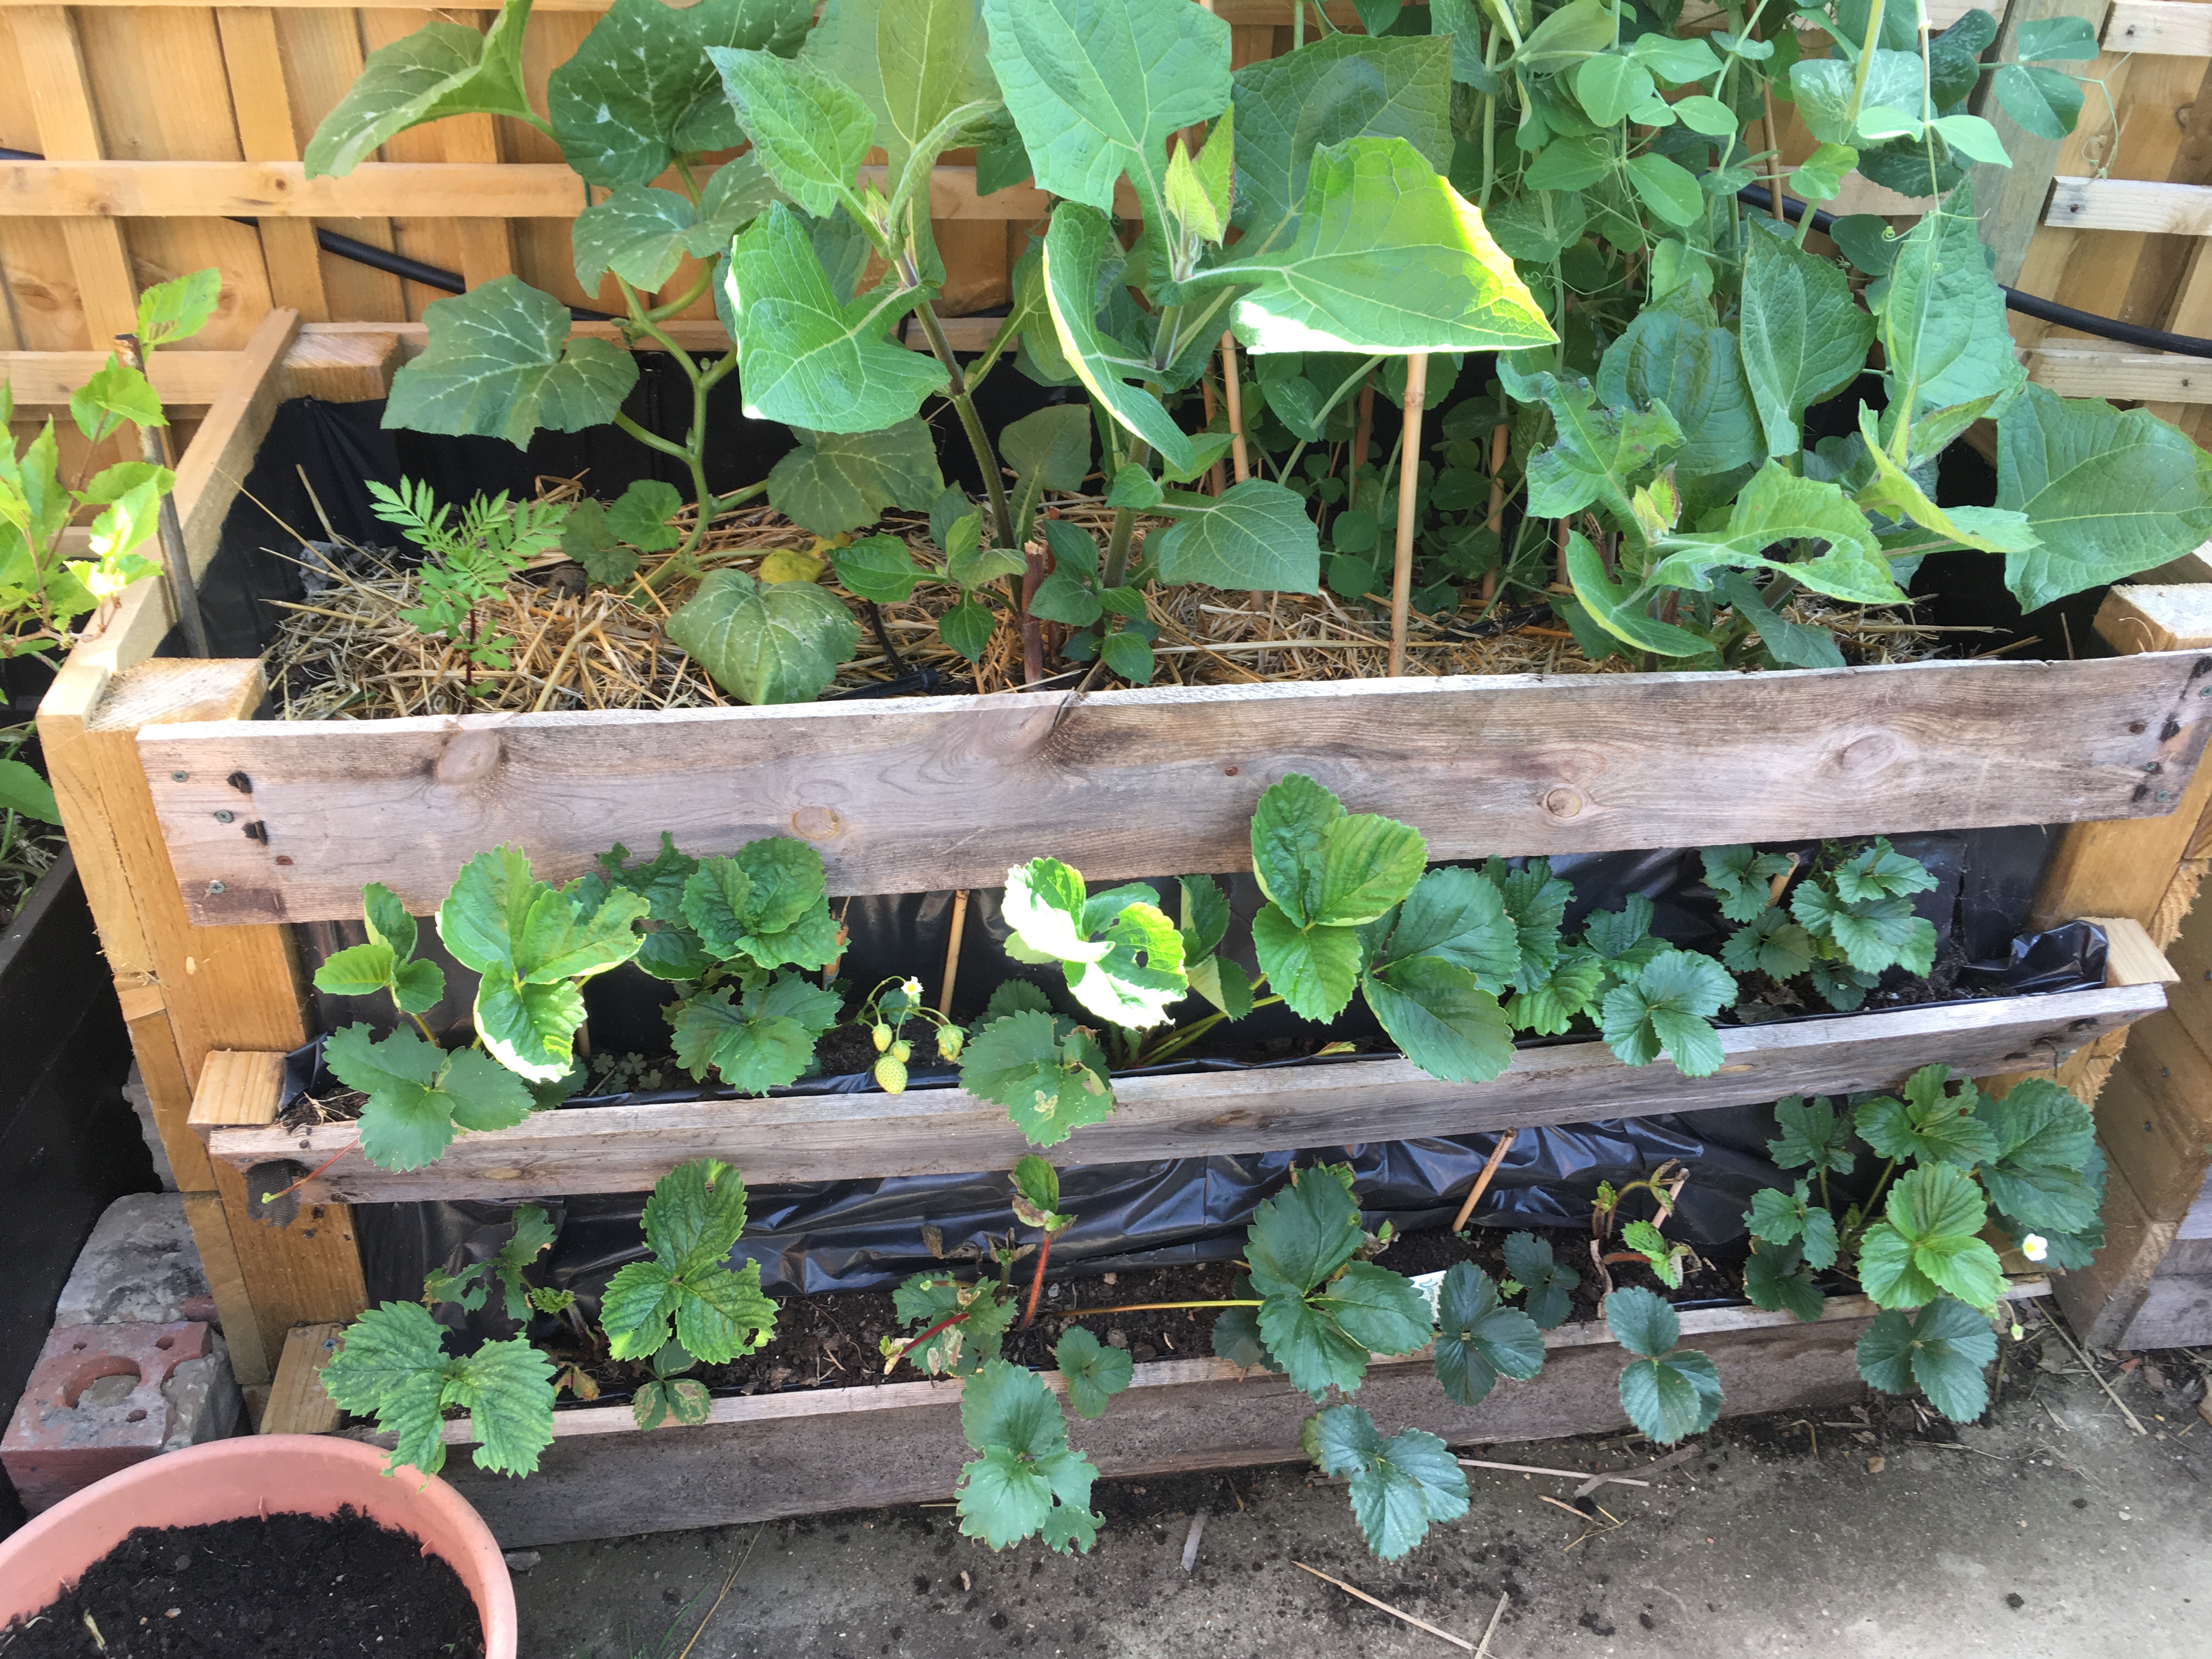
Large perennial grown for its flower buds. Choose a variety that is hardy for your conditions. Can be grown from seed or easily propagated from suckers. Preparation and cooking can be easy and eating, leisurely.
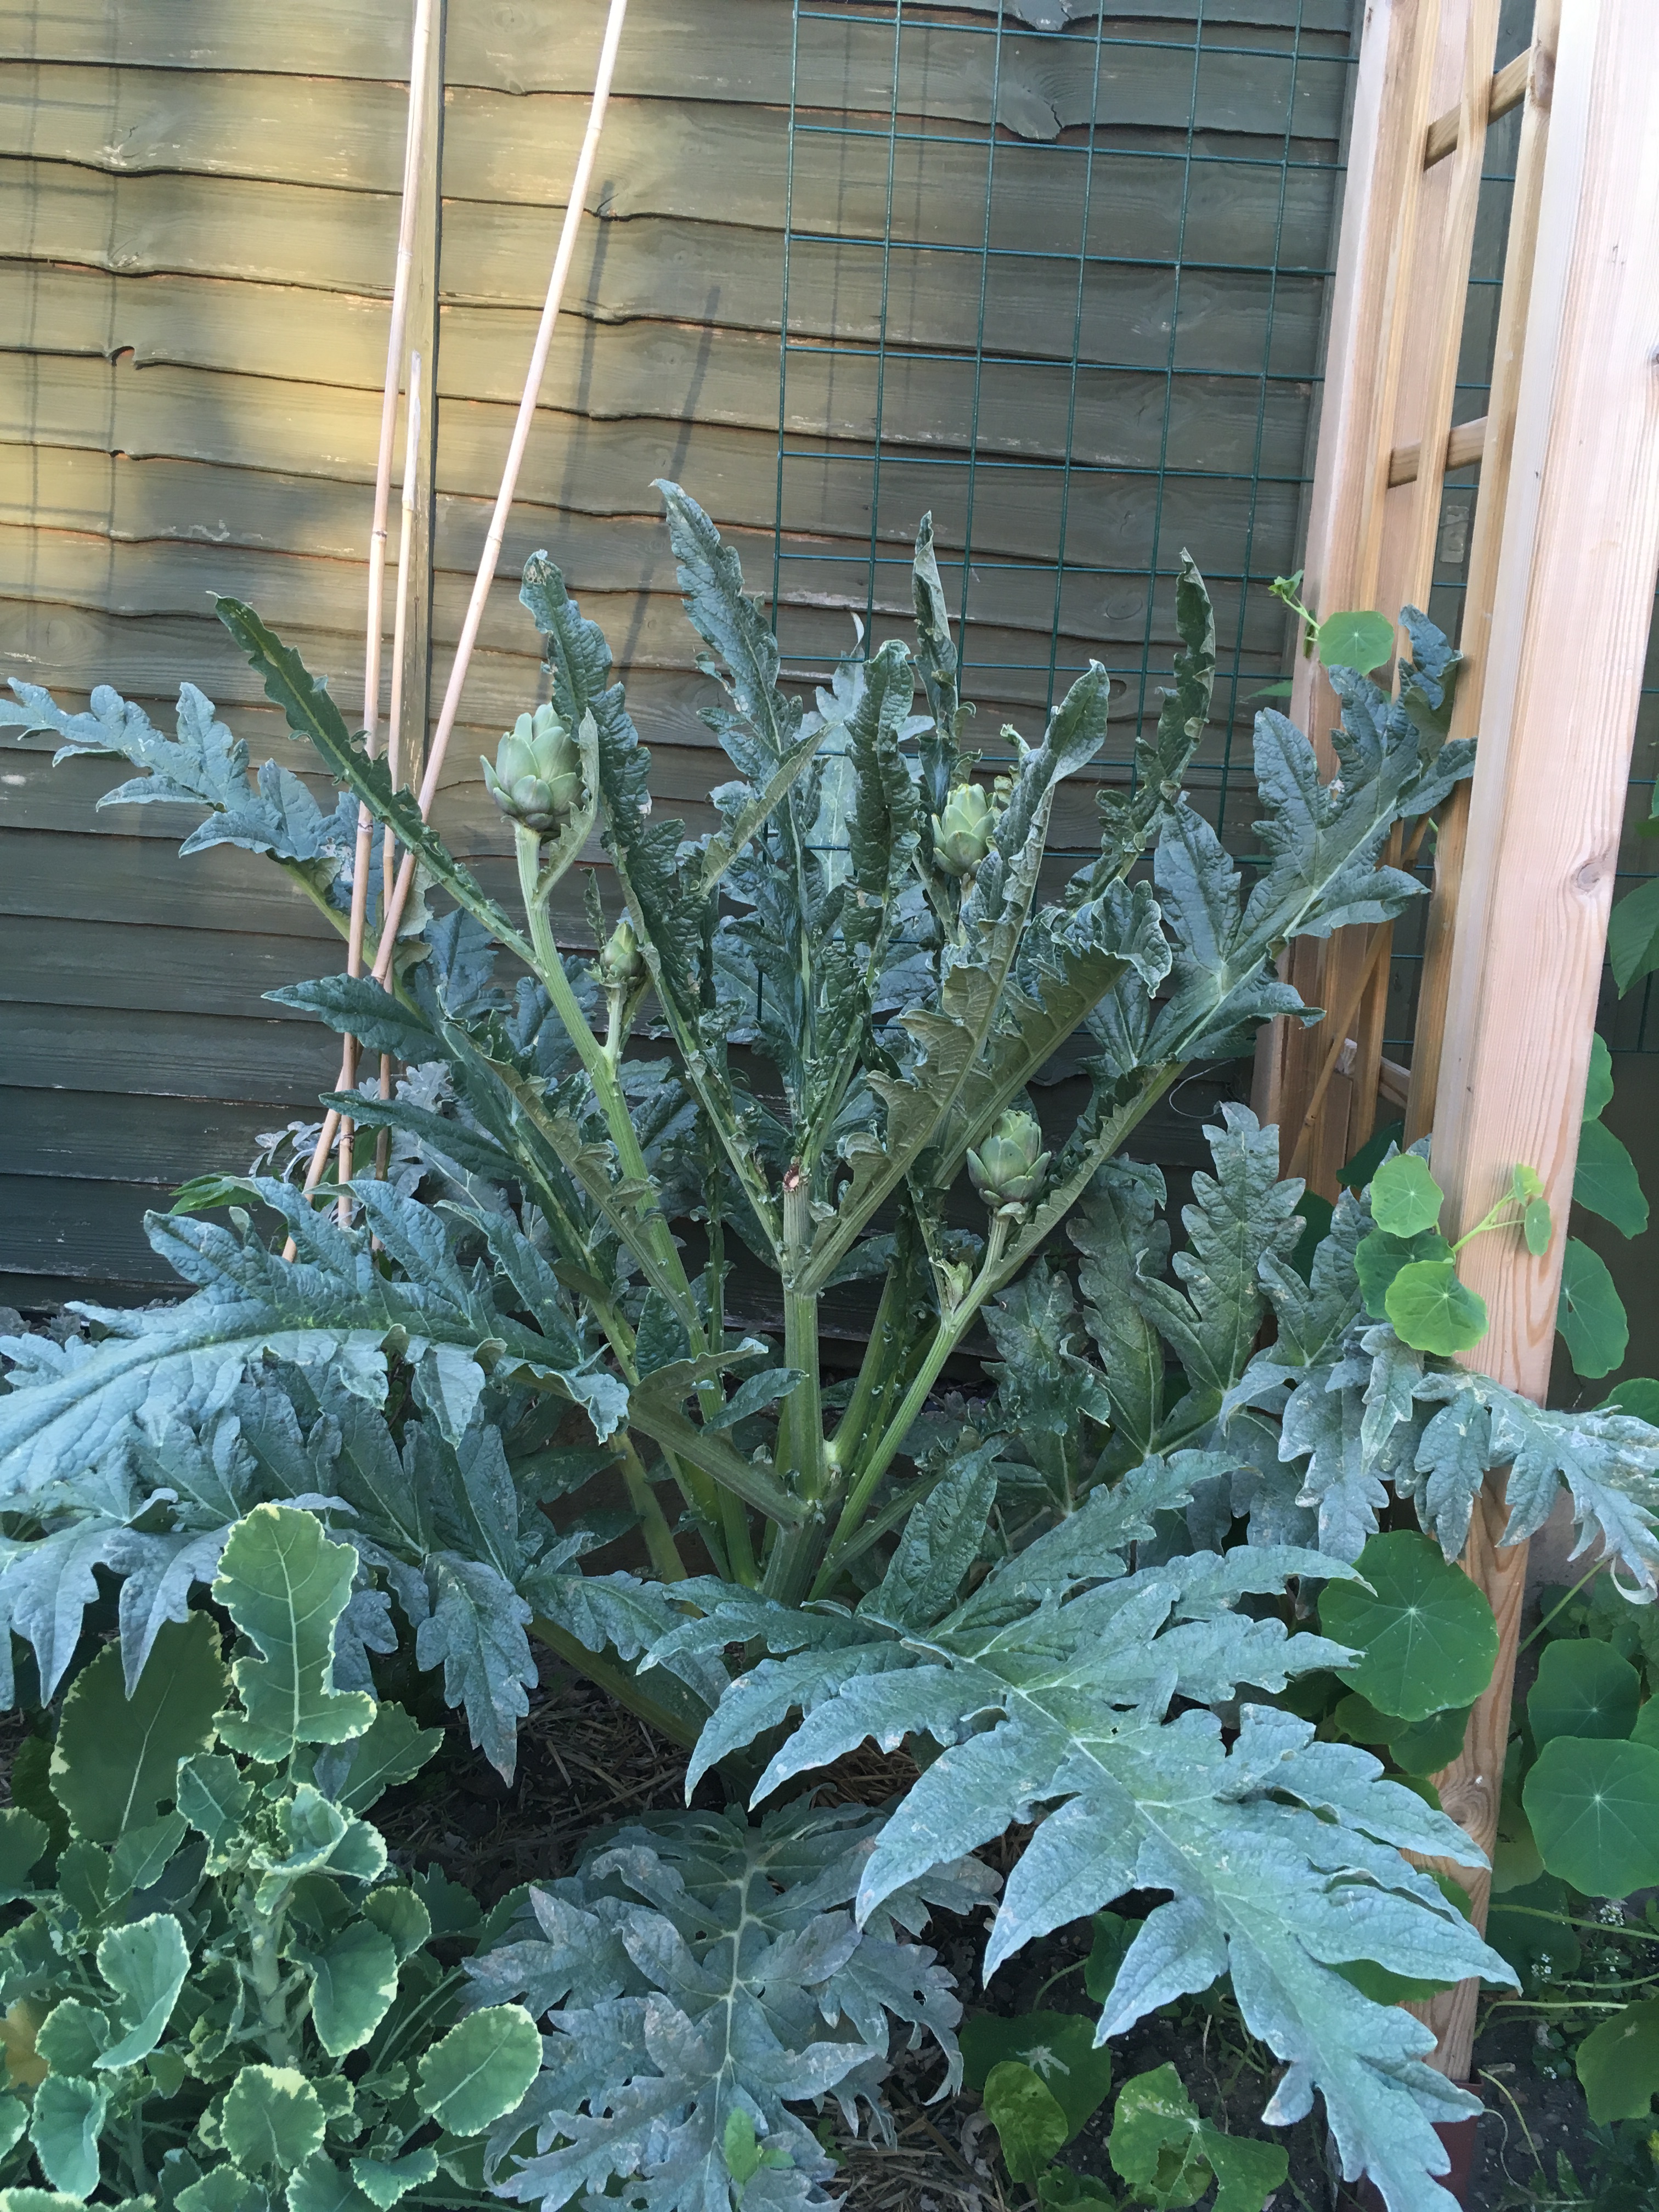
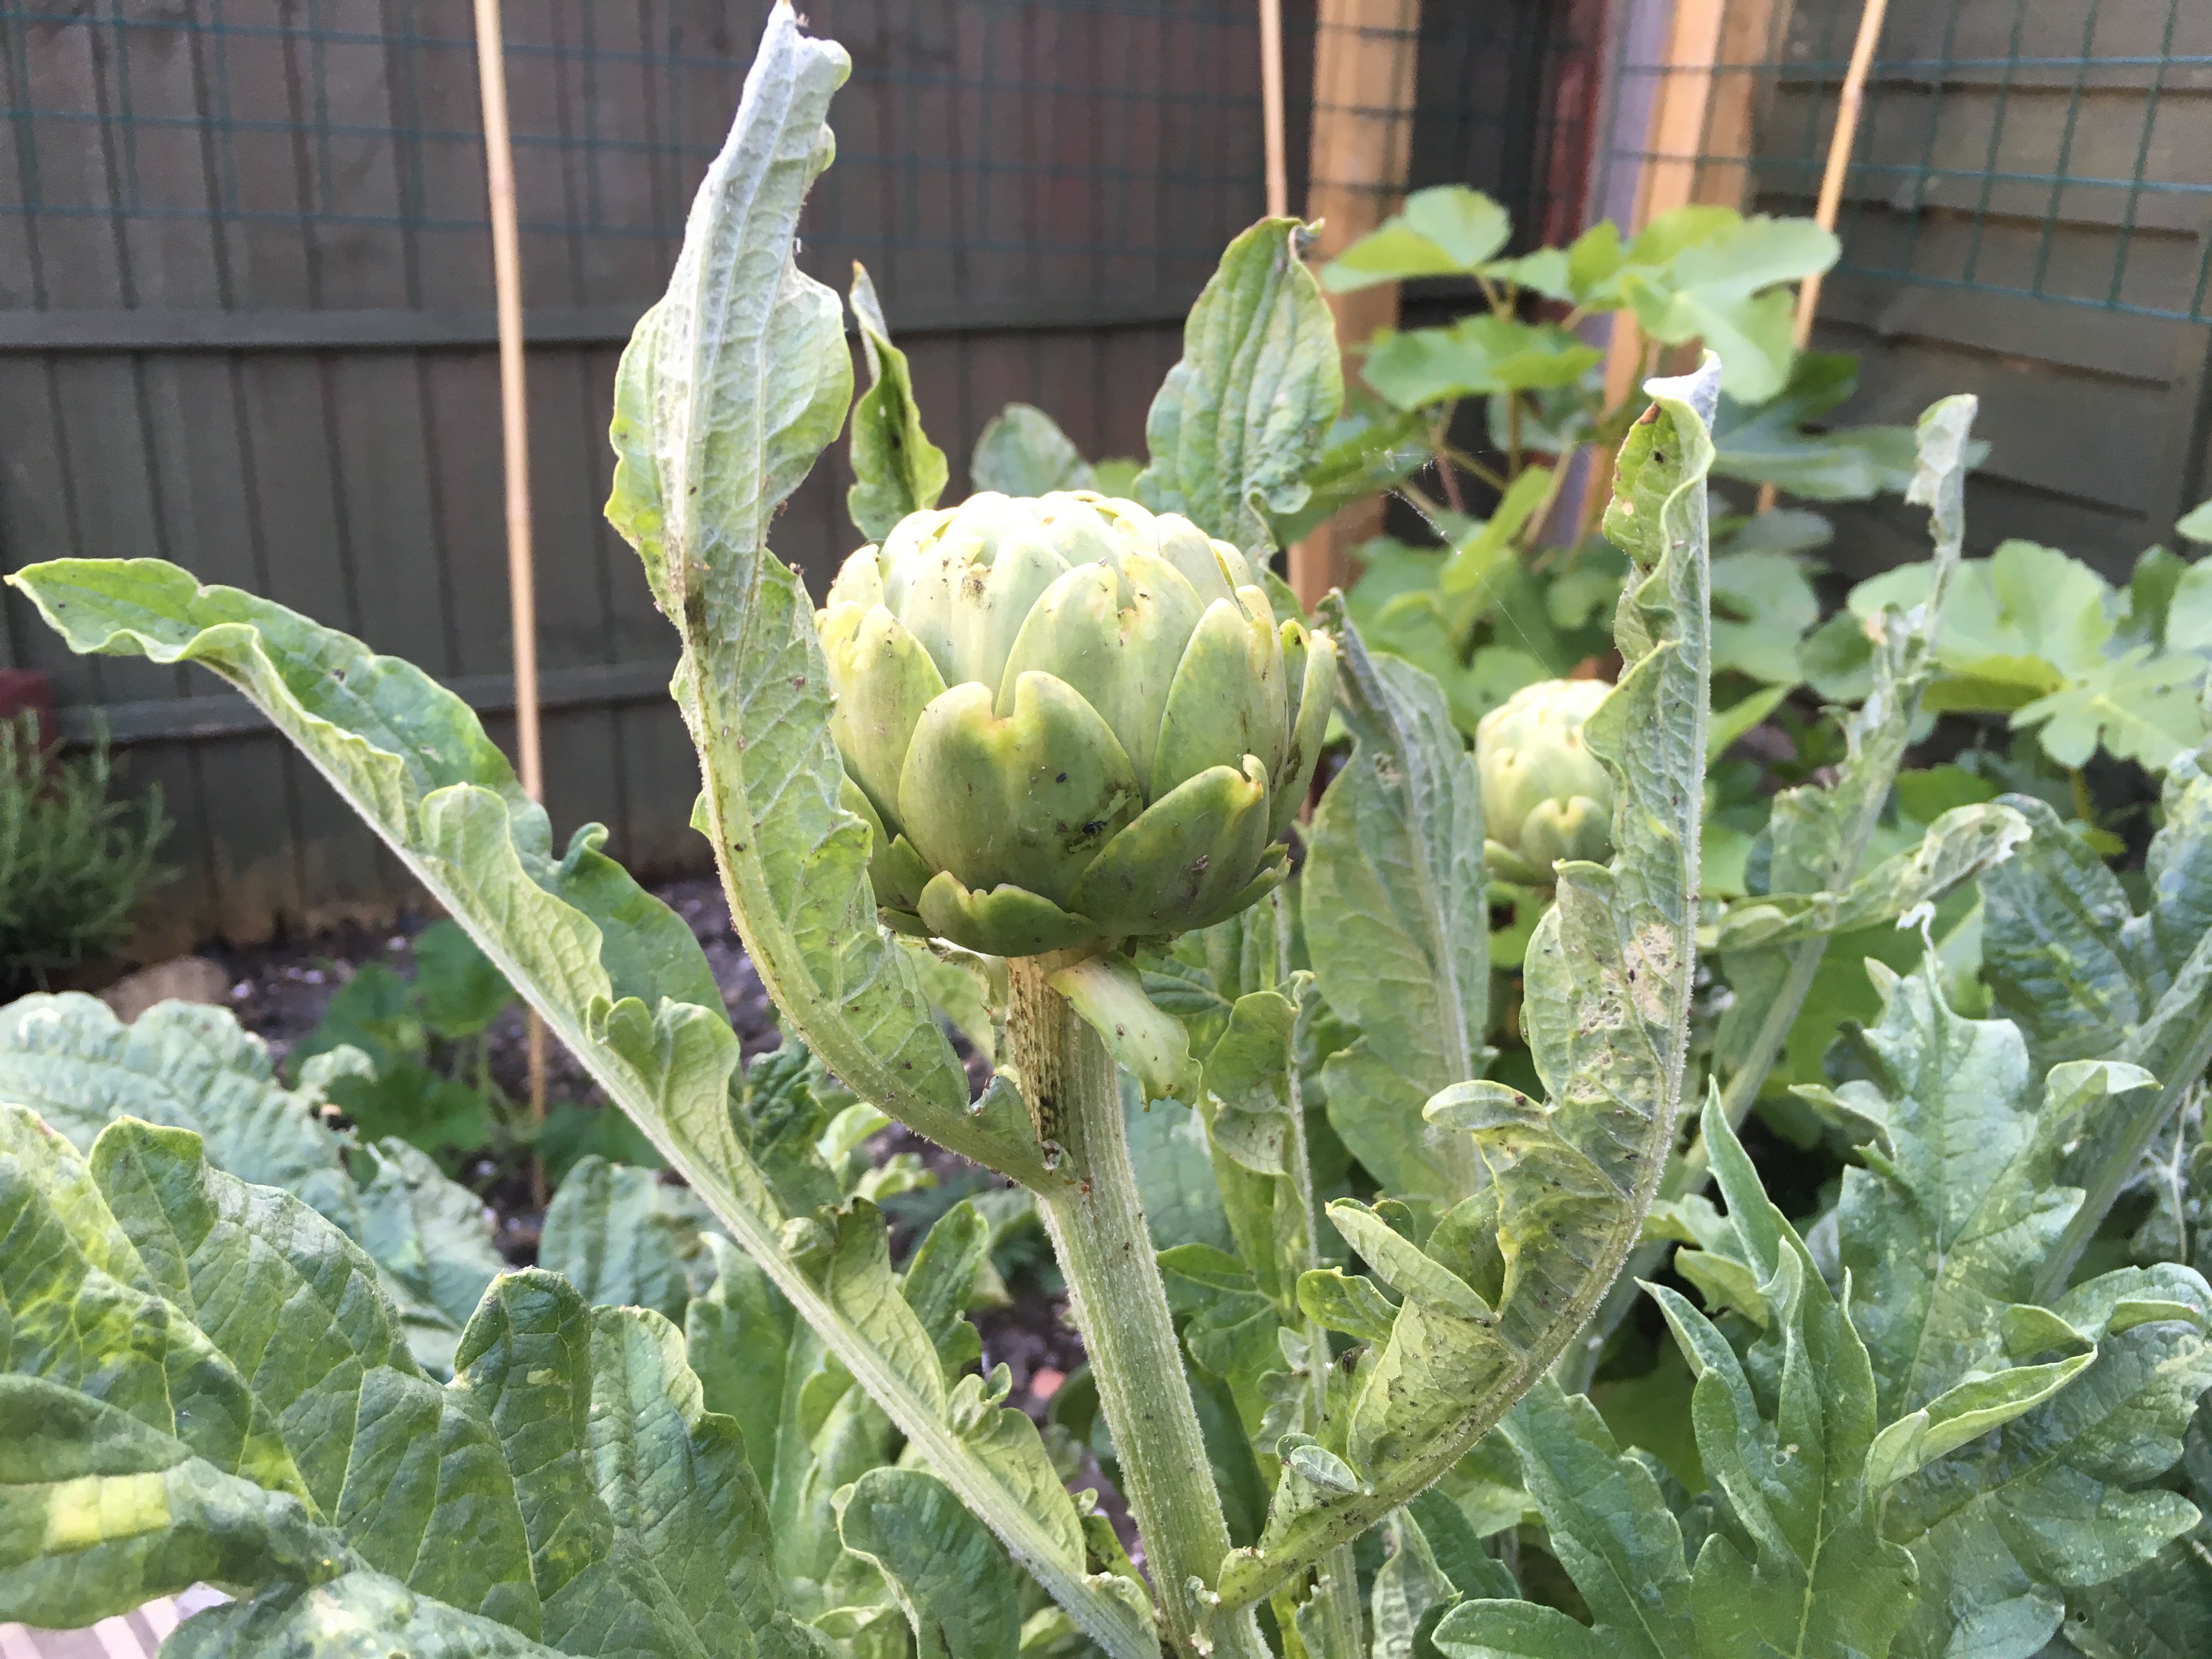
It’s probably only when you see the mature flower of an artichoke that you can see the connection to thistle flowers. Mine never get that far because we love them – and I do me we. I have never failed to get my fussy 3 year old to eat when serving artichoke. If you have very little space in the garden, then artichokes may not be for you. They do take up a substantial amount of space for the amount of food they provide (a bit like pumpkins). They block the light out at ground level so much so that I don’t usually have to weed around them. They do make a nice front garden statement though if you want something big and showy.
Growing artichokes
Seeds
One of the cheapest ways to start artichokes is to sow seeds. Seeds are easy to get hold of from retailers. The variety I see most often is Green Globe, popular for being hardy, reliable and prolific. I, therefore, figured it would be the easiest to grow. I planted 3 seeds and 2 grew. I’m sure experts could tell you what specific mix of compost, temperature and light conditions you need to ensure germination but my approach to all seeds is chuck them into a pot of whatever big bag of compost I happen to be working my way through, whack it in the porch, water it regularly and wait for it to grow as I’ve written in my ‘Sowing Seeds’ post.
Plug Plants
Tiny plug plant
If you only want one or two plants and don’t have the patience for seeds, then you can buy artichokes as plug plants, though one will probably cost more than a pack of seeds. I bought the variety Tavor which is supposed to be hardier than Green Globe and matures in the first year.
I sowed the Green Globe indoors in February and then bought
the Tavor plug plant in July. Both provided their first crop the following May.
To be honest I can’t tell the difference in taste between the two. Both have
given us a wonderful crop for a couple of years now. They’ve also survived the
winters fine, even the freezing one that seemed to break half of London’s water
pipes.
Green Globe
Tavor
Propagating artichokes
So seed was only ‘one of the cheapest ways’ because in fact
the totally free way of growing an artichoke is knowing someone who is growing
artichokes who want to give you their offsets!
See – when I have my way and half of the people in cities are growing their own food, imagine how easy it would be to ask someone on your road for a cutting of their perennials. Or in a barter system, do a ‘swapsies’.
Anyway… Artichokes, as they mature will start sending out
suckers. These are little side plants that would grow into a new plant. Generally,
it’s good practise to remove these so that they don’t end up competing with
your established plant.
The offshoot is just left of the much larger original stem
This is about a month after it was separated. Be prepared for some of the original leaves to wilt and die back.
Growing conditions
Good sun is important and provide plenty of water during hot
days. Yes, I’m sure there is plenty of information on how a soil rich in
organic matter is best for your artichokes but the soil you have is the soil
you have. Pretty much all of London (so I’ve read – I haven’t actually gone
around testing samples) is clay. Mine is heavy clay and it would be too time
consuming or expensive to amend it before I planted my artichokes. I have been slowly
adding organic matter to the whole garden and will continue to over the next
few years.
After a year the plant was about 3 foot
The year after the plant was about 5 foot
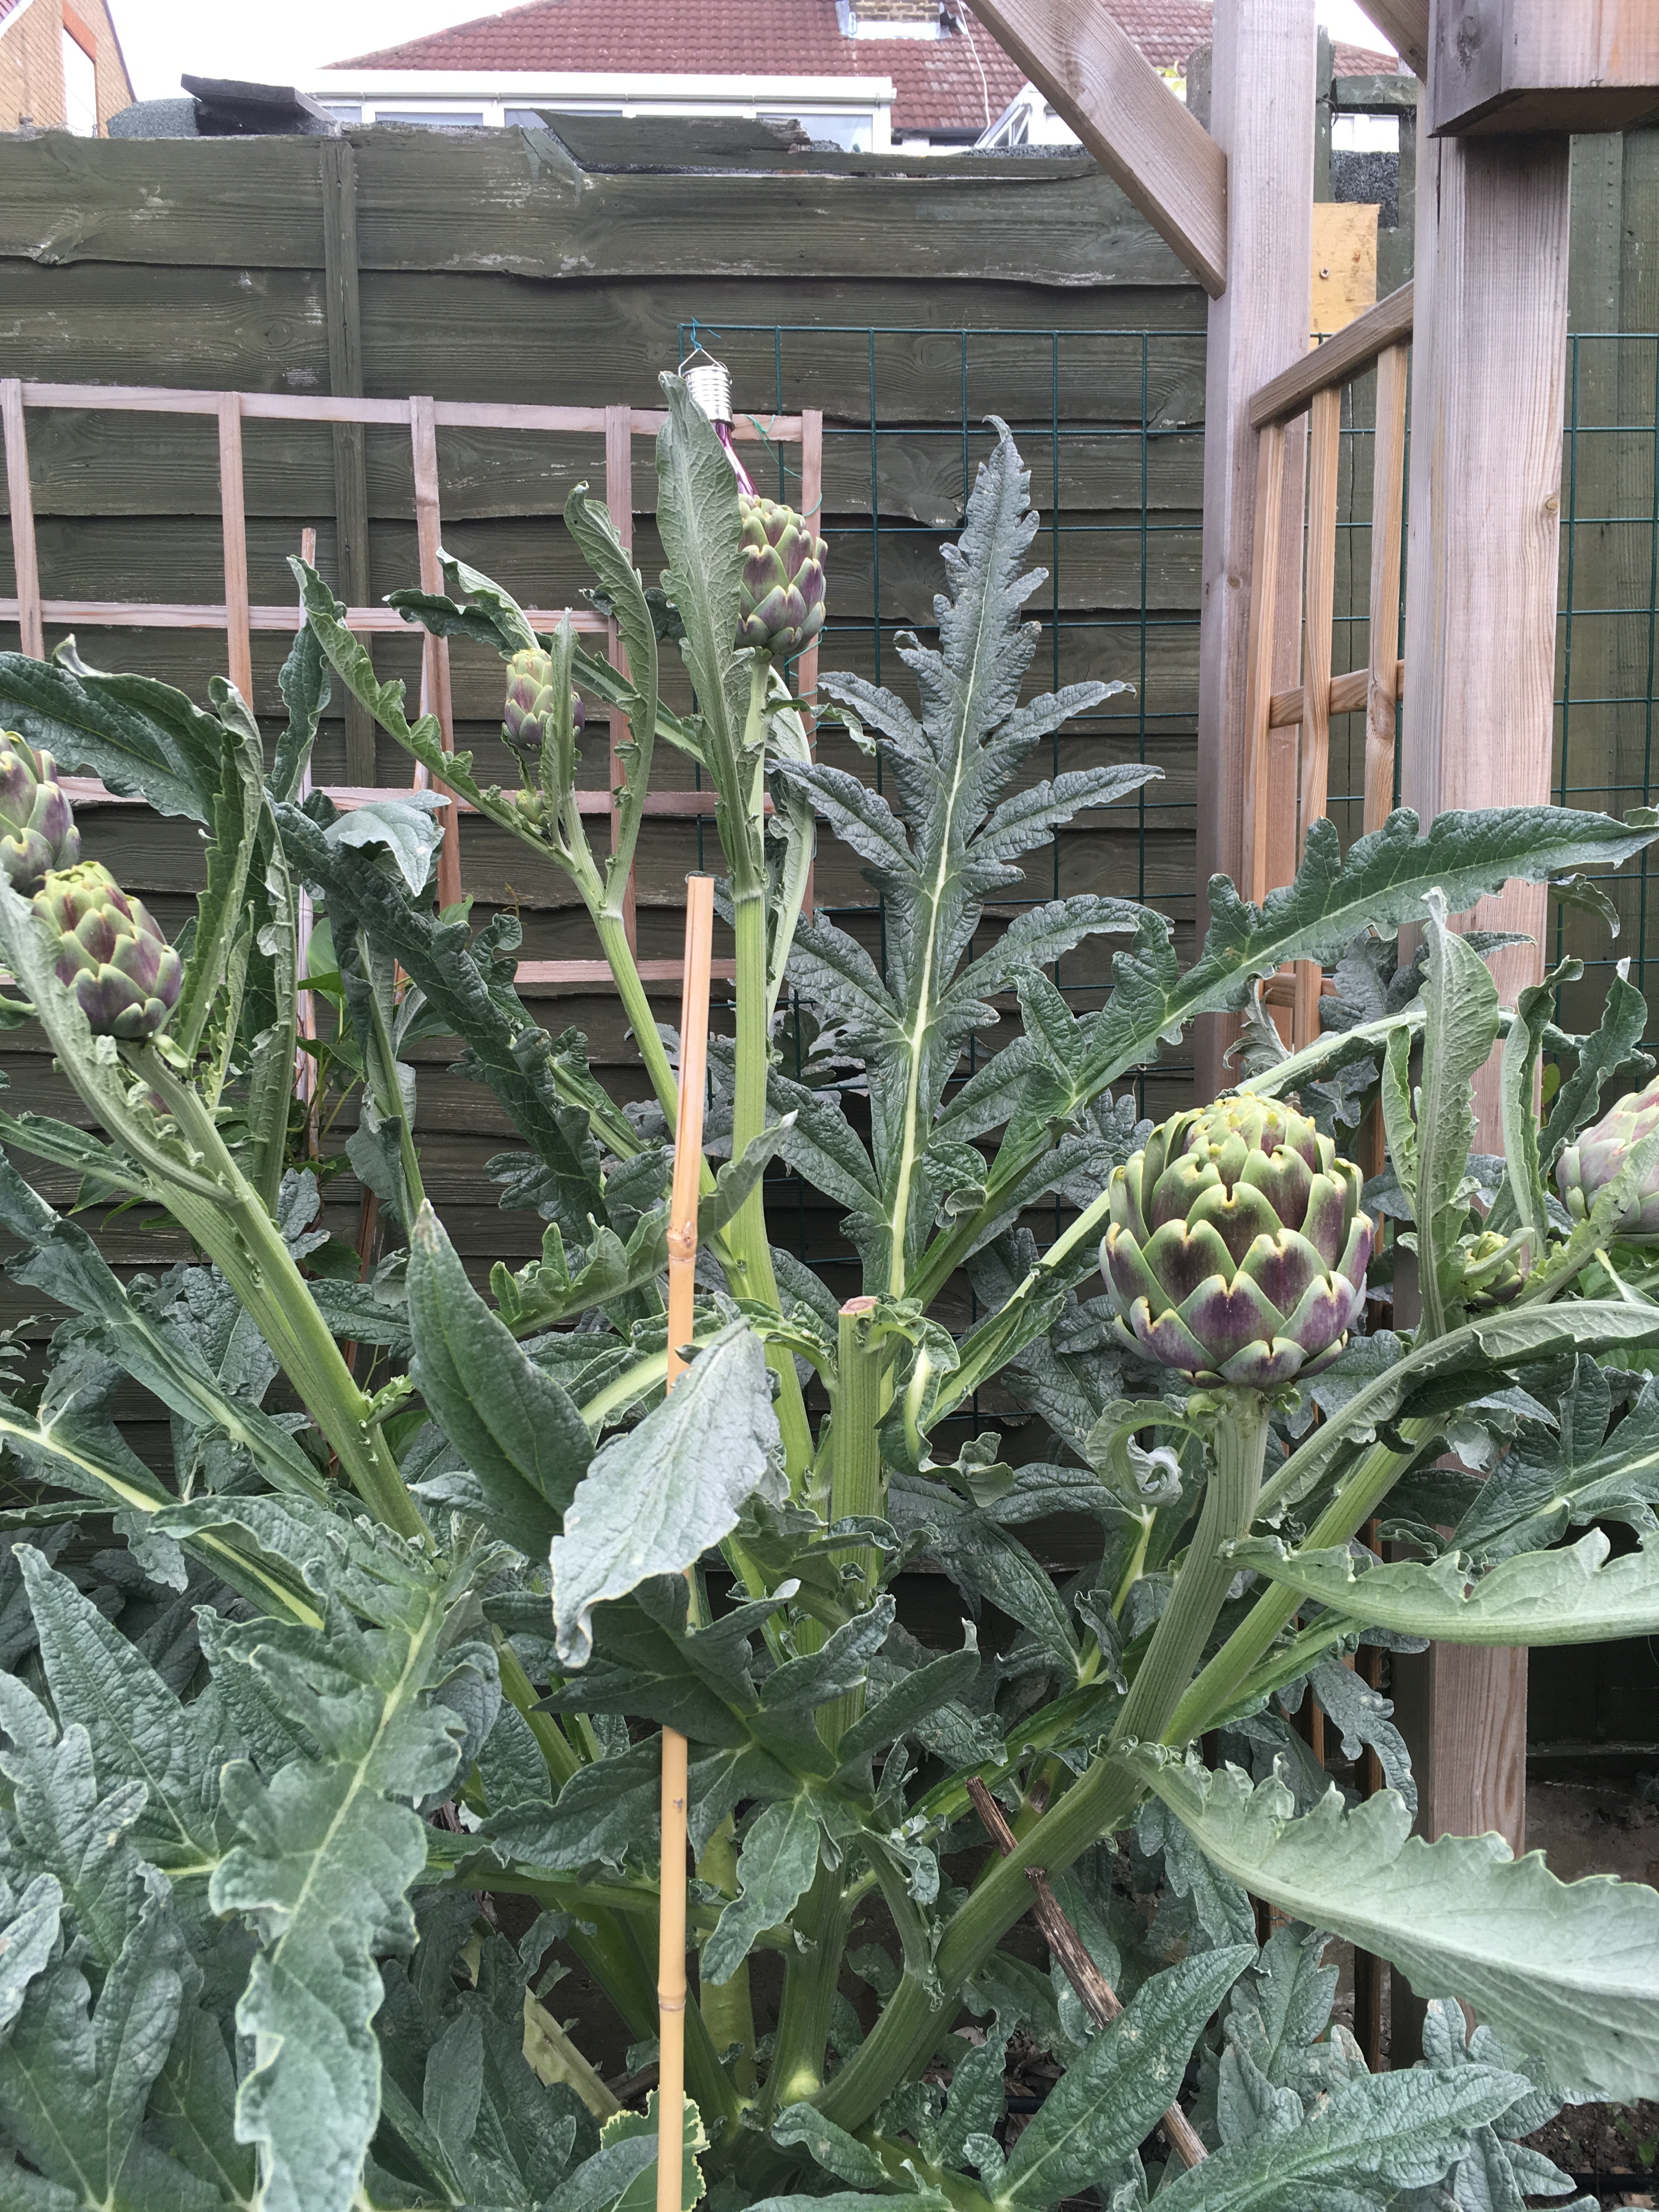
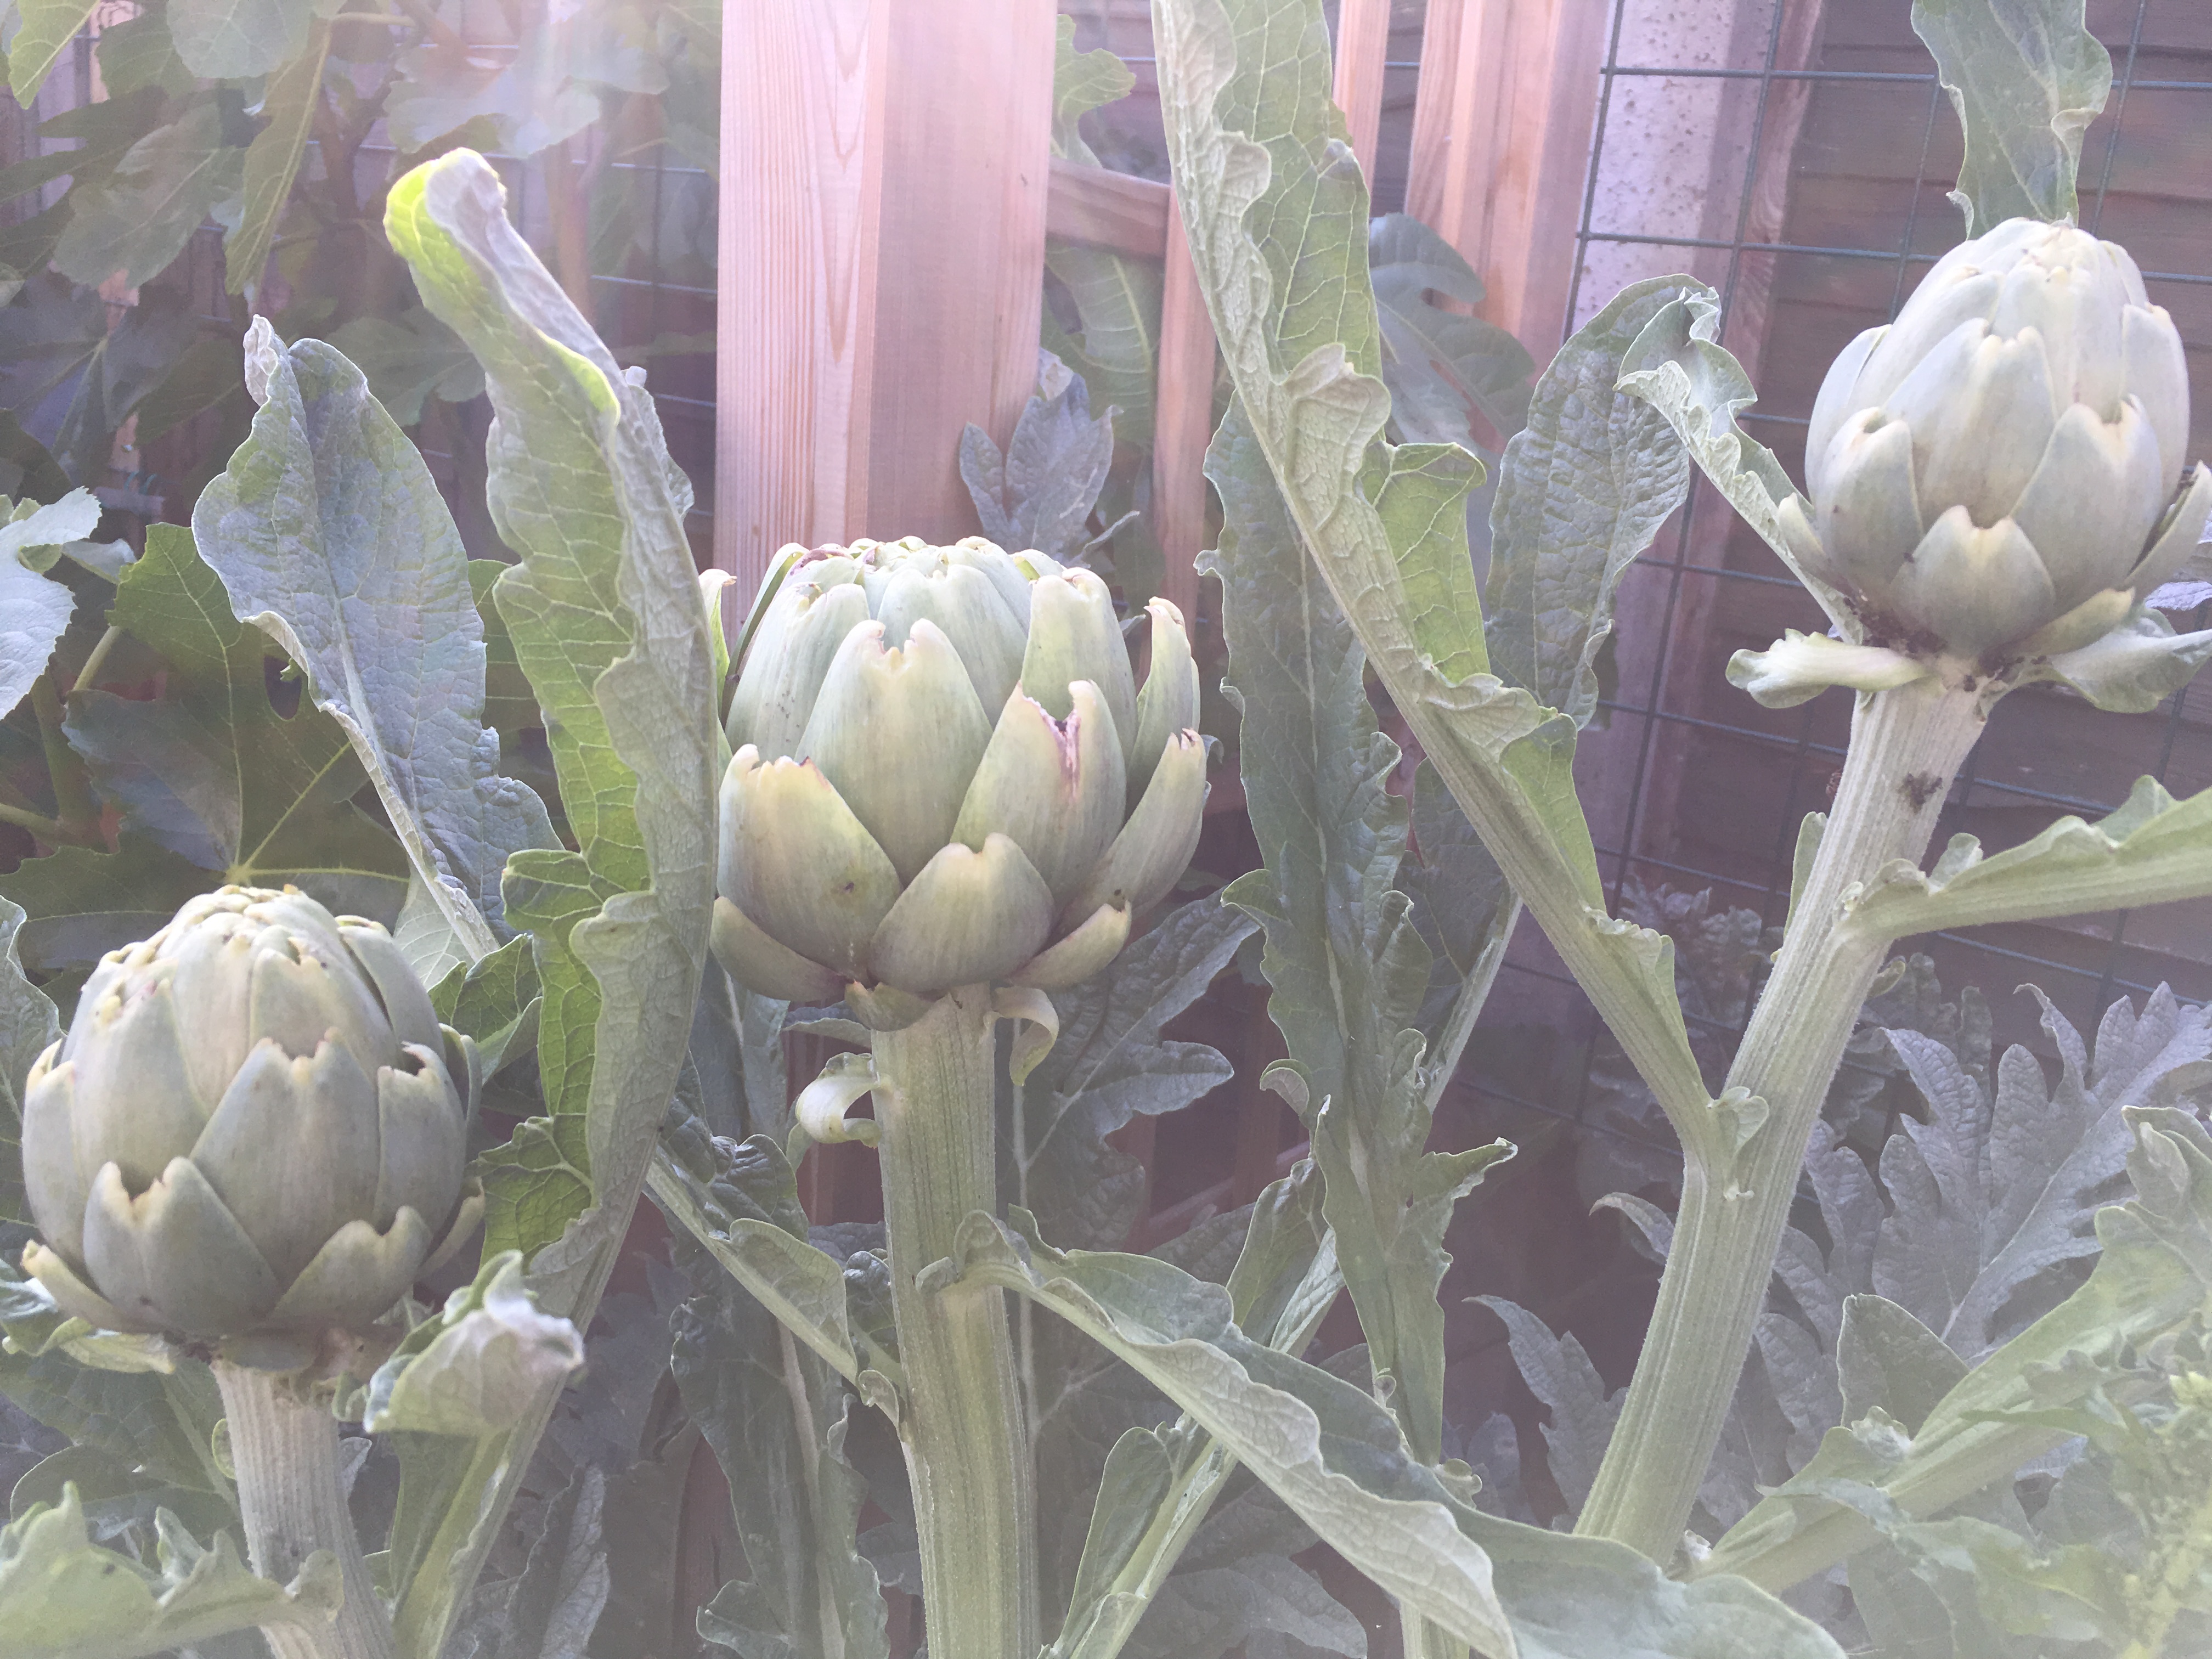
Harvesting Artichokes
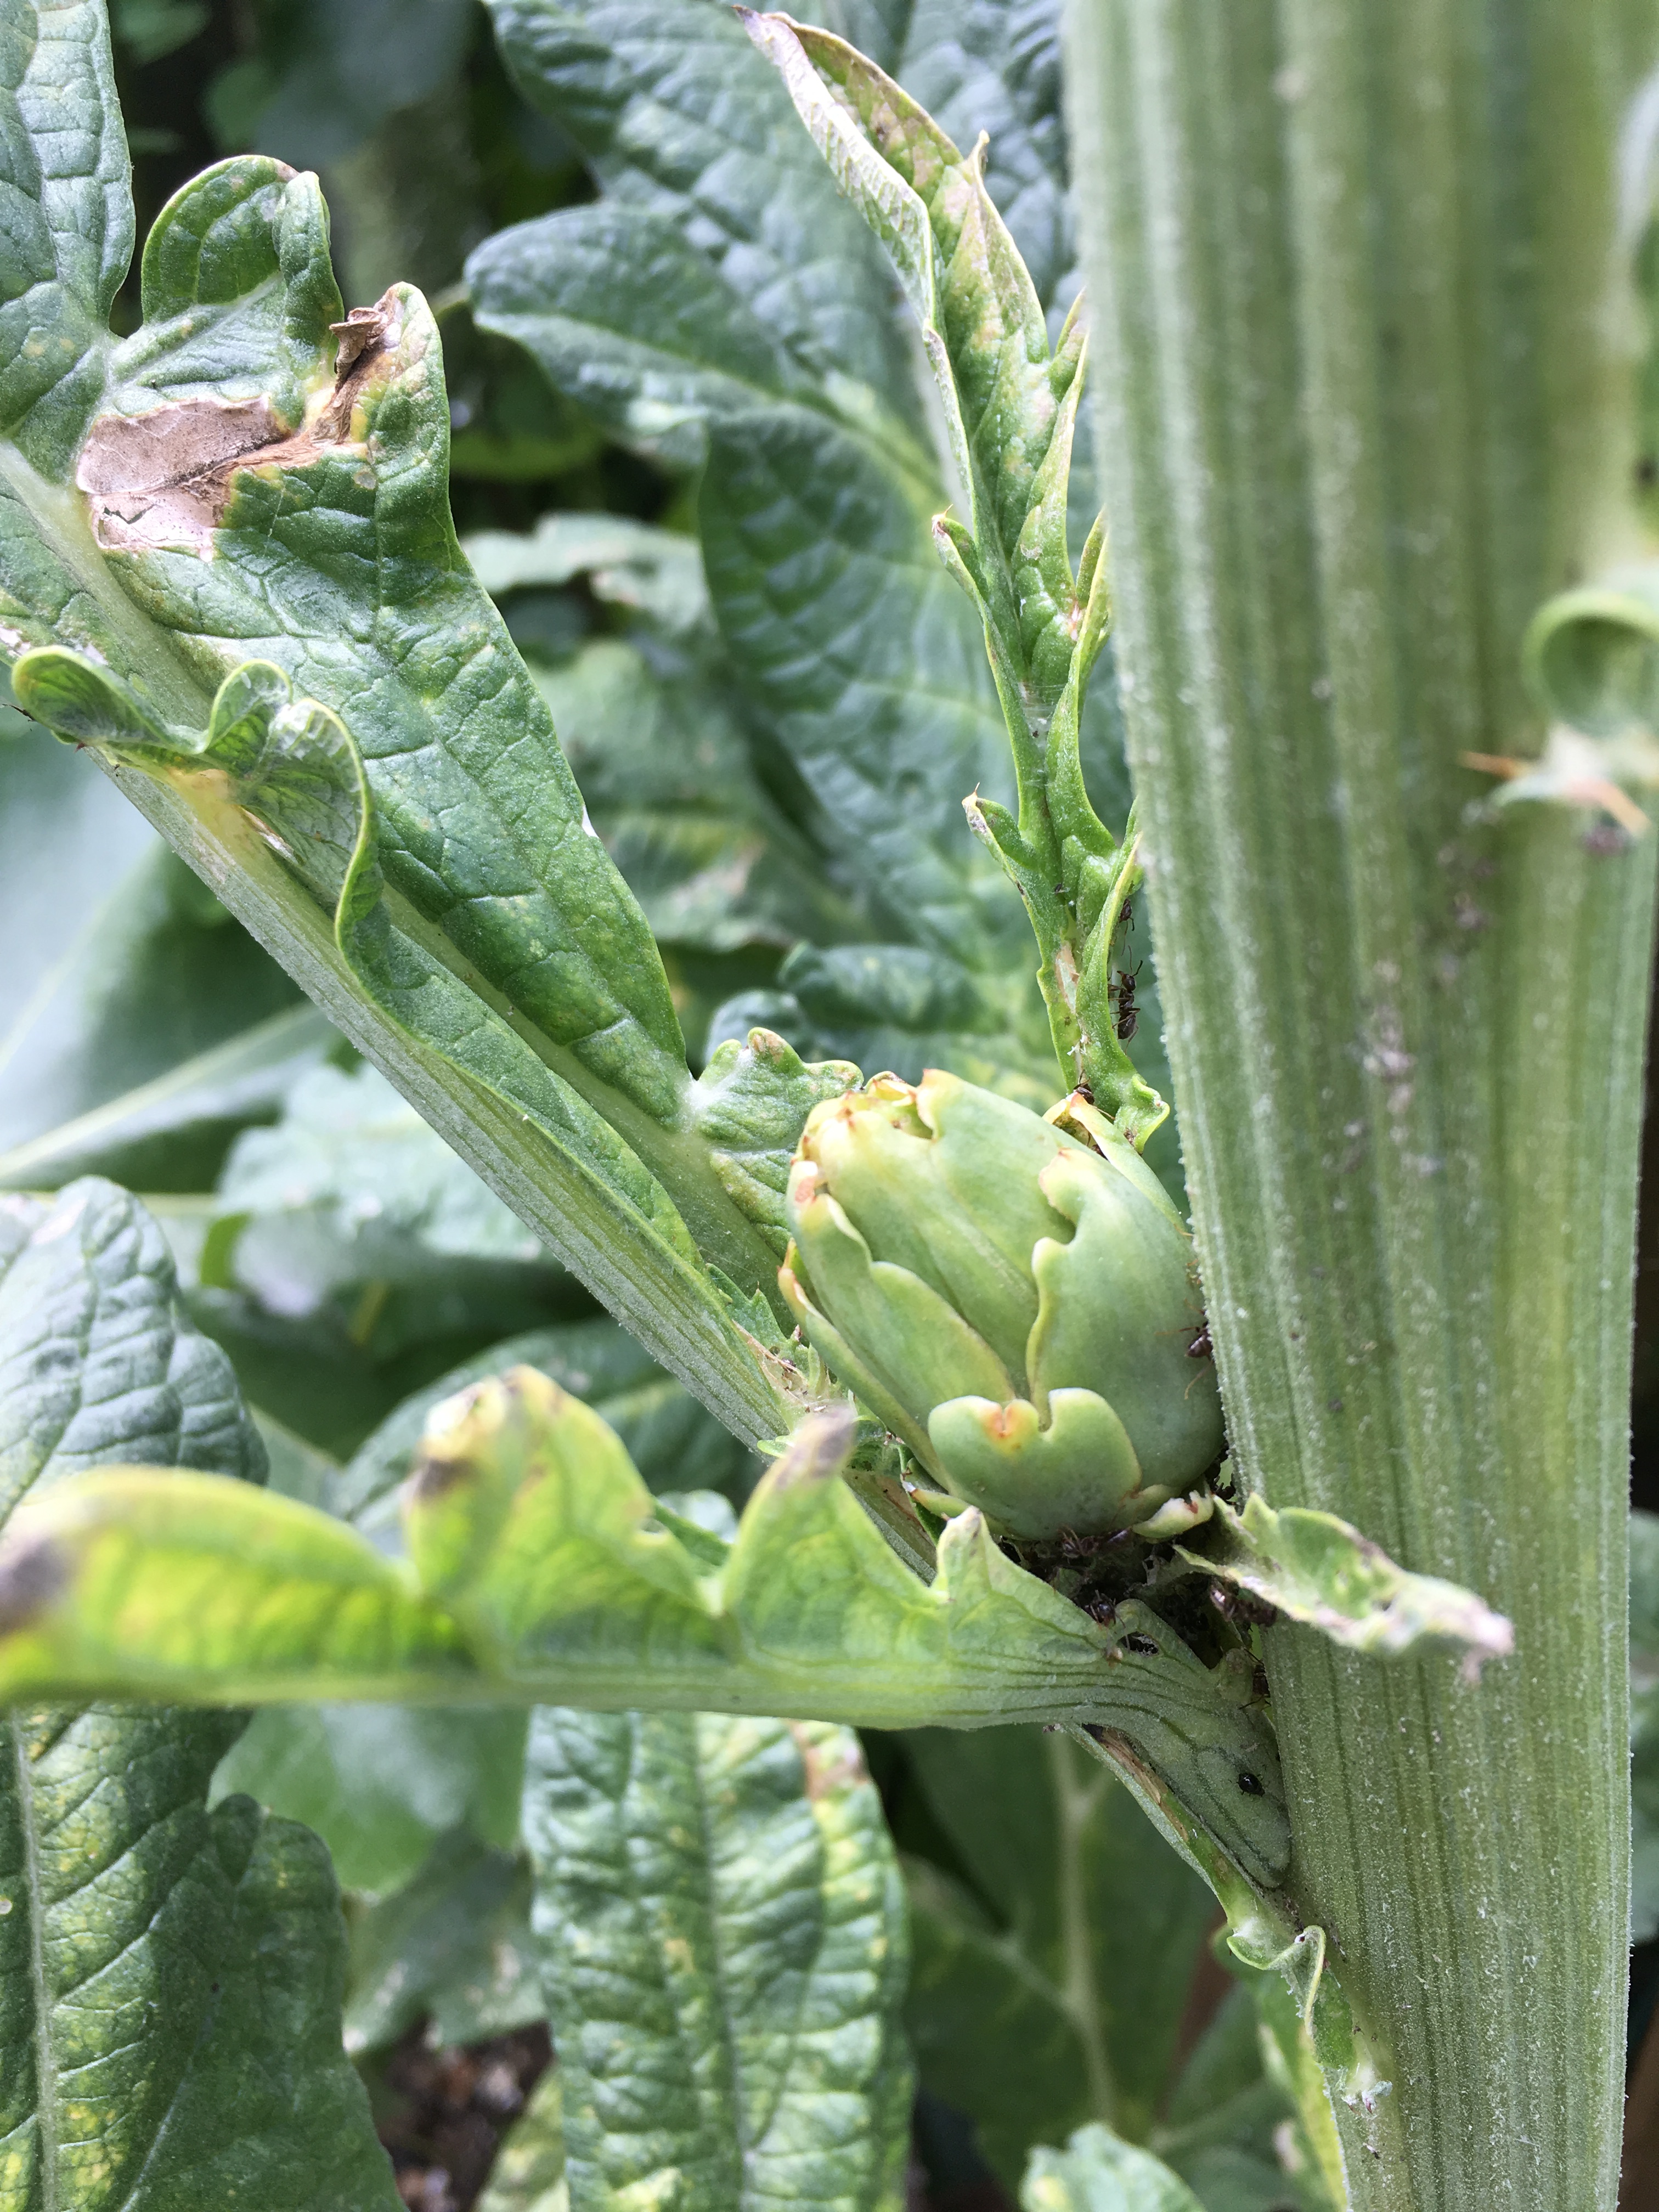
This is the very small bud come after the side buds and probably won’t grow much
Size is supposed to be a deciding factor on when to harvest,
but the size of your buds will depend on variety and whether it’s the main bud
or a side bud. Therefore, I’d say when the bud looks like it’s beginning to
open it needs to be harvested. If the plant isn’t watered enough the bud will
try and open prematurely and it will be tougher. I have found that my plants
stay quite tight budded for a good couple of weeks and the first year I found
myself harvesting them far too early for fear that I would leave it too late.
That’s not a problem though as I found in these cases that the ‘choke’ wasn’t
so spikey and was actually edible. You will get one big main bud and then slightly
smaller side buds. I have also found that there can be some even smaller buds
that appear a little while after.
The main bud in the centre is ready for harvest. The secondary ones will not grow quite as big and will be mature about 2 weeks later.
To harvest, cut the stem a few inches below the base of the
bud with a sharp knife or secateurs.
Preparing Artichokes
It doesn’t need to be complicated.
This is what I was told:
Wash thoroughly
Cut the stem from the base of the artichoke
Peel the stem
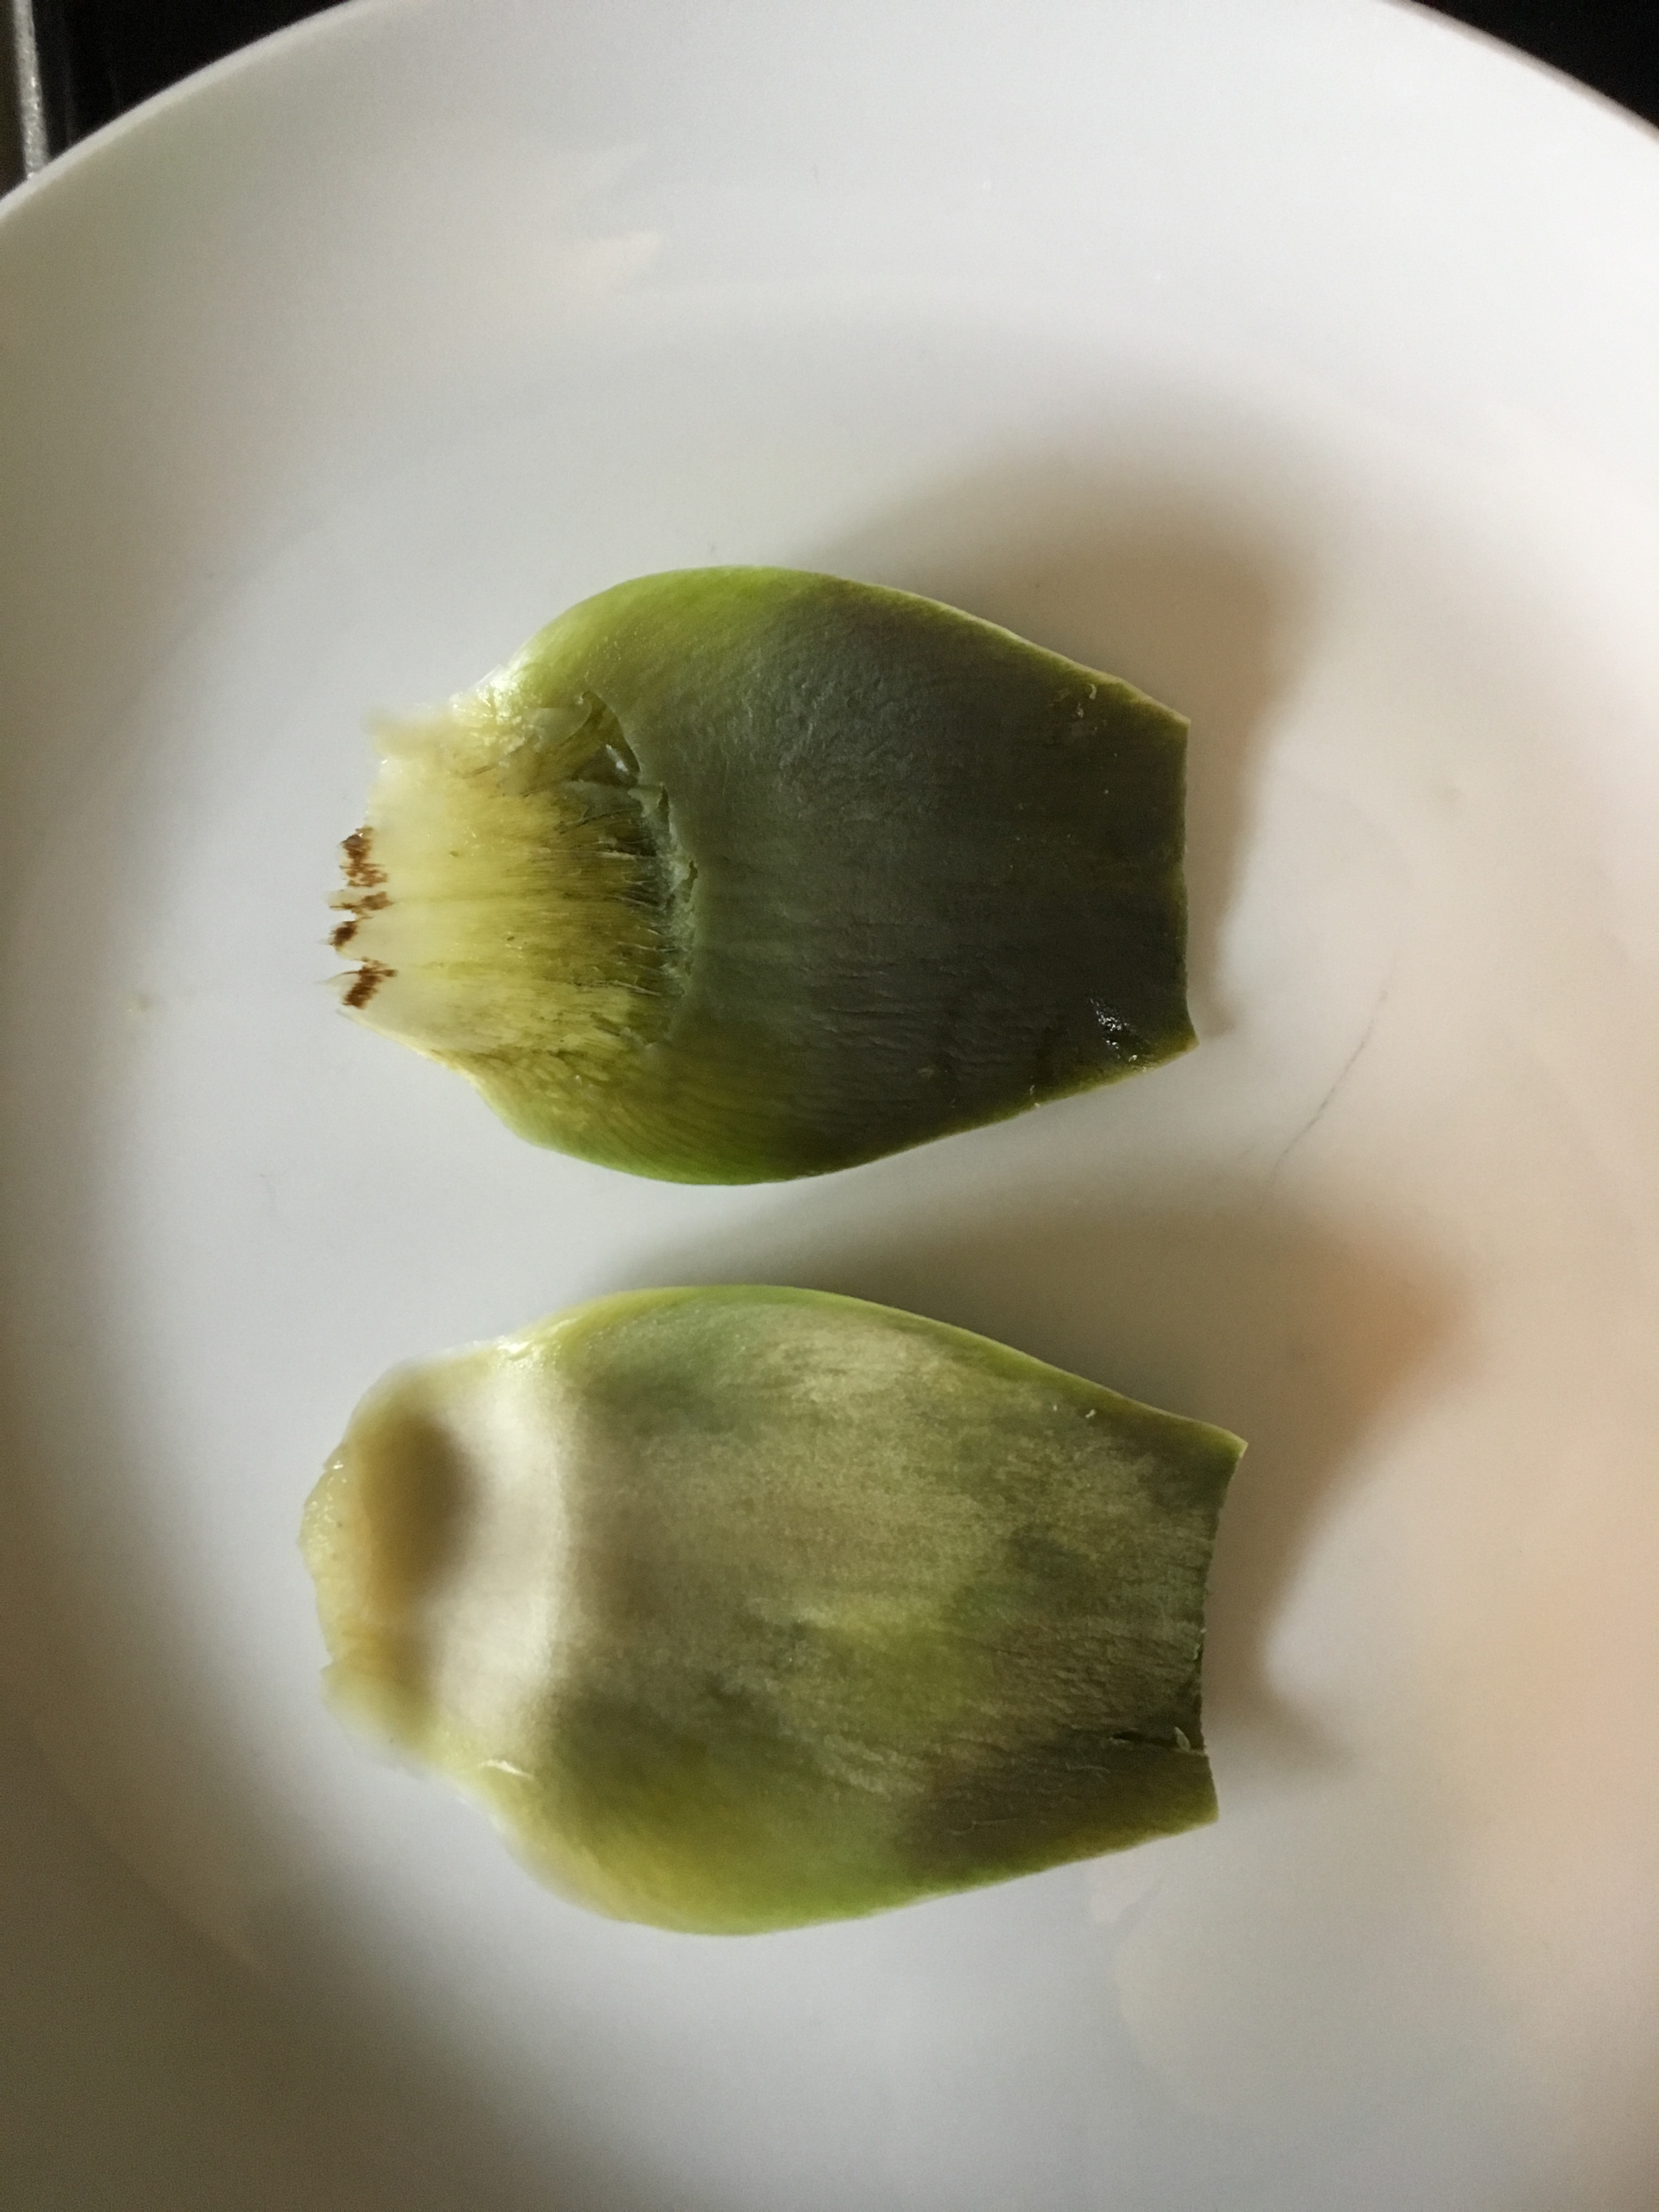
Remove the first layer or two of leathery scales
Remove the top inch of the bud with a knife
Using a pair of scissors cut the top of each petal to remove the thorn
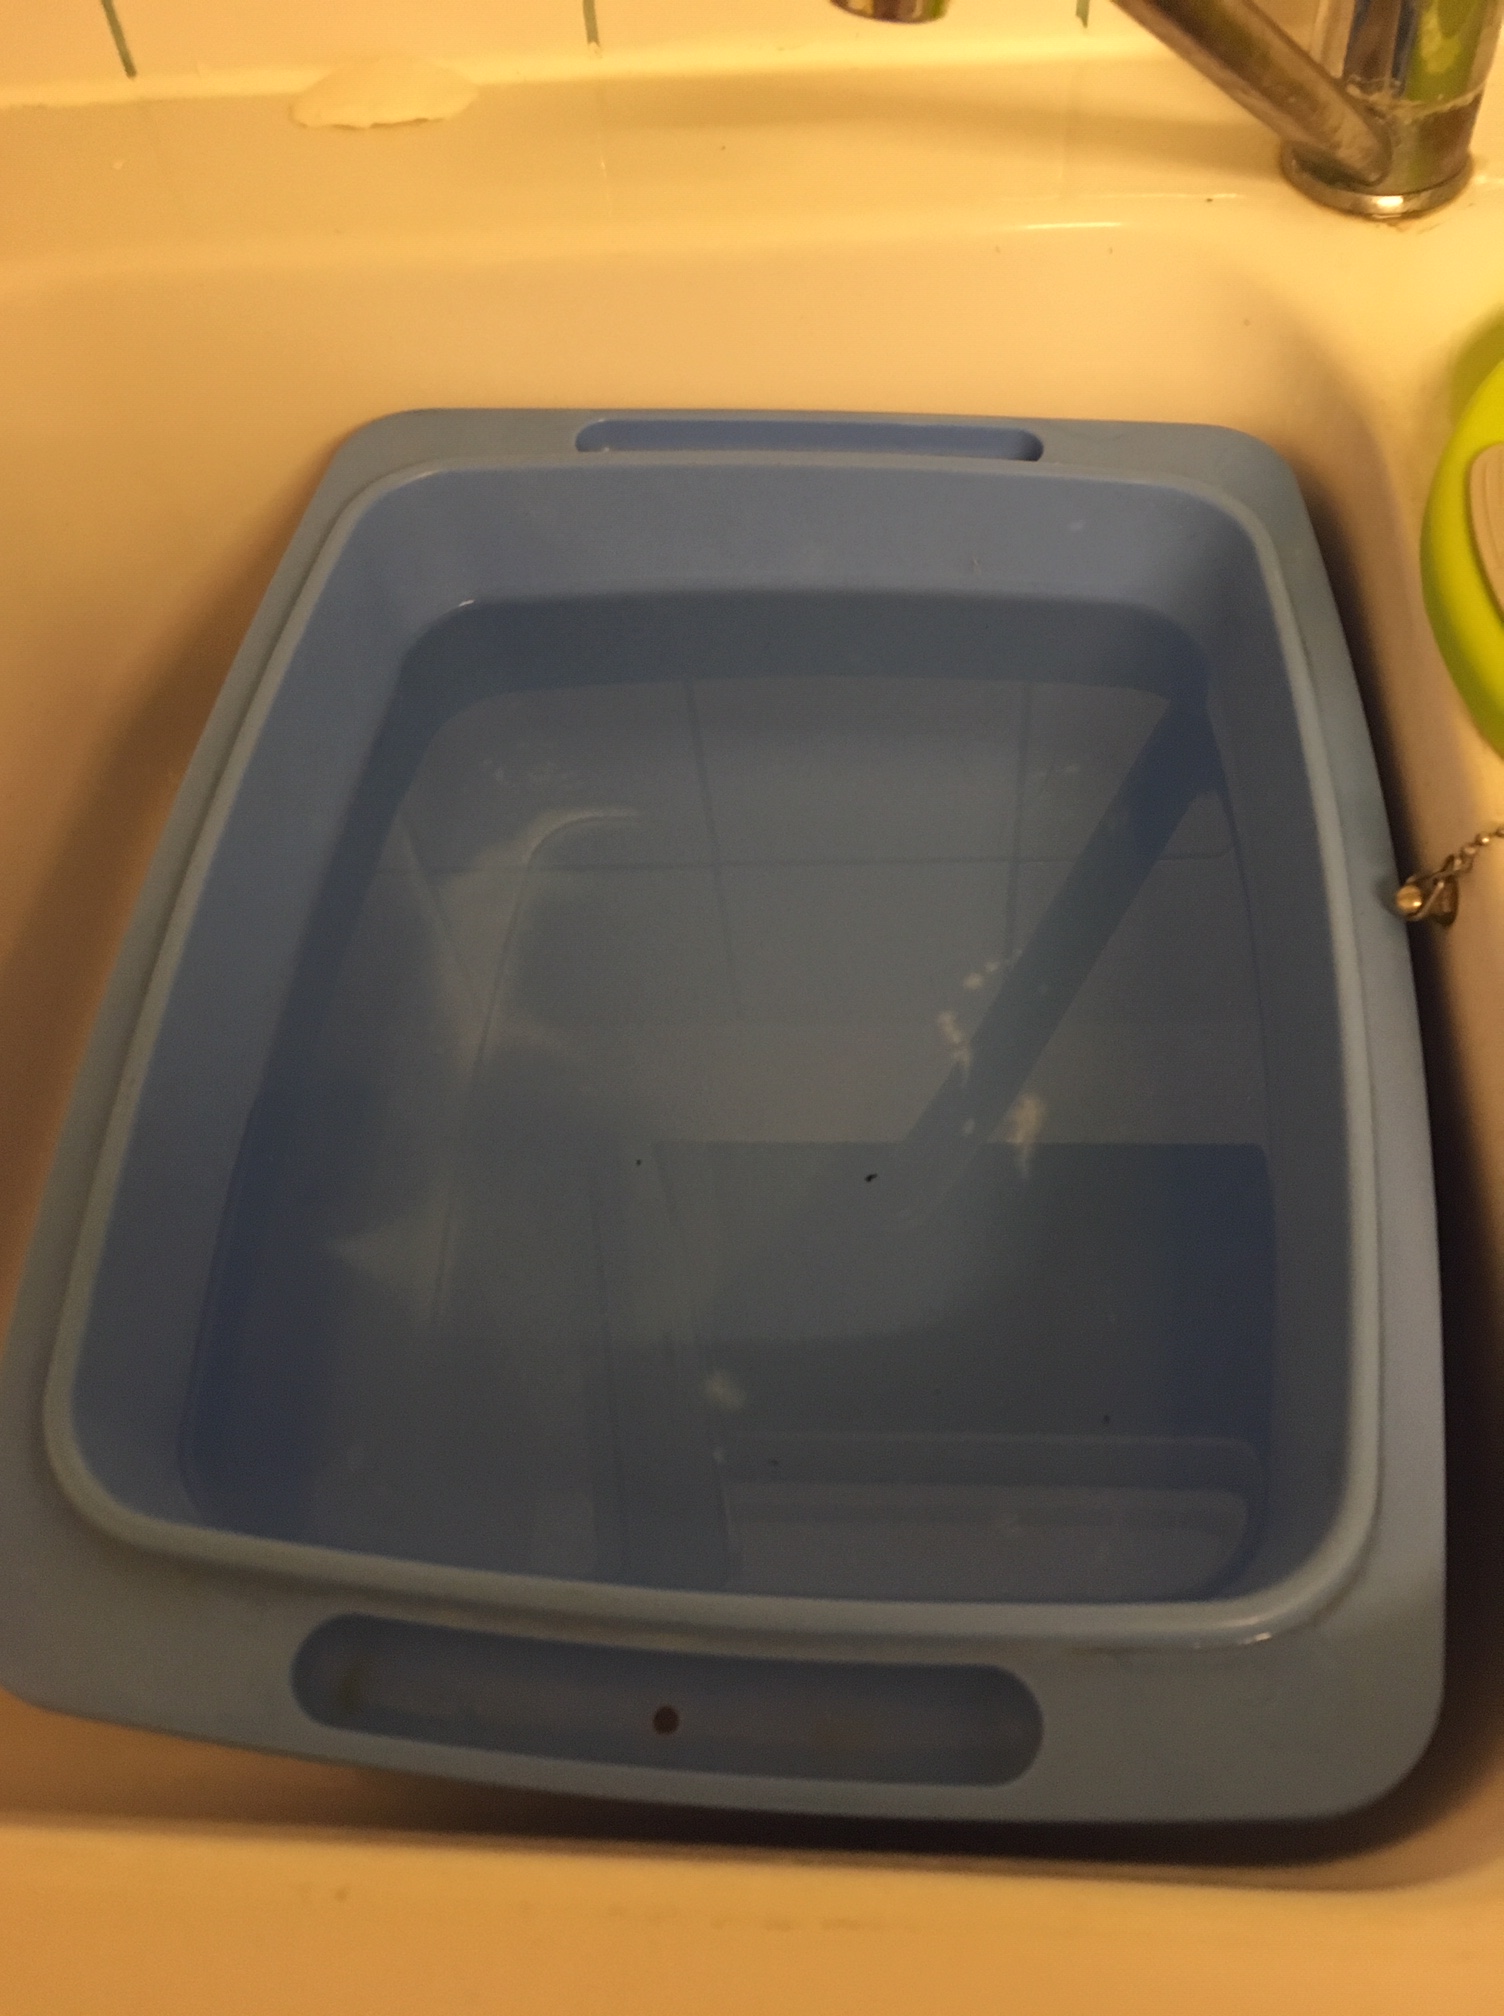
Boil in a large pan of water with a pinch of salt and a squeeze of lemon to avoid discolouration
The ‘thorn’ is in the centre of the tip of the petal
‘Properly’ prepared
The core is the yellow bit and everything else is fibrous.
These are the only necessary steps.
Cut the stem from the base which includes the
5 smallest petals (the first layer)
Wash thoroughly
Boil in a pan of water for around 20 mins or
until a leaf comes away easily when you pull on it.
Two secondary buds of the Tavor
Cut the base petals off when cutting the stem
Here I prepared one fully and one the lazy way
Seriously, the rest is just minutiae. If you think the rest of the artichoke is a faff then you really won’t think the stem is worth it. If you’re trying to squeeze every last bit of eating out of the plant, then you can peel the stem and add it halfway through cooking – but it is only the very central core that isn’t fibrous. How many petals you remove is preference, but you can just cook them and try and eat them. The worst that’ll happen is you’ve left a couple of tough leaves that don’t have anything worth eating on them. Removing the top inch of the bud and the tips of the leaves is to remove the thorn but I’ve found that with most artichokes the thorn isn’t too sharp and/or the thorn becomes soft in the cooking and isn’t an issue. The last bit with the lemon and salt – sometimes I can’t find any lemon (not even bottled kind) in the fridge, or in fact I’ve forgotten both lemon and salt and it’s fine. If your bud is covered in aphids then just soak the bud in salty water for 10 mins and then rinse, pulling back the petals a little to wash in the gaps.
Eating Artichokes
So… this is where it’s fun/tedious depending on what kind of
person you are.
Outer petal on top, the petals get much thinner than the one below
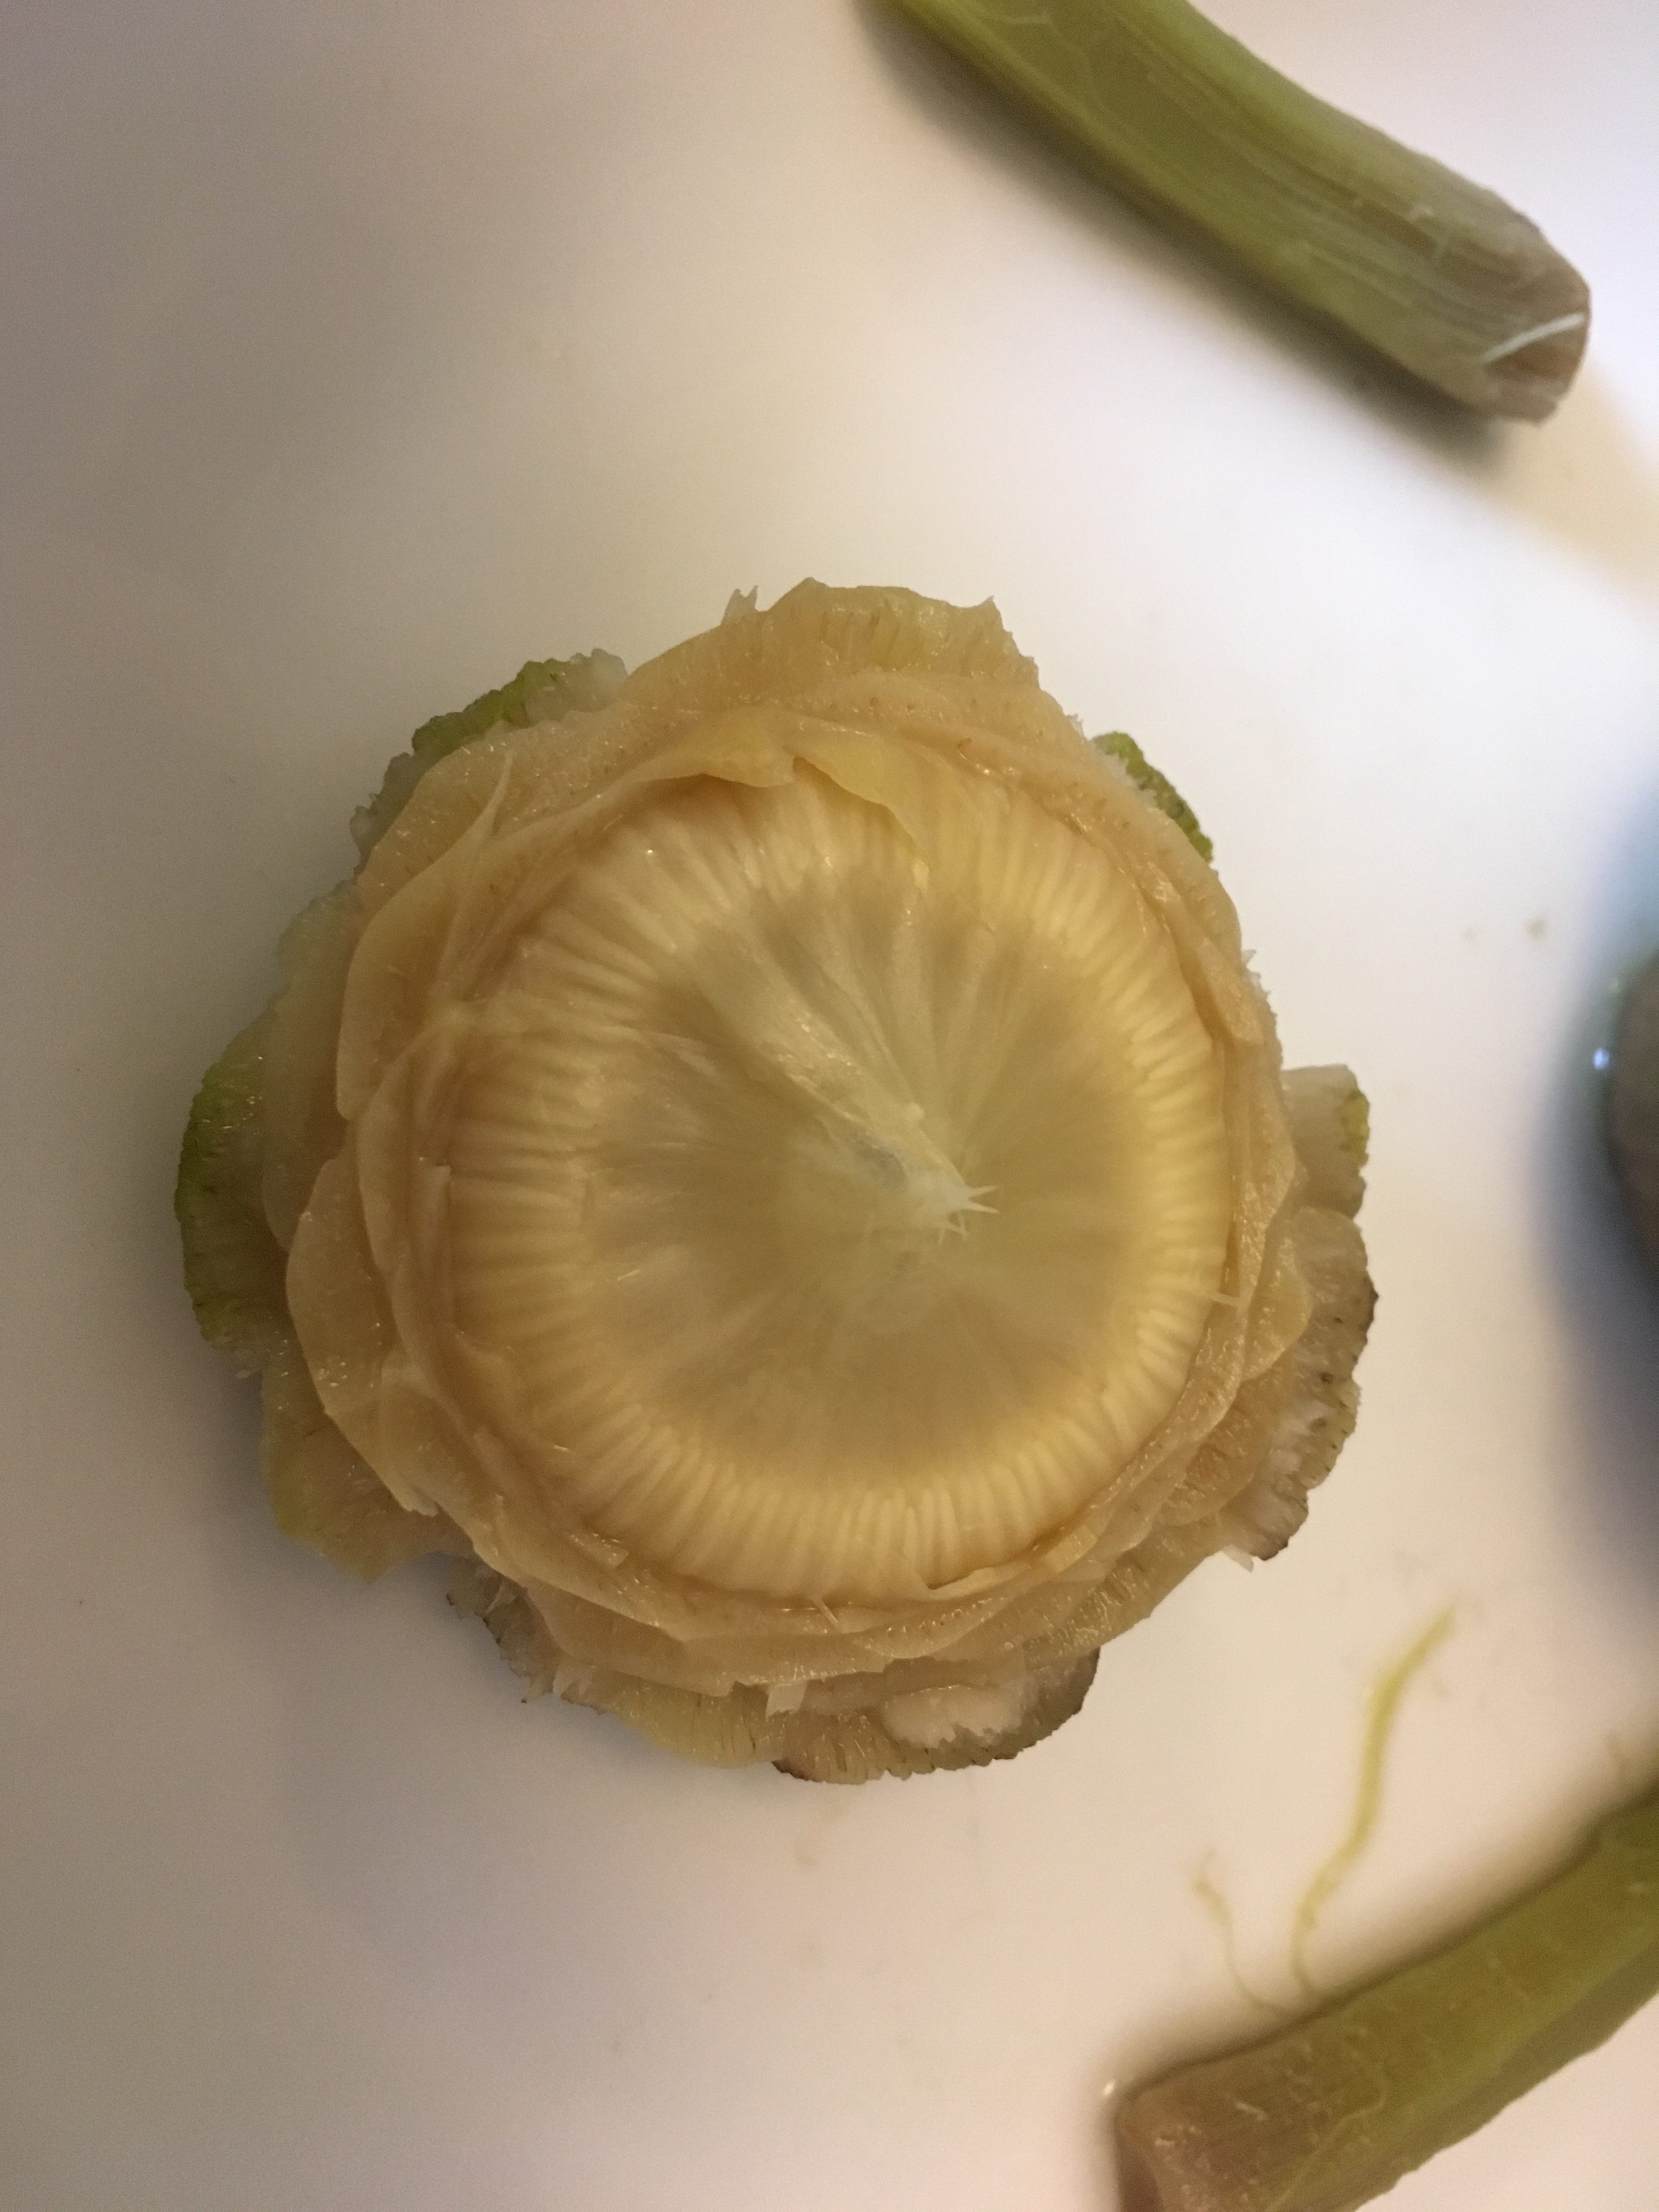
The inside with the choke on top
The choke is easy to pull away from the heart
Cleaned and ready to eat heart.
Using a thumb and a fingertip(s), with your thumb on the inside of the curve pull off a petal. When you lift it to your mouth, the thumb will be on the bottom. Use your teeth to scrape off the ‘flesh’ in the base inside of the petal. Do this for all the large petals. The petals get smaller and thinner as you get to the centre. For the very thin petals you can bite off anything that isn’t too fibrous. You then reach the choke in the centre. This is spikey and not edible. Scrape it off with a spoon and you’ll be left with the heart. In our family our hearts get devoured by the 3 year old.
My 3 year old has her own way of eating it. Aficionados will note that she is putting the petal in her mouth upside down. It’s easier to eat the other way round and scrape the flesh away with your bottom teeth than your top. We pile petals that have cooled enough and that she can easily eat in front of her. Just FYI that isn’t all from one artichoke.
The heart tastes a bit like taro but the artichoke (all of the bits you eat) has a funny way of making everything you eat afterwards taste sweet. It’s quite fun eating different things in between eating the petals. Try a sip of wine straight after a petal. This is because something called cynarin in the artichokes inhibits your sweet receptors. As you stop eating the artichoke and eat or drink something else the cynarin is washed away and everything taste sweet.
So literally, artichokes will make your life taste sweeter, if
only for a couple of seconds.
Plants need water to grow and survive. There are environmentally friendly ways to provide that water (rain barrels, grey water and sneaky planning) and there are lazy and easy ways to water too (automated watering systems). Also watering by the roots is better for your plants (mostly) and the environment.
There’s a lovely garden in Streatham Common called ‘The Rookery’. Within its beds of beautiful flowers and trees there is a well. I was trying to explain to my 3 year old what a well was and how we are so lucky to be able to get clean potable water straight out of the taps in our house. It’s also easy to get the hose out when the plants need a drink. One thing we could consider is how we can provide water to our plants in an environmentally friendly way. All the water that comes out of our taps does require filtering and cleaning in order to make it safe. When it gets carried away in our drains it needs to be treated again. These processes require energy (as does the maintenance of the pipeways), so the more water that needs to be treated, the less environmentally friendly we are. However, the more our countries use renewable options to generate electricity the more environmentally friendly that will of course be.
With the hot sunny days comes the need to water the garden more. A previous post ‘Photosynthesis, Respiration and Transpiration’ can tell you why plants need water if you’re curious. Of course, it is ironic that when there is less rain plants need water more. In the past, during the 10 days we would go away, London would be treated to a heatwave. We’d return, having missed the nice weather, to a desiccated garden. Rain would then descend, and it would have been far too late to save anything. We would be the ones kneeling in the garden in the pouring rain mourning the loss of our vegetables and shaking our fists at the sky.
So, here are some watering ideas that are environmentally friendly or easy and lazy or automatic ones to help whilst you’re away.
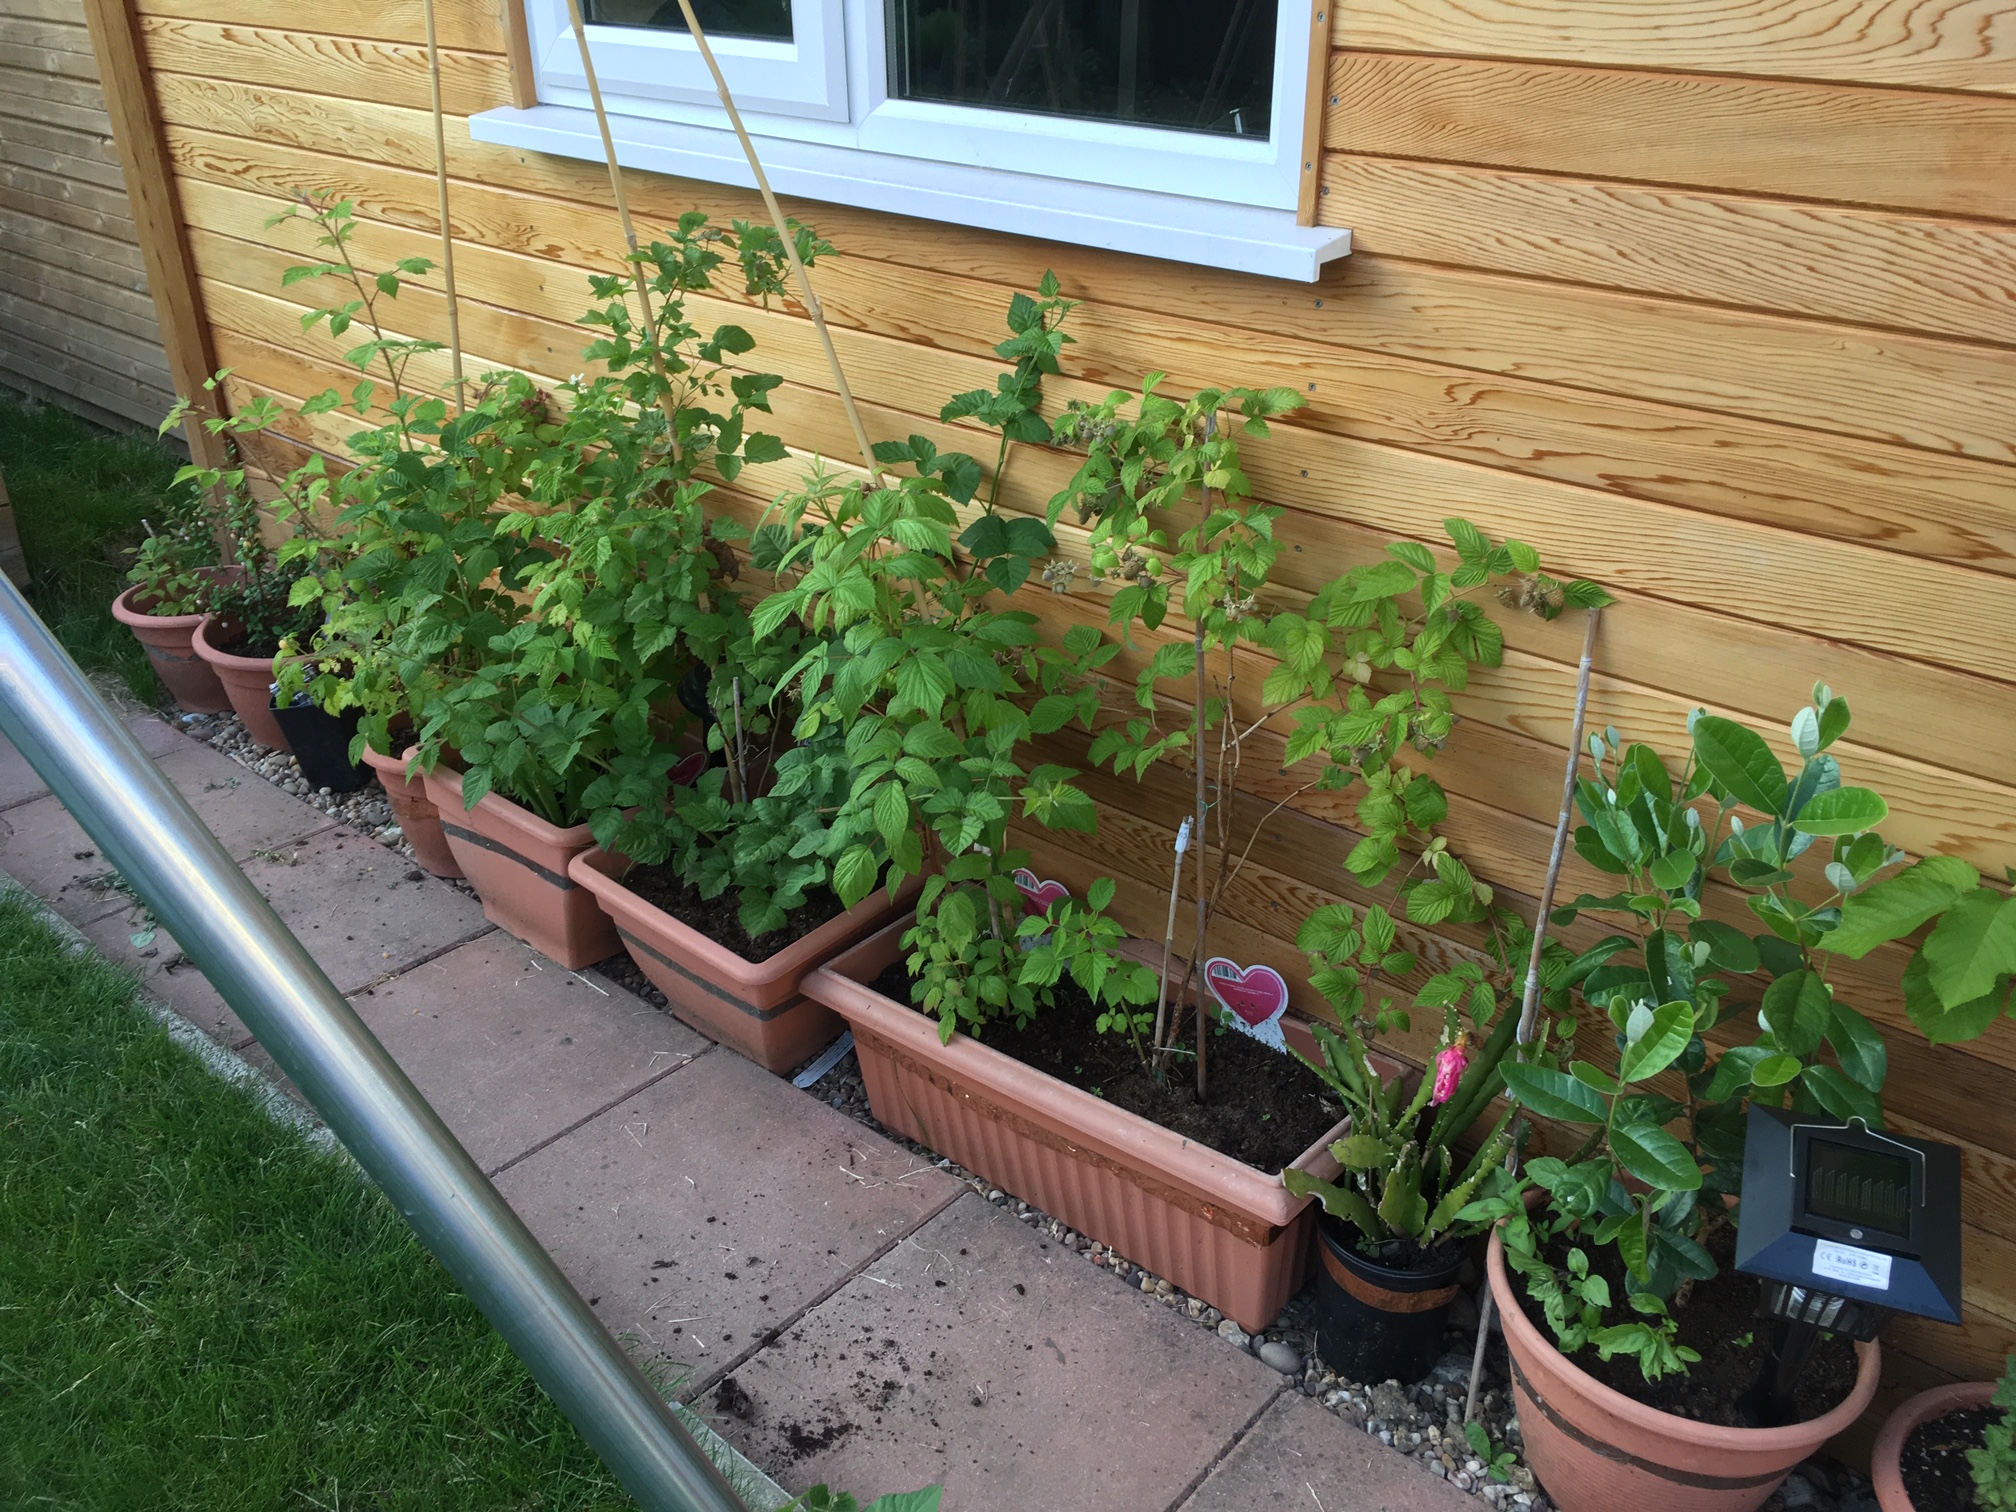
Rain barrel
You can see behind that we were demolishing a wall. We kept part of the wall in order to provide the rain barrel with a bit of shelter. It’s a space saving one for our small garden.
This is a large container that you attach to your downspout in the guttering. You can make one (environmentally friendlier but potentially disastrous if you end up with water damage by your guttering) but they’re cheap to buy. They come with all the bits and bobs and instructions on how to cut the downspout. It should be sealed so that light doesn’t encourage algae and mosquitos don’t get in and lay their eggs. The rain that falls on the roof area goes into the rain gutters which then all go down the downspout so you’ll find that after even one good shower you should get a full barrel. It’s only when there are weeks of no rain and hot sun that you’ll have nothing. Rainwater tends to be a little acidic. The water reacts with the carbon dioxide in the atmosphere and its pH is lower than 7. It’s a bit like sparking water. That’s acidic because in order to make it fizzy it has carbon dioxide dissolved in it. Anyway, this means rainwater is great for growing raspberries, blueberries and kiwis which like ericaceous (acidic) soil. Rainwater is generally considered better for plants anyway.
If you don’t have an outside tap, or one in the garden you grow veggies in, but you do have a down spout then a rain barrel should make the task of watering easier.
The other great reason to get a rain barrel is of course it is environmentally friendly. You won’t be using treated water out of your pipes, saving a bit of processing energy.
There are pumps you can attatch to your rain barrel to automatically water for you, but in the end we decided that it was expensive and it’s not too difficult to use a watering can. The energy used in the manufacture and running of a pump would outweigh the good that using a rain barrel would do. Especially if you factor in the manufacture of a plastic rain barrel. Of course if having it all automatic will be the only way you’d use a rain barrel, then maybe it’s worth exploring.
Grey water
This is a term used to describe used water that is not sewage. I don’t know anyone who uses much grey water. My mum will keep some of the water she’s used to wash rice in (Chinese people wash rice) to use in the garden. She has different reasons though. She does it to add nutrients back into the soil rather than to save water. Basically the inconvenience of transferrring that grey water to the garden and concerns about its safety worries most people.
This water is ready to go out.
An easy way to do it is to keep a plastic sink basin that fits into the sink closest to the garden door. For us the kitchen sink is about 5 steps to the door. After washing veggies or hands (a bit of soap won’t harm your garden) we chuck the water into the garden. Sometime I’ll drain the water from boiled vegetables into the basin to cool. Some of the nutrients are then also returned back to the soil.
Speaking of adding nutrients there is something a little gross that I don’t really want the neighbours to know – but even potty training was a happy event for the garden. Obviously, the number twos went down the loo, as omnivore solid waste (how many euphemisms can I come up with?) used in this way is not heathy in the garden. The little tinkles in the potty is full of great nitrogenous waste. After a whizz, I would help her wipe and put the tissue into the loo, then add water to the potty to the top and pour that onto the soil. To wash the potty, I would fill it again with water and pour it into the garden a couple of times. Please be aware that you do need to dilute urine before you put it into the garden and you want to put it on the soil, rather than the leaves. You will also want to wash your vegetables well before eating. Here we have come full circle, as you can then use the vegetable washing water to water the garden. I don’t know many adults willing to pee into a pot so I don’t suppose this is actually for…er…. anyone.
Placing of beds under the eaves of a small building
The rain ran off the roof here into these pots of blueberries, raspberries and pineapple guava. This was replaced soon after with a wooden bed for the ericaceous fruit so that there was more soil to retain the water for longer.
Bike sheds, garden sheds and garden rooms don’t usually come with guttering. Water is allowed to run off the roof to the surrounding area as these rooves don’t tend to be large enough for that to be a concern. If you can get a bed at the bottom of a roof, then that bed will get any extra water that would have fallen on the whole surface area of the roof. You do need to consider if this would be a problem in the rainier seasons, but with good drainage it shouldn’t be an issue.
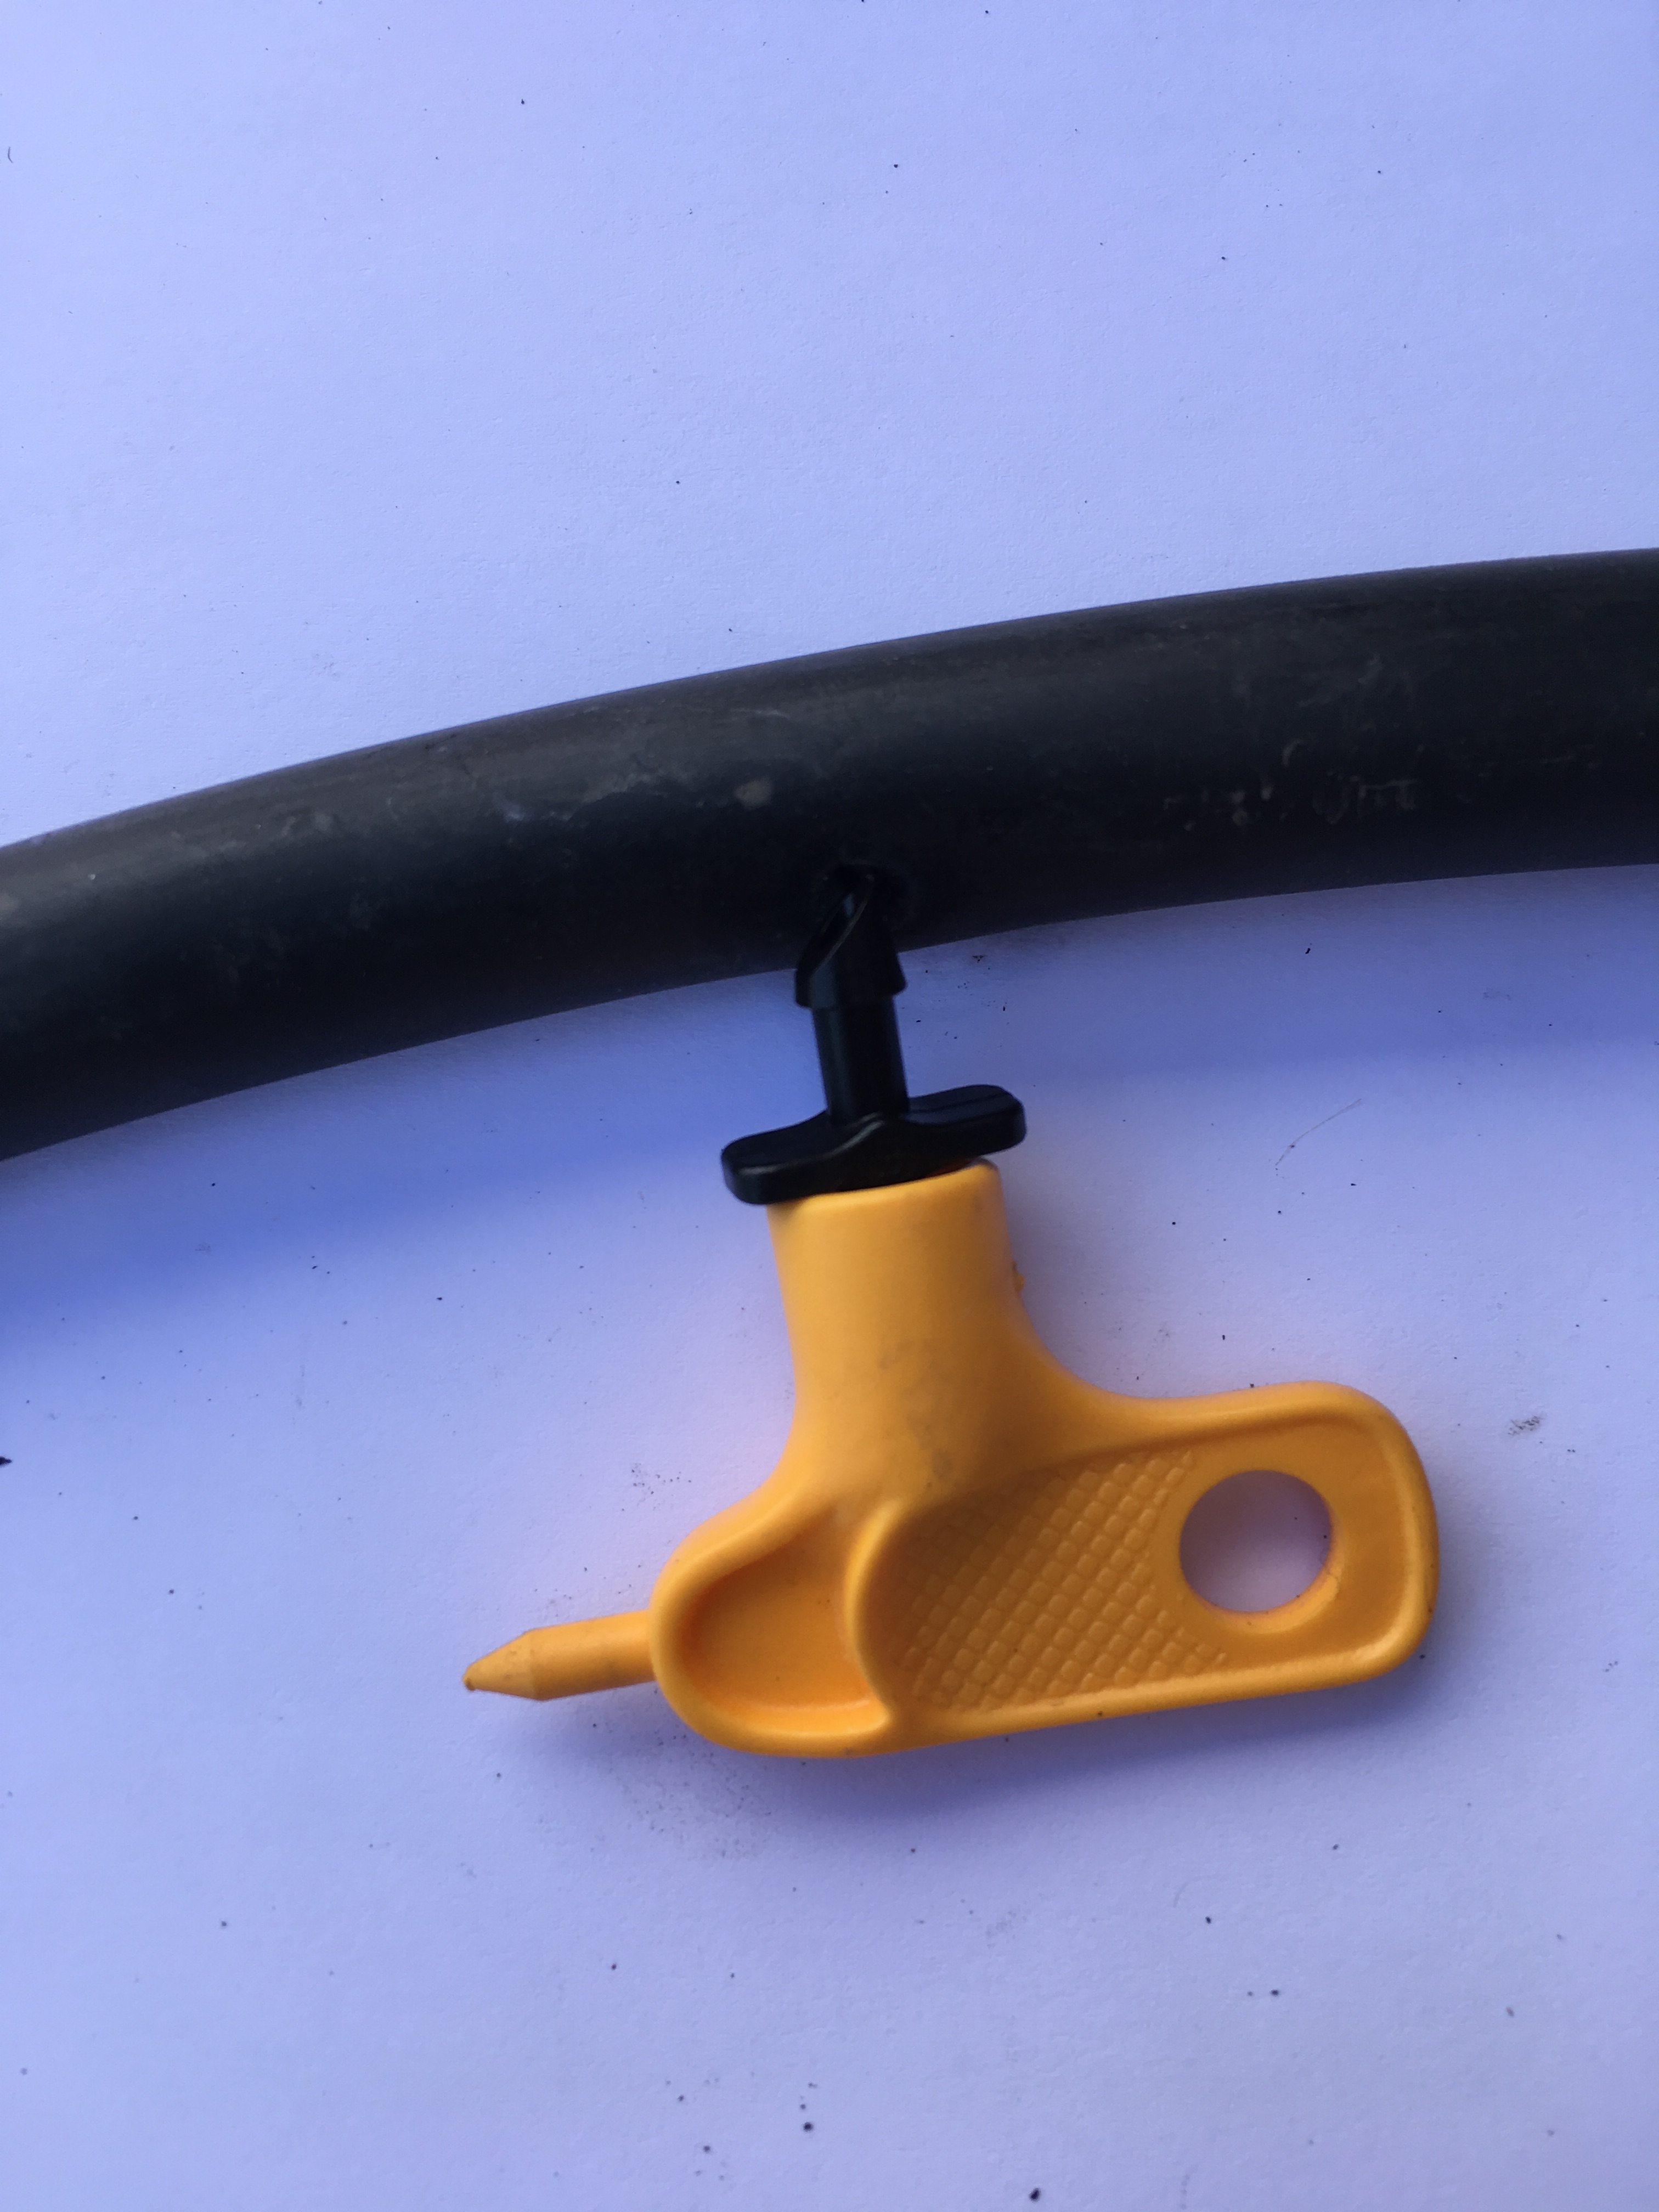
Water drippers
These deliver water directly to the soil as opposed to watering overhead like you do with hosepipes and to some extent watering cans. Plants take all their water requirements up through their roots. There is no need to wet the leaves. When the leaves are wet, the water will evaporate off the leaves and will in effect be ‘wasted’, as in not useful to the plant. In addition, there are some diseases e.g. powdery mildew that are made worse by having damp leaves. I have heard that spider mites thrive less well when conditions are damp like this but spider mites are generally less damaging than powdery mildew.
There are many systems that you can buy but I can only show you how my own one works. Some of the others are fairly similar.
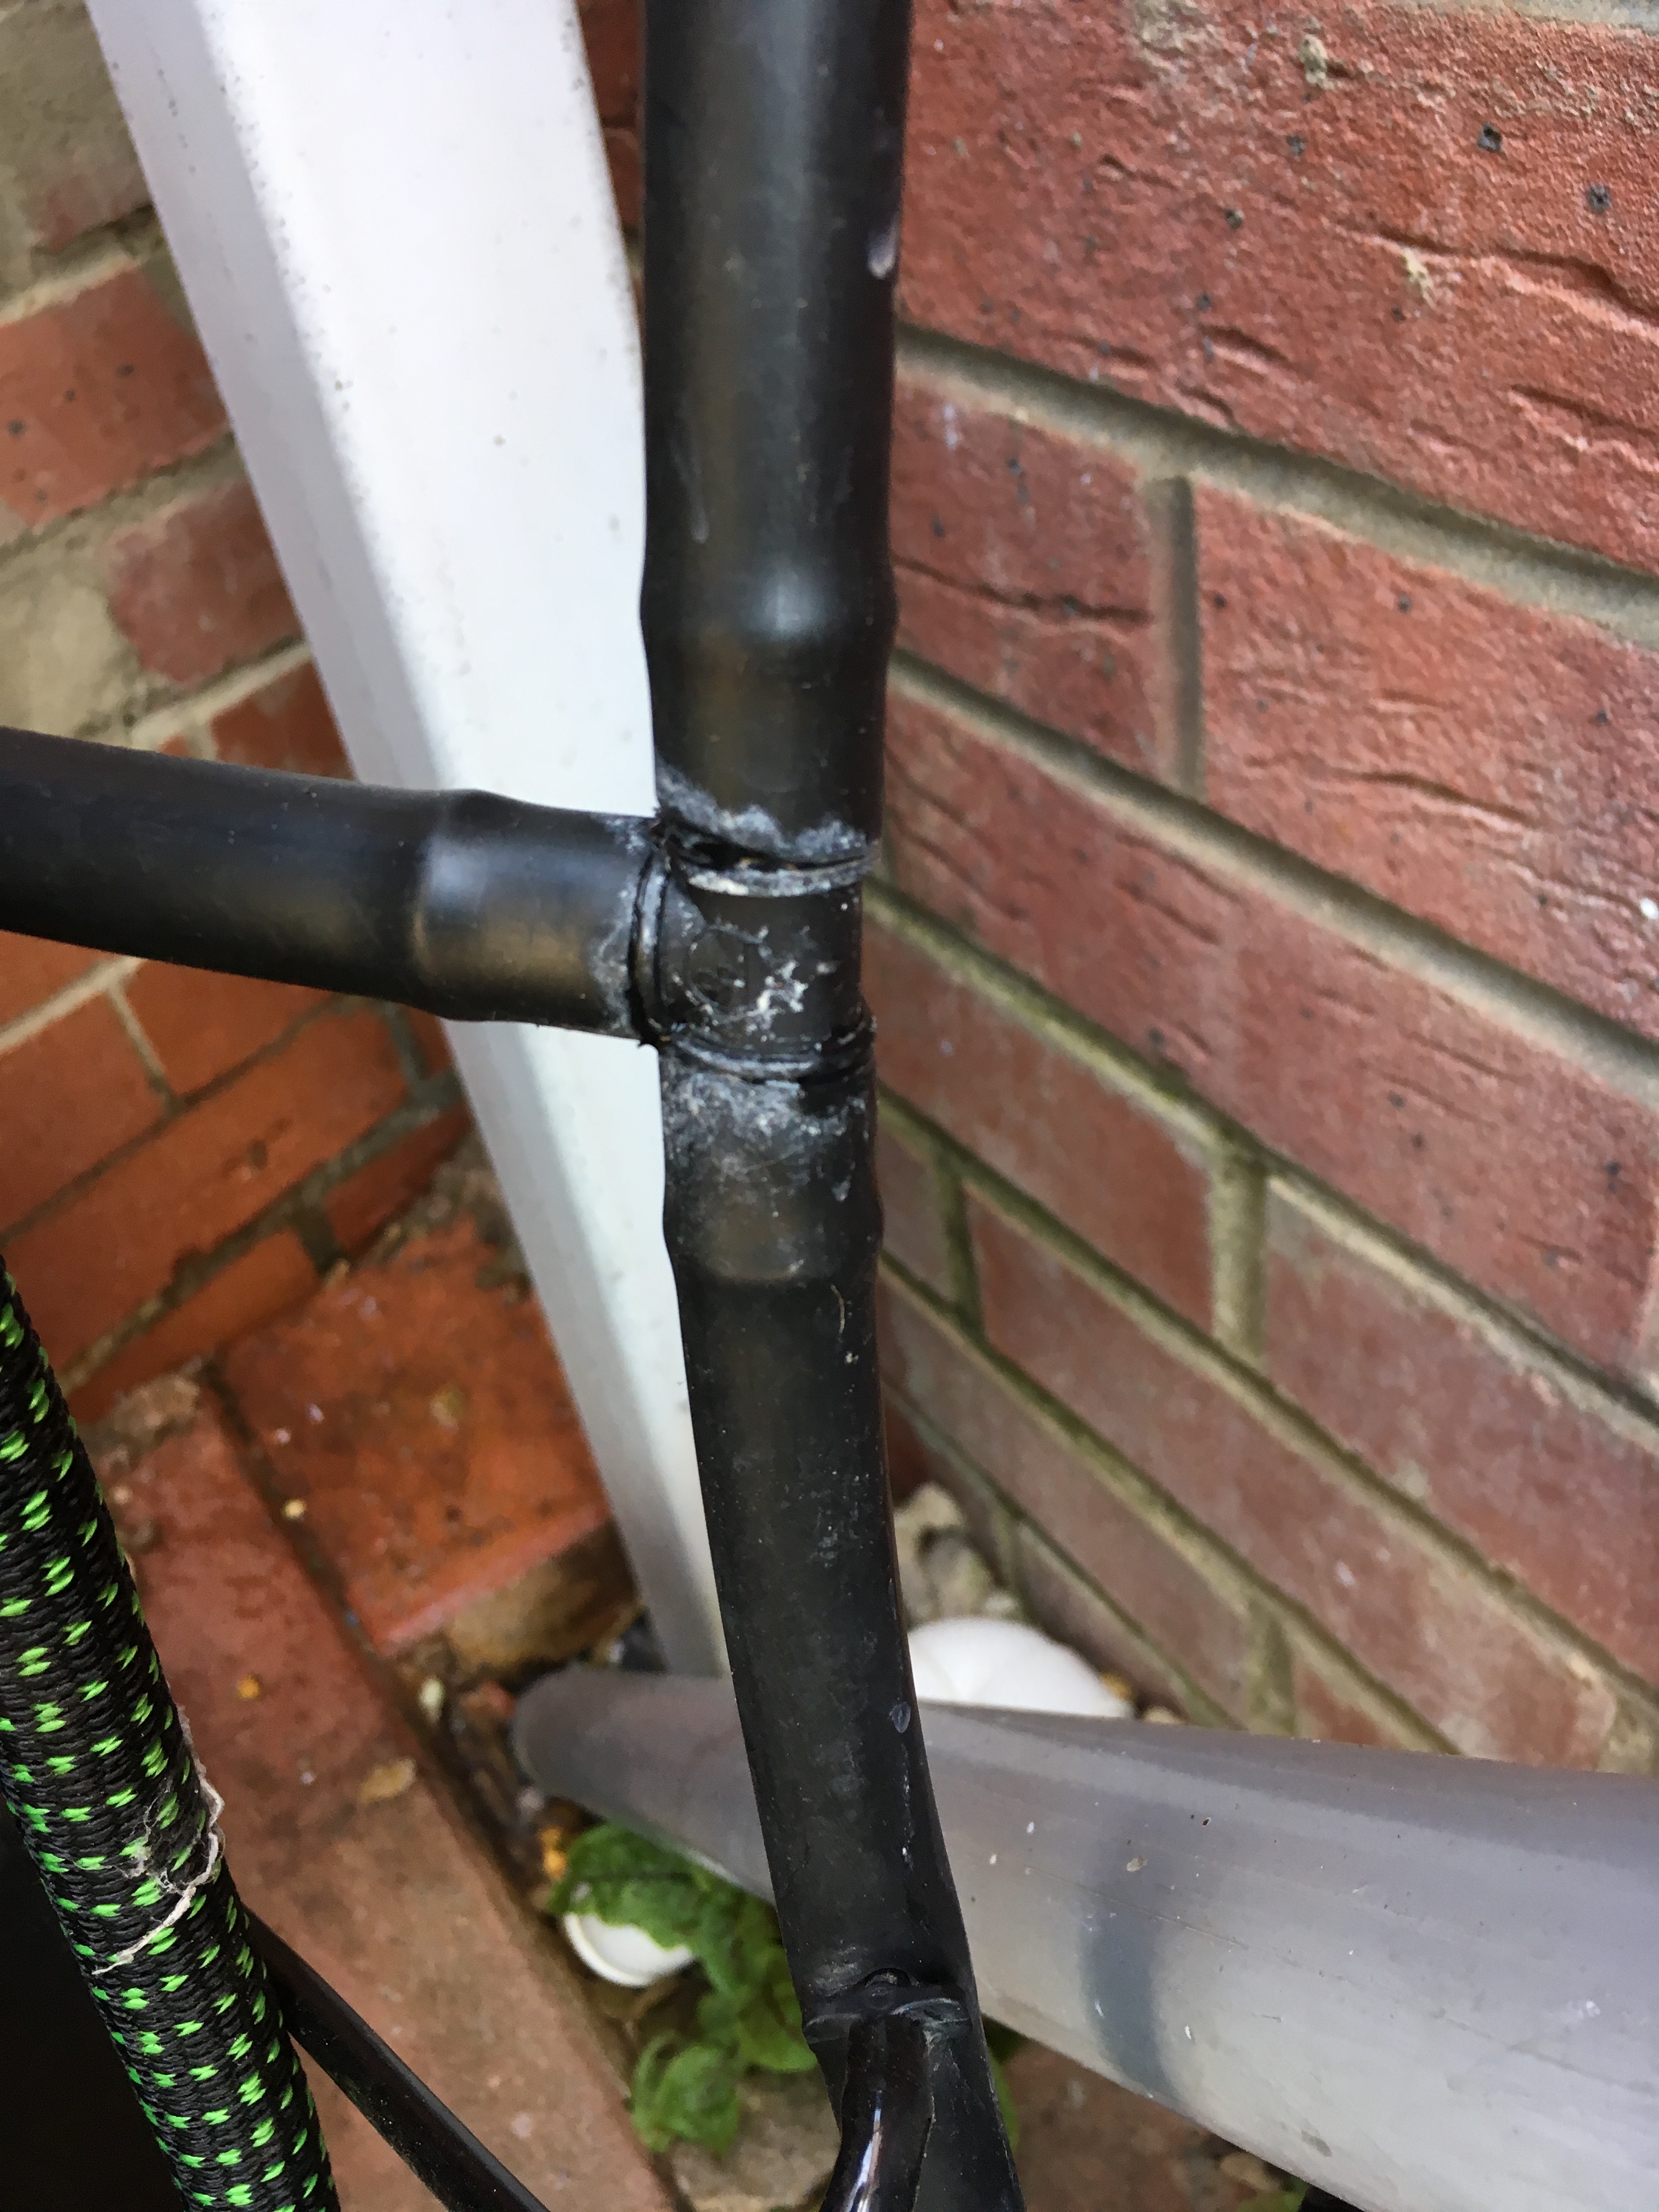
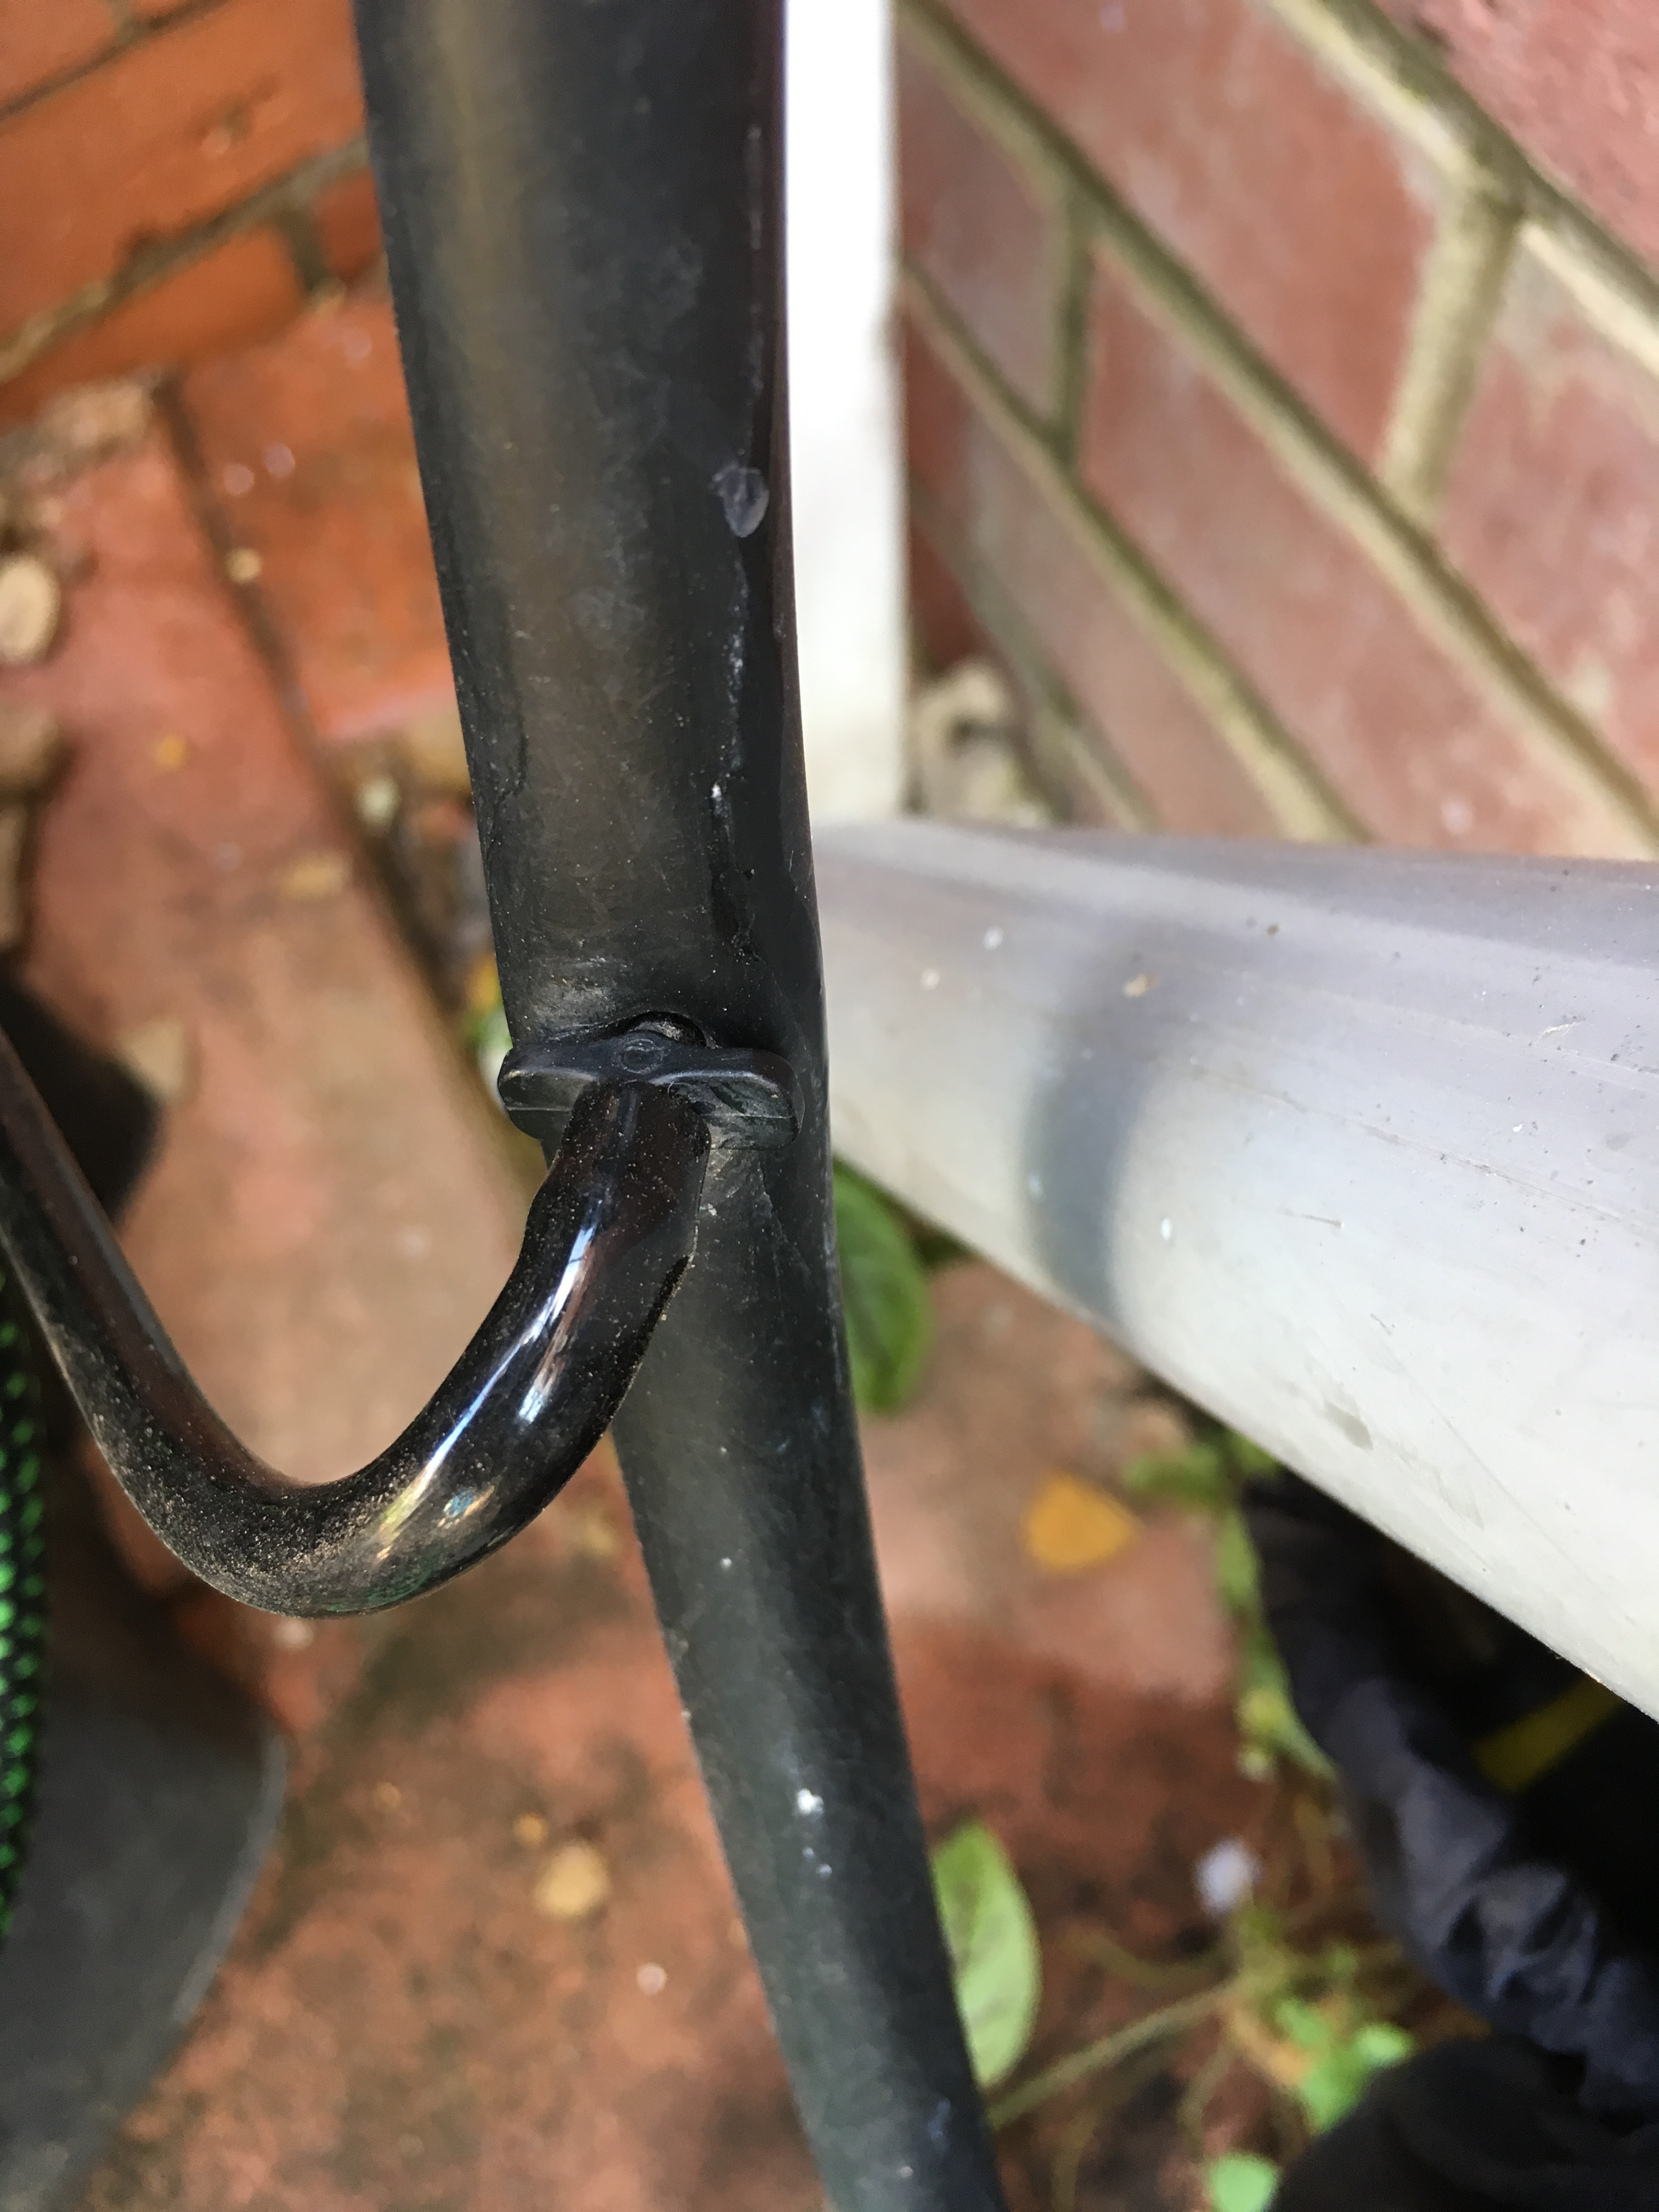
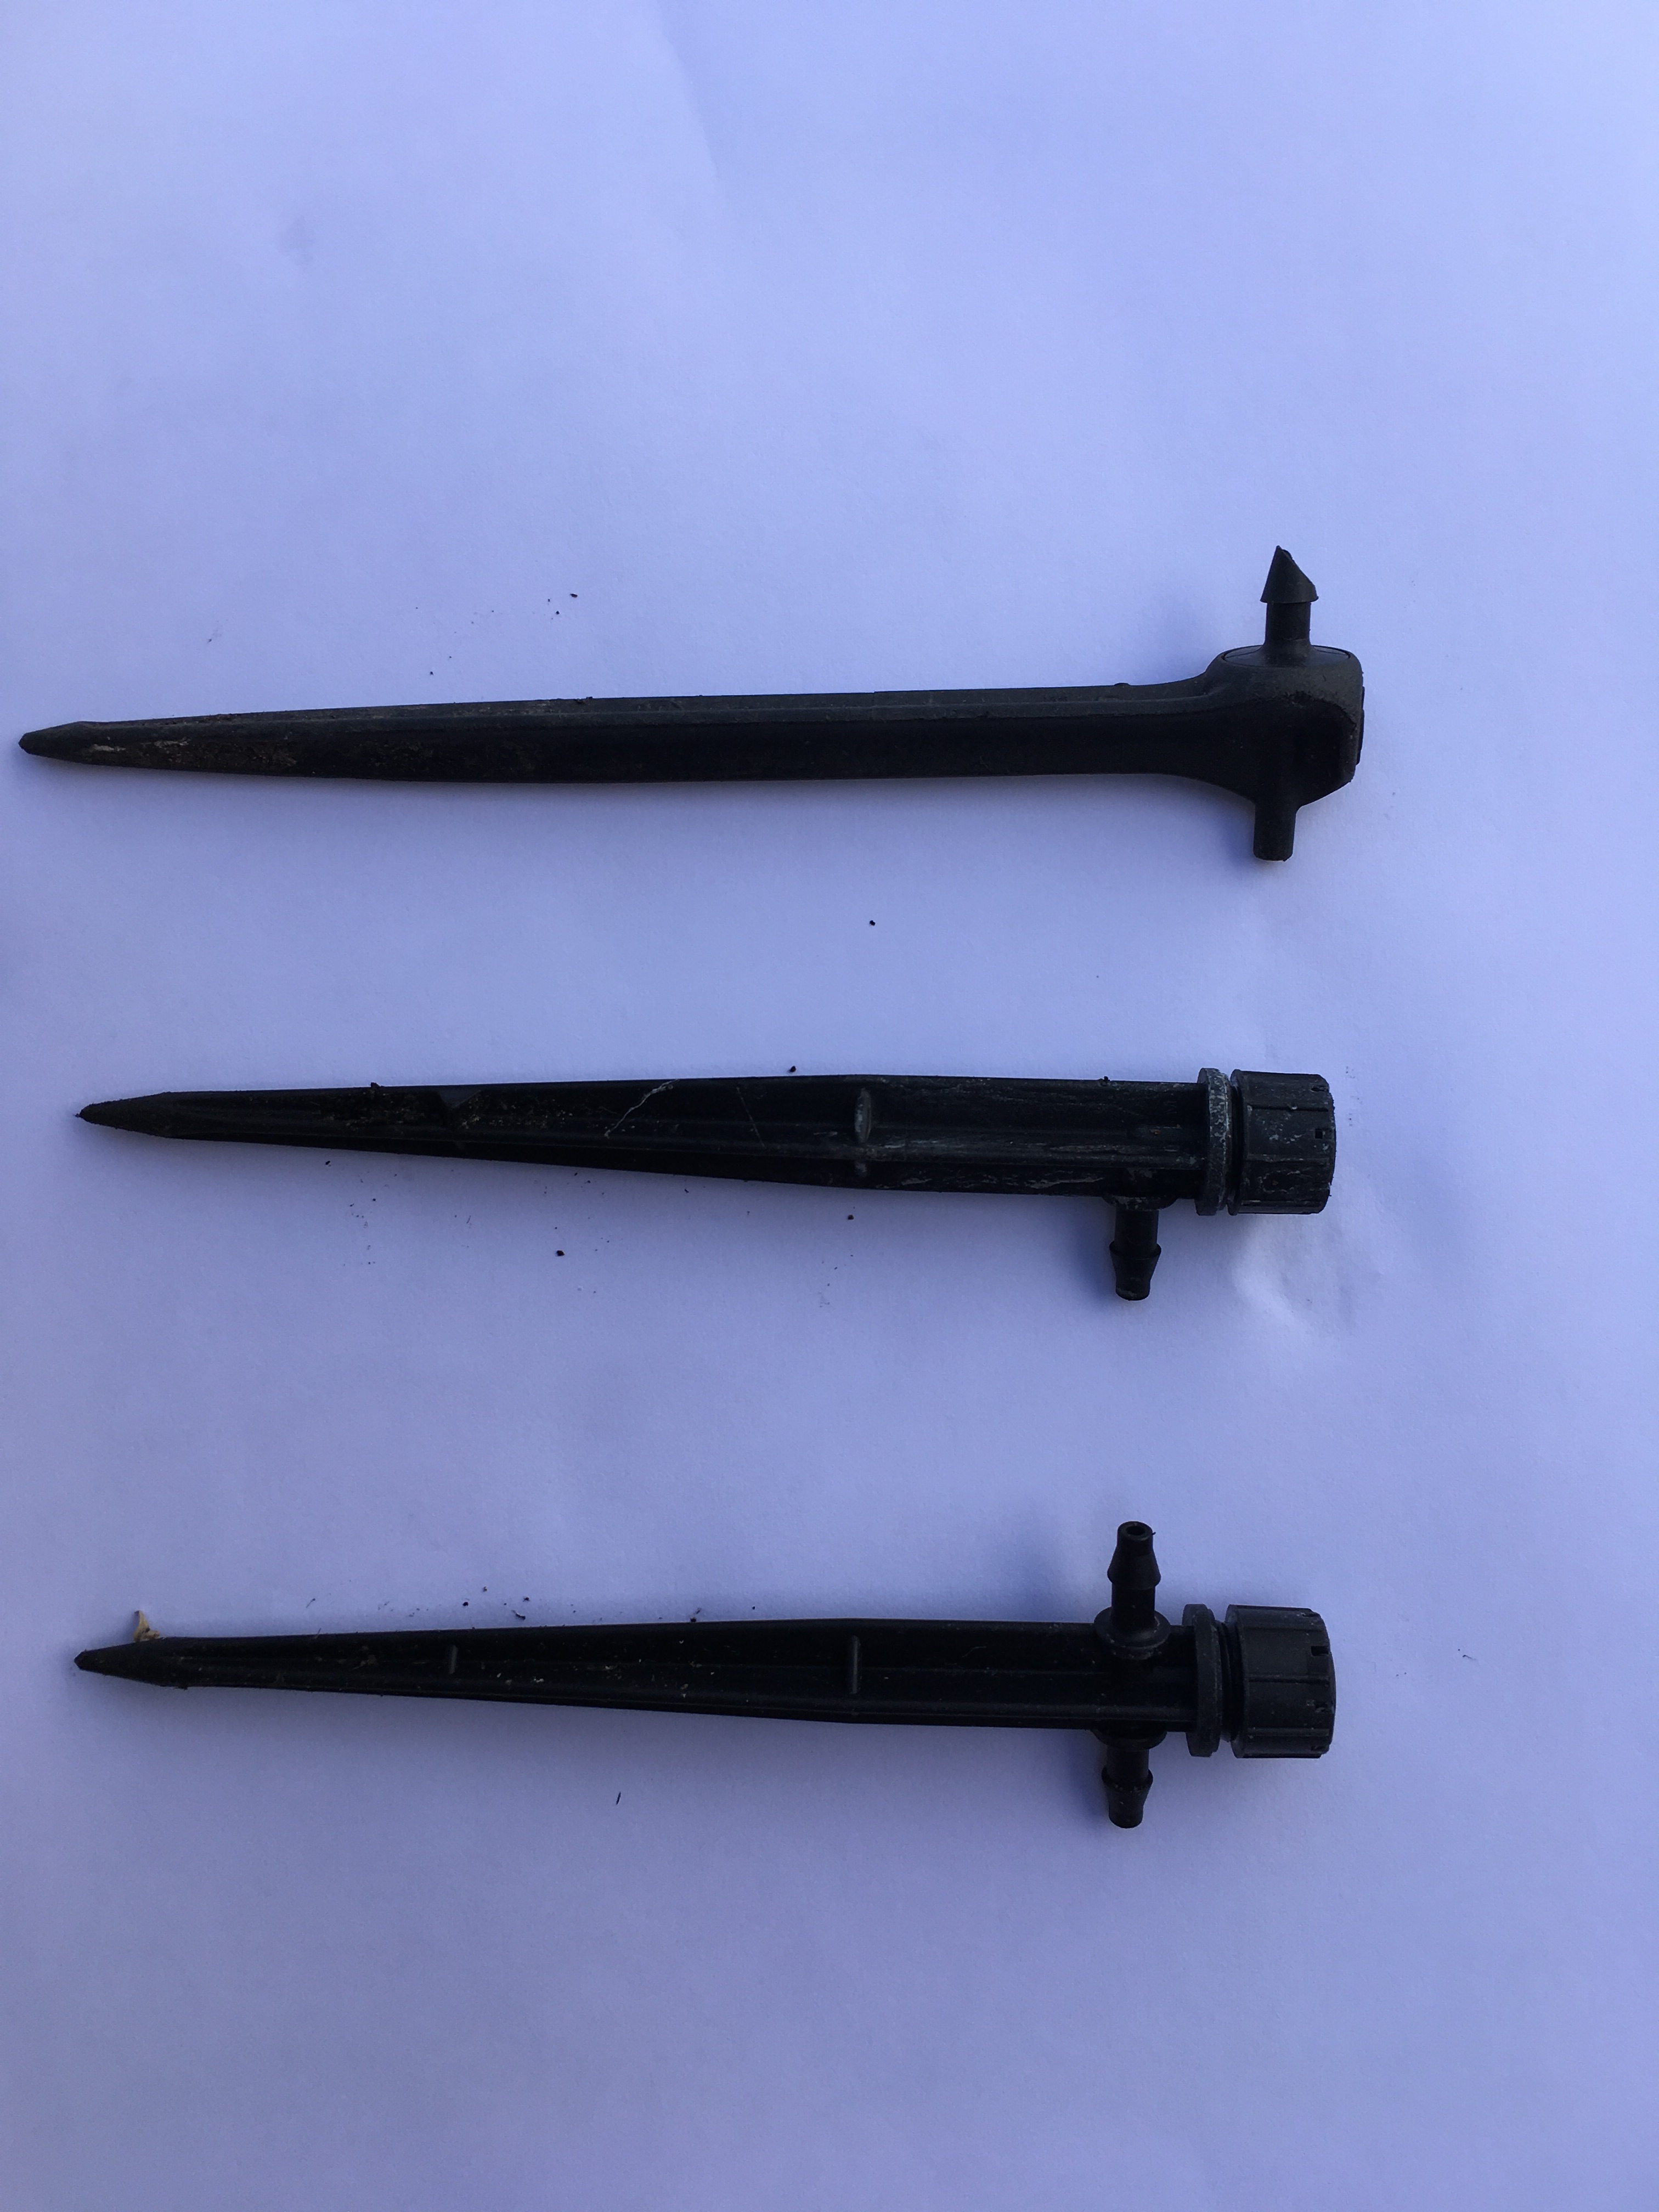
We have 2 sizes of pipe – 13mm and 4mm
The 13mm is attached to the tap with a valve that regulates pressure
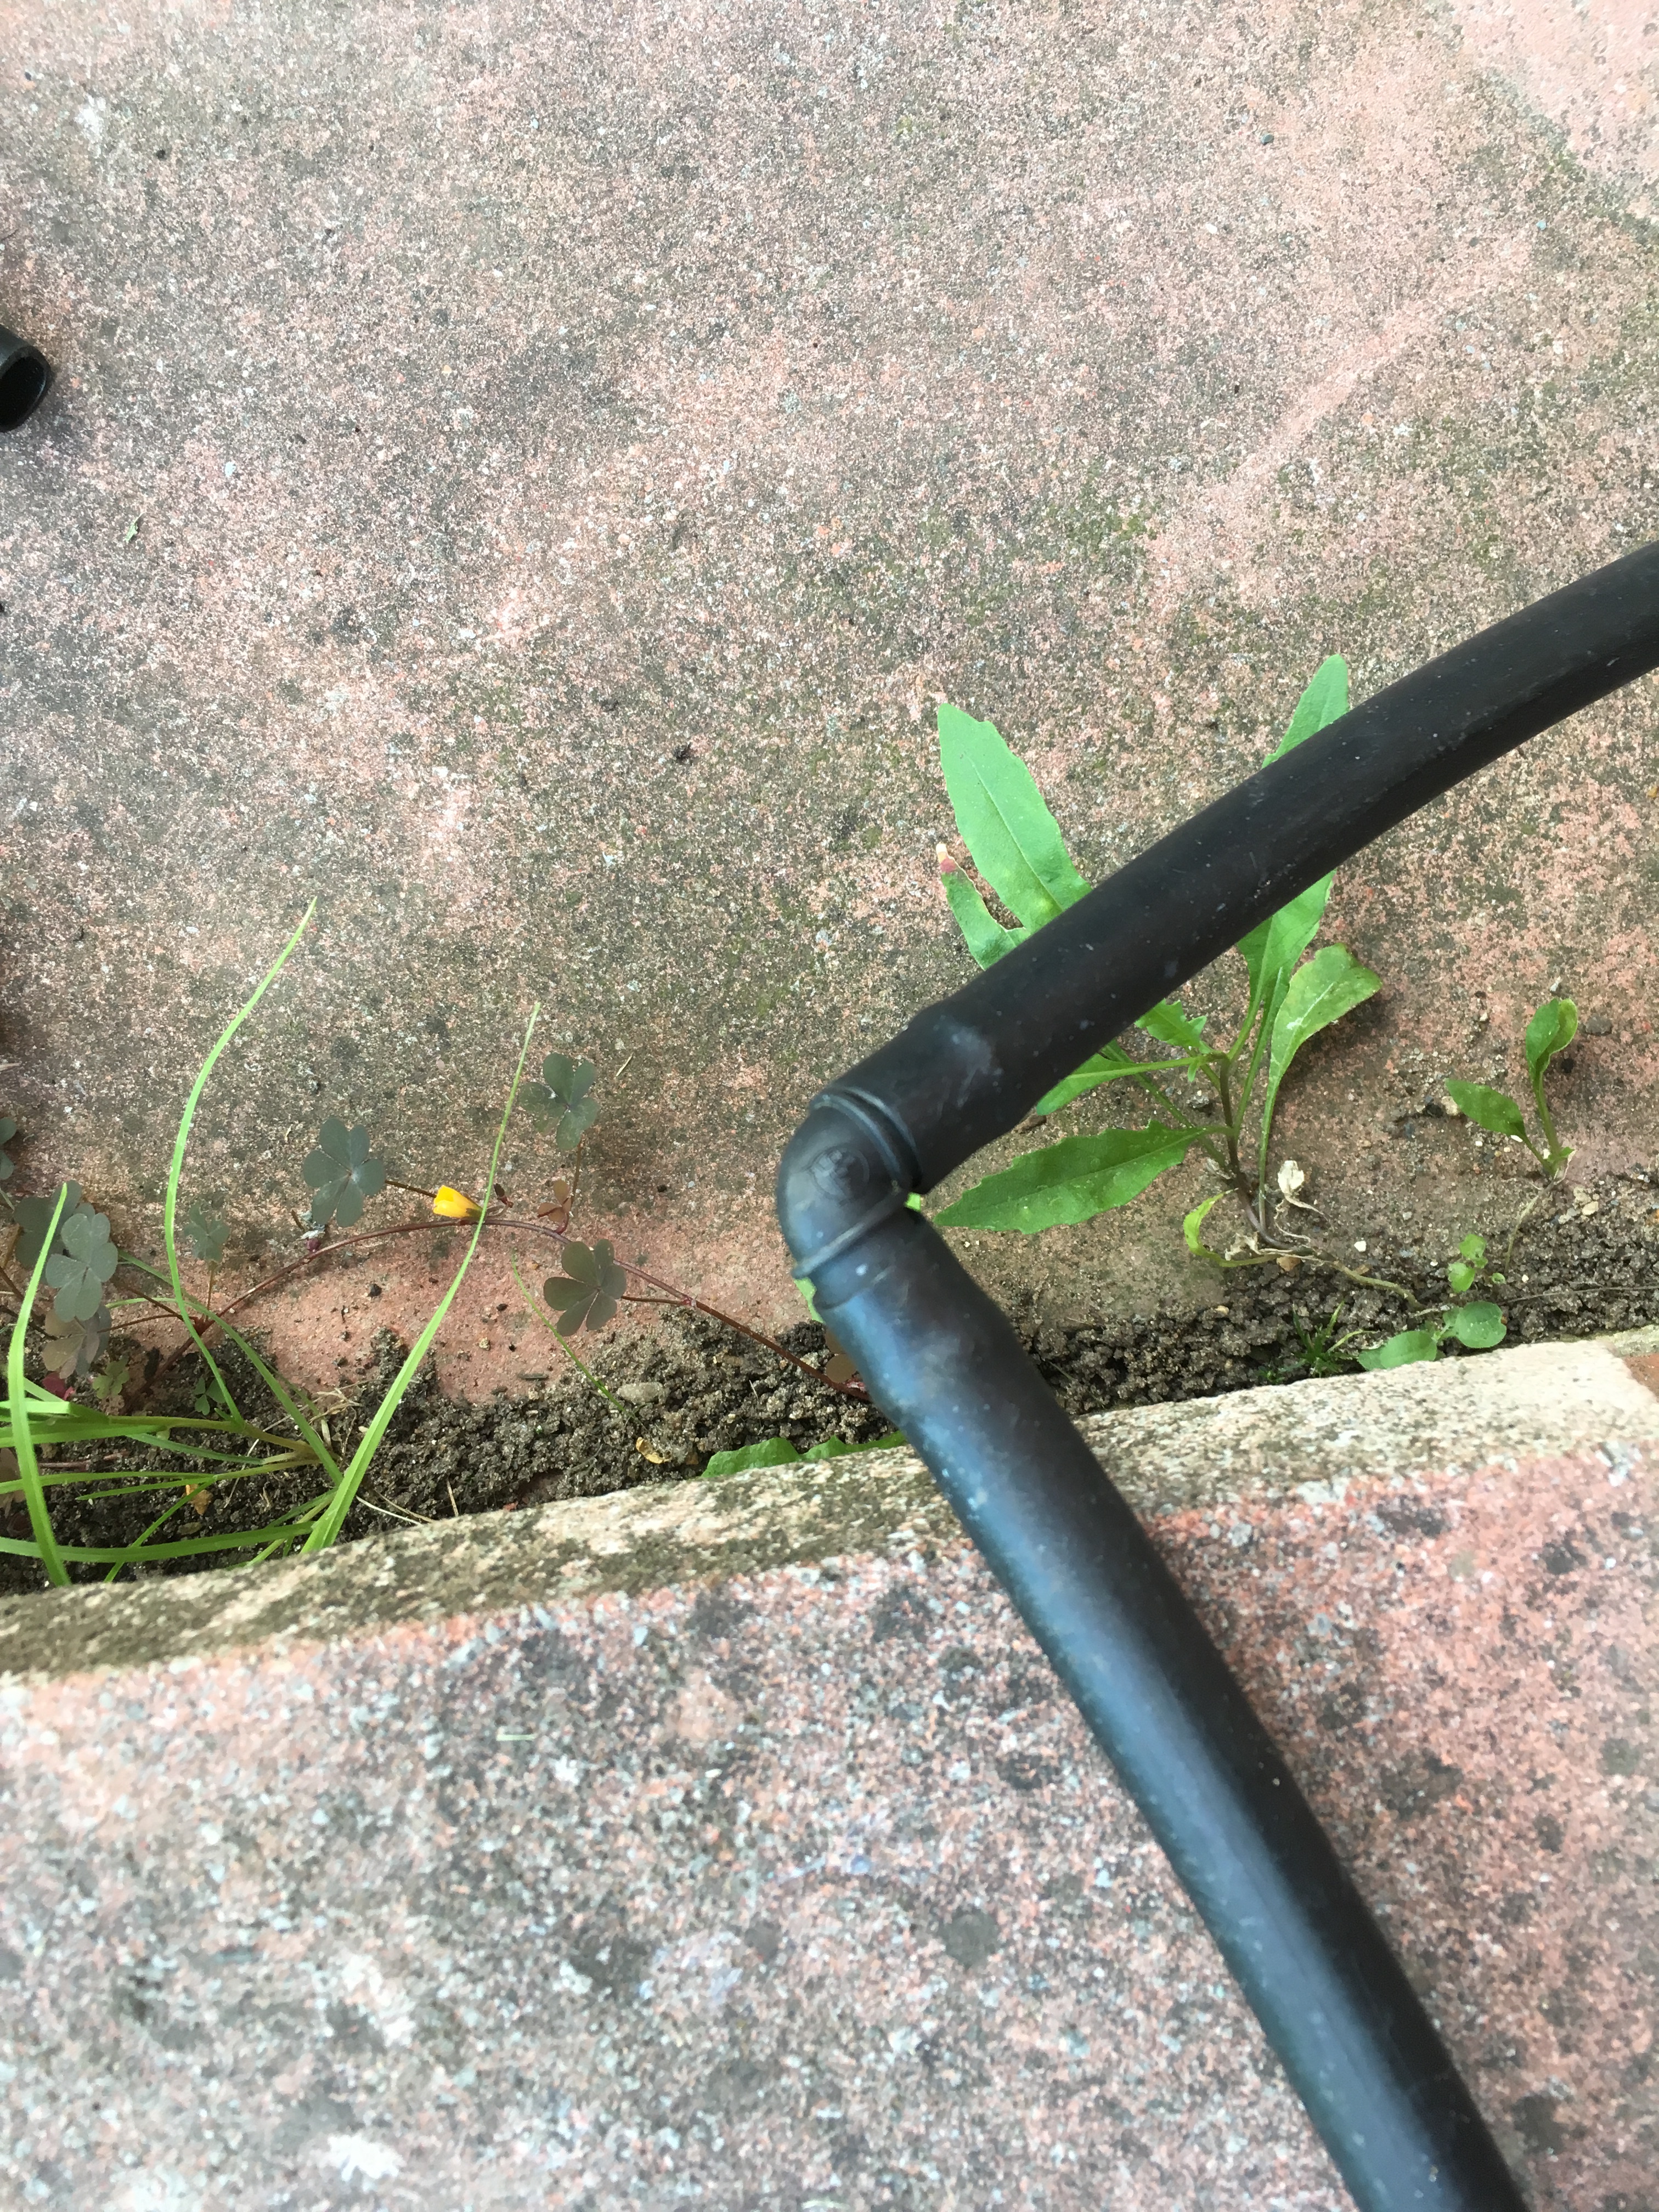
The 13mm pipe can be split in different directions using a T joint
It can also be made to go round corners tightly with an elbow joint
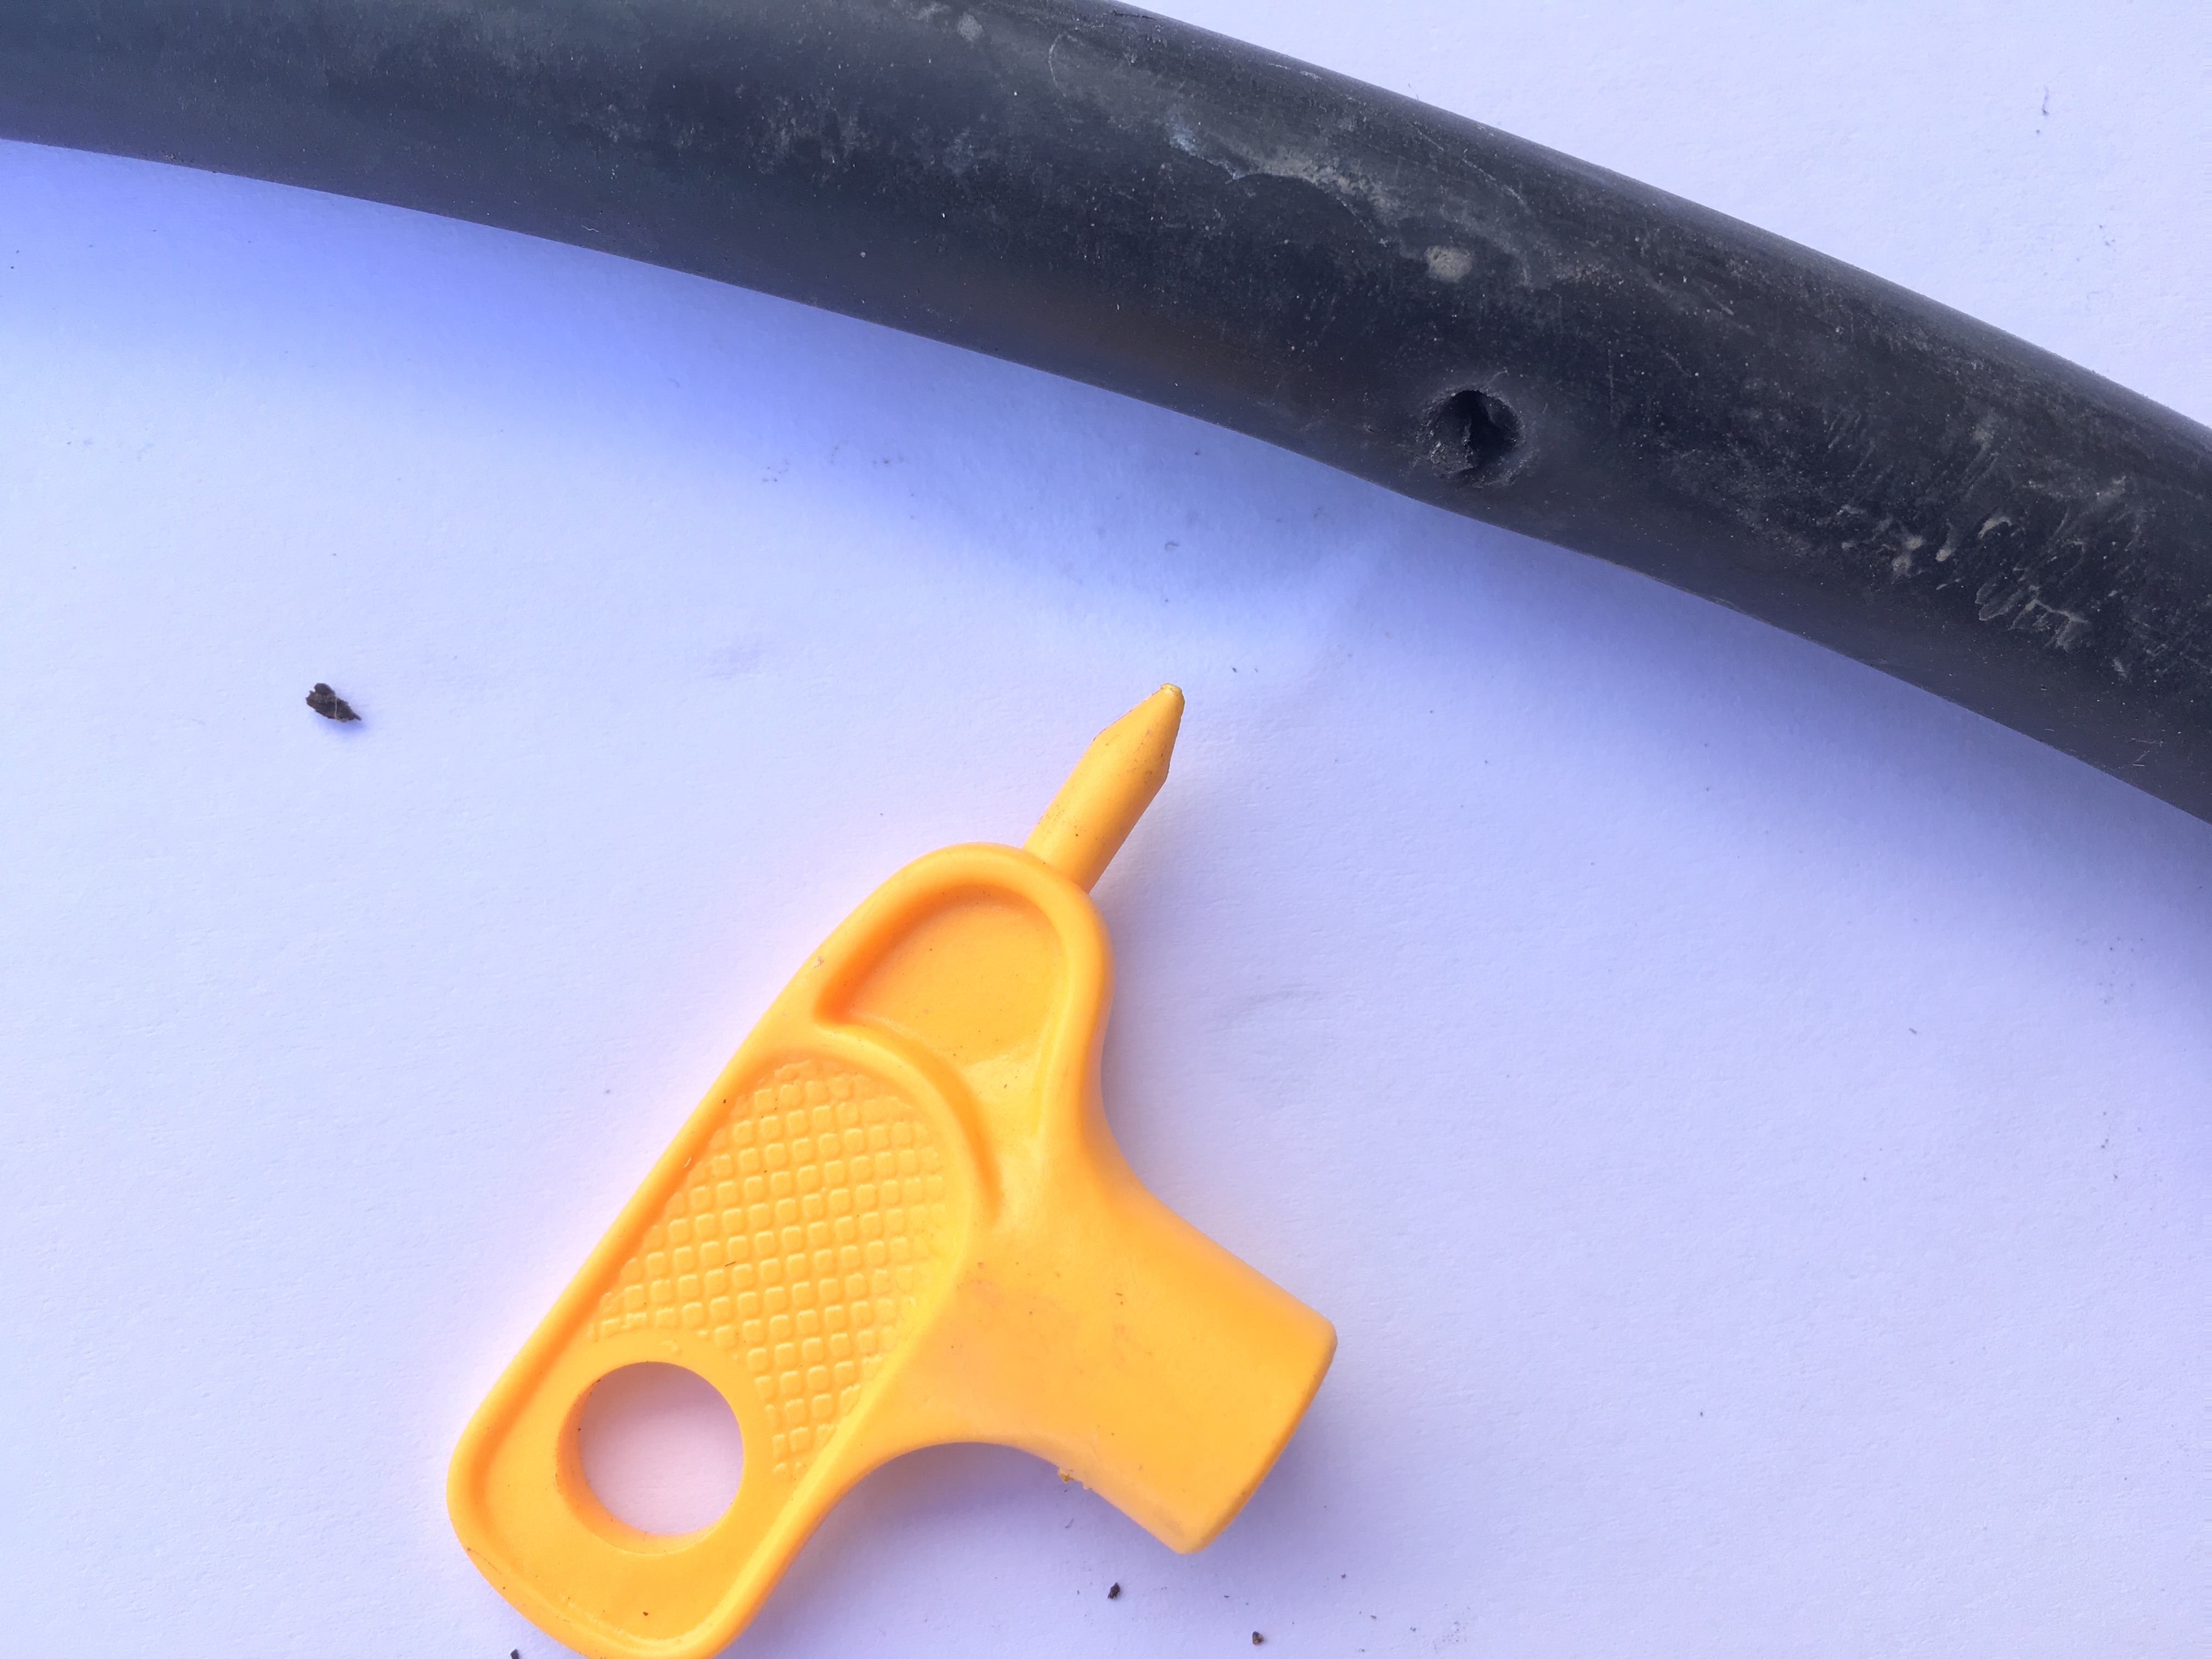
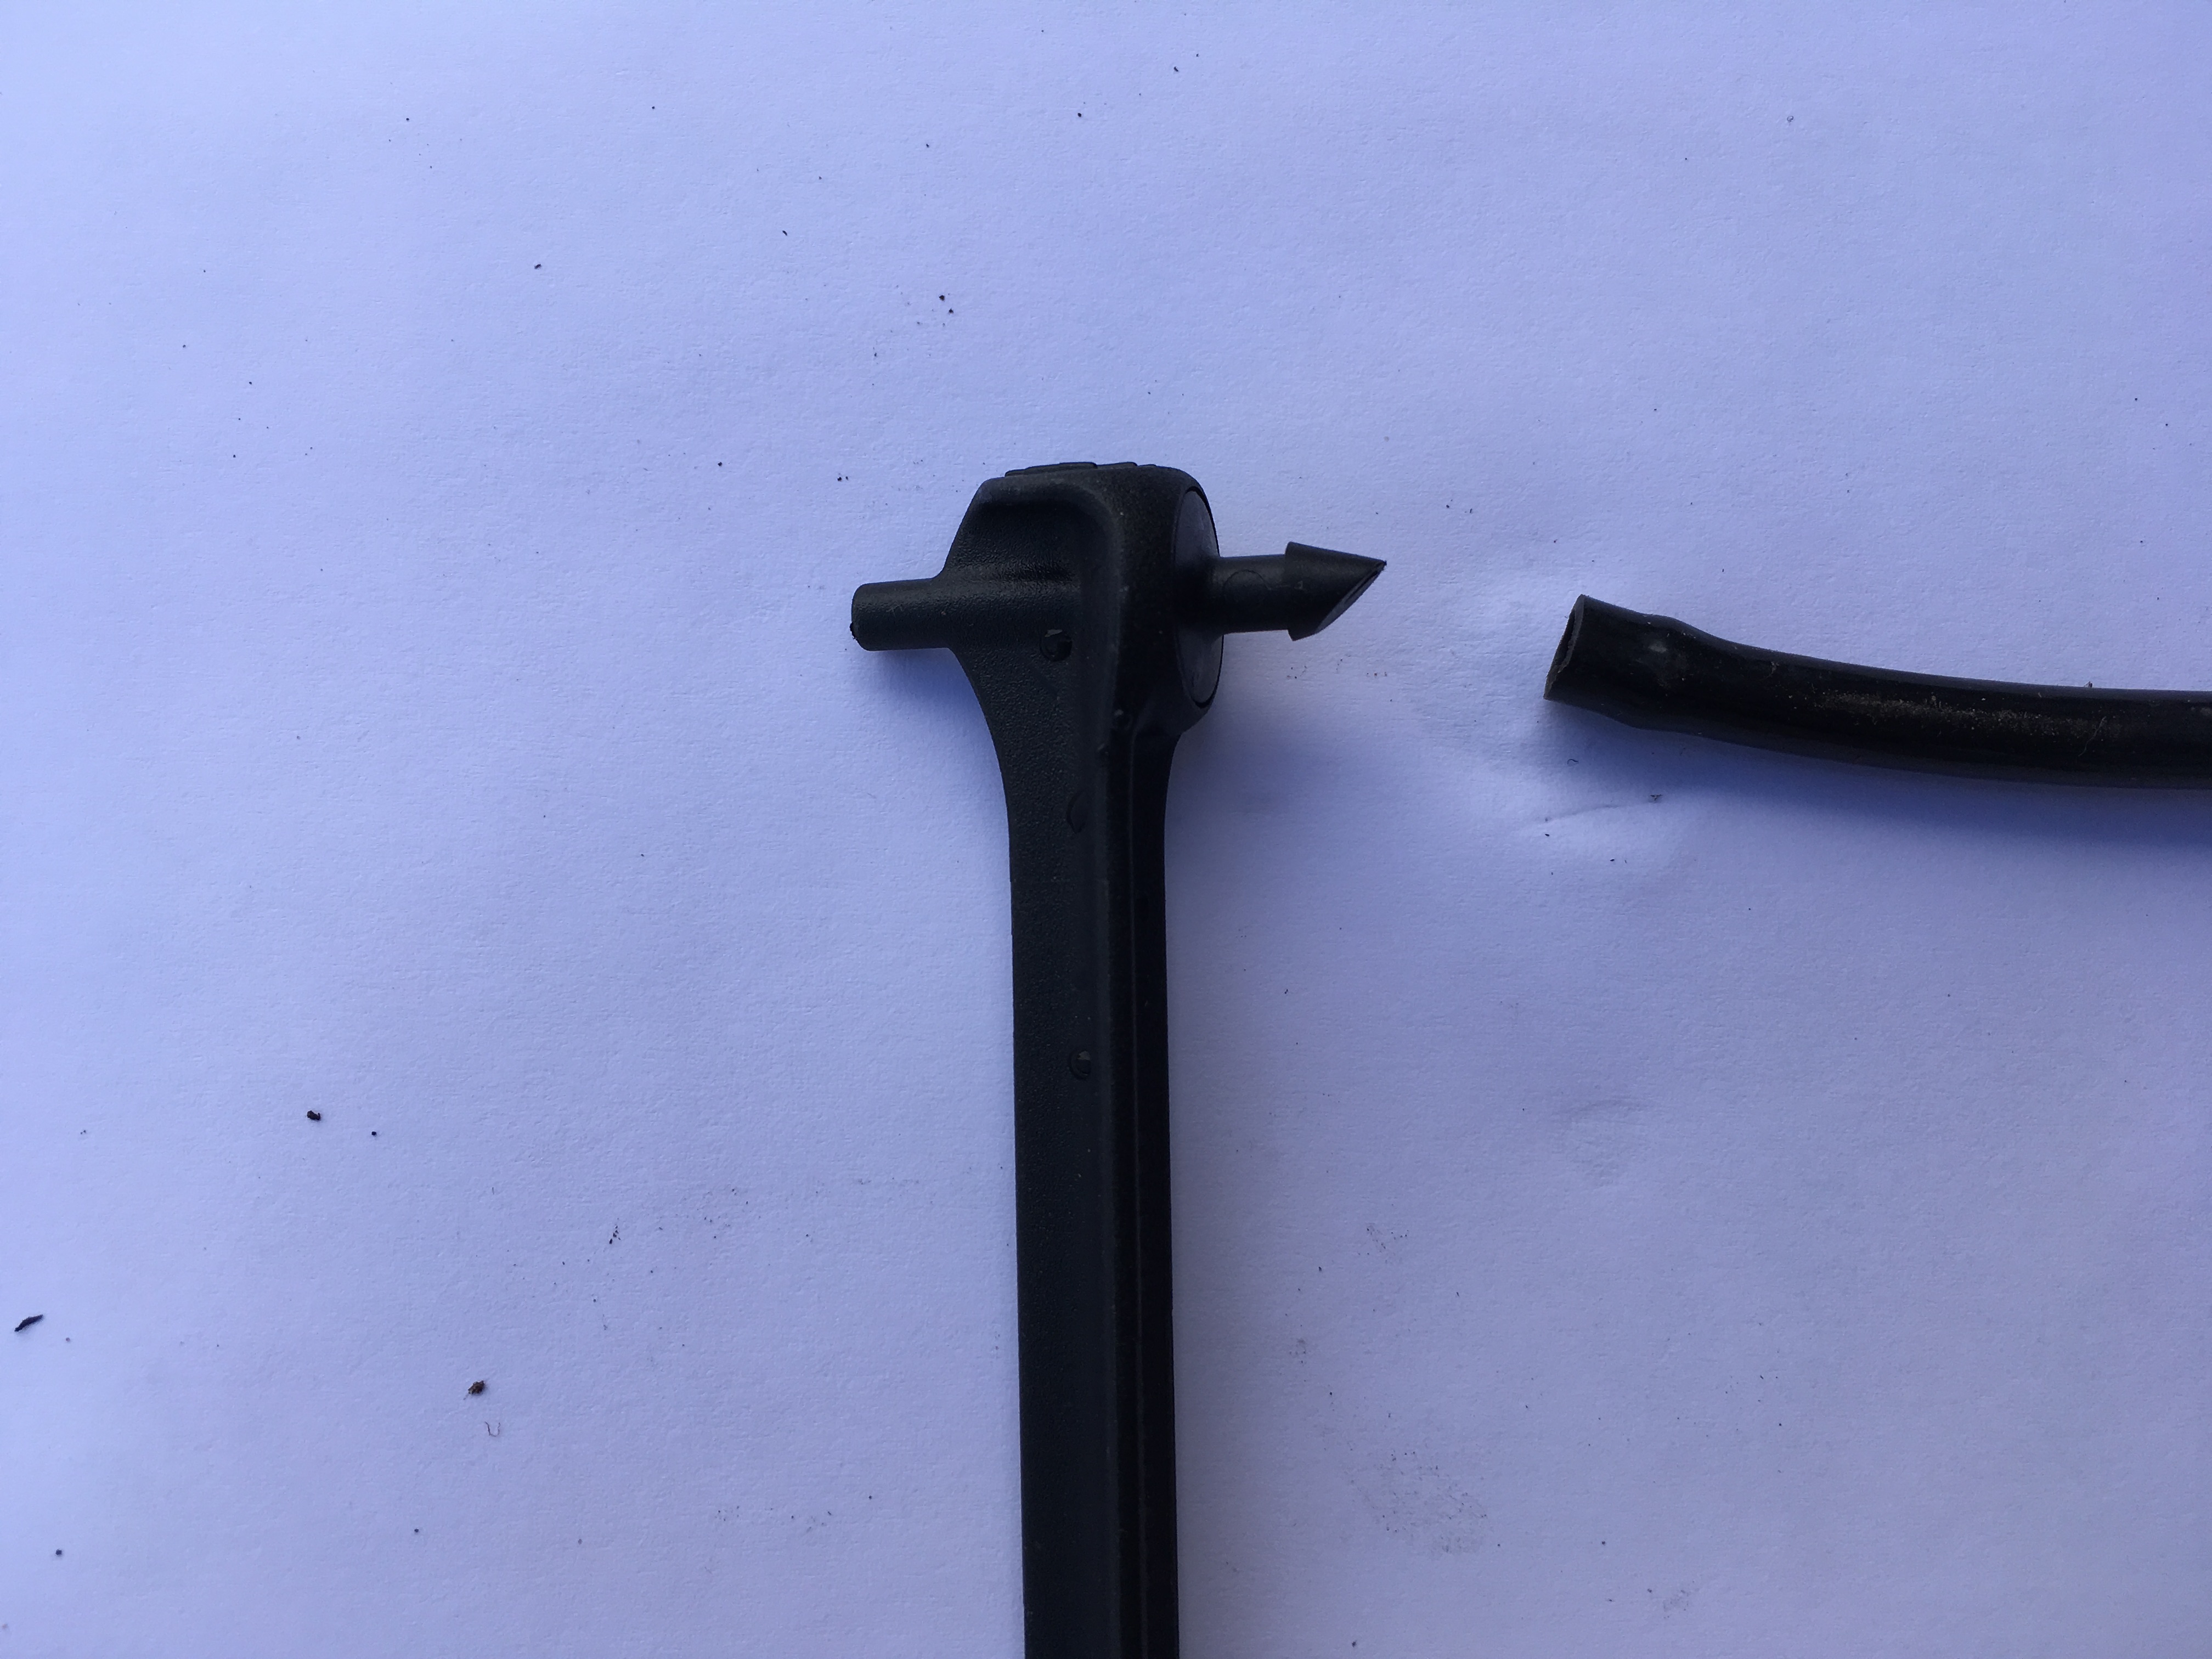
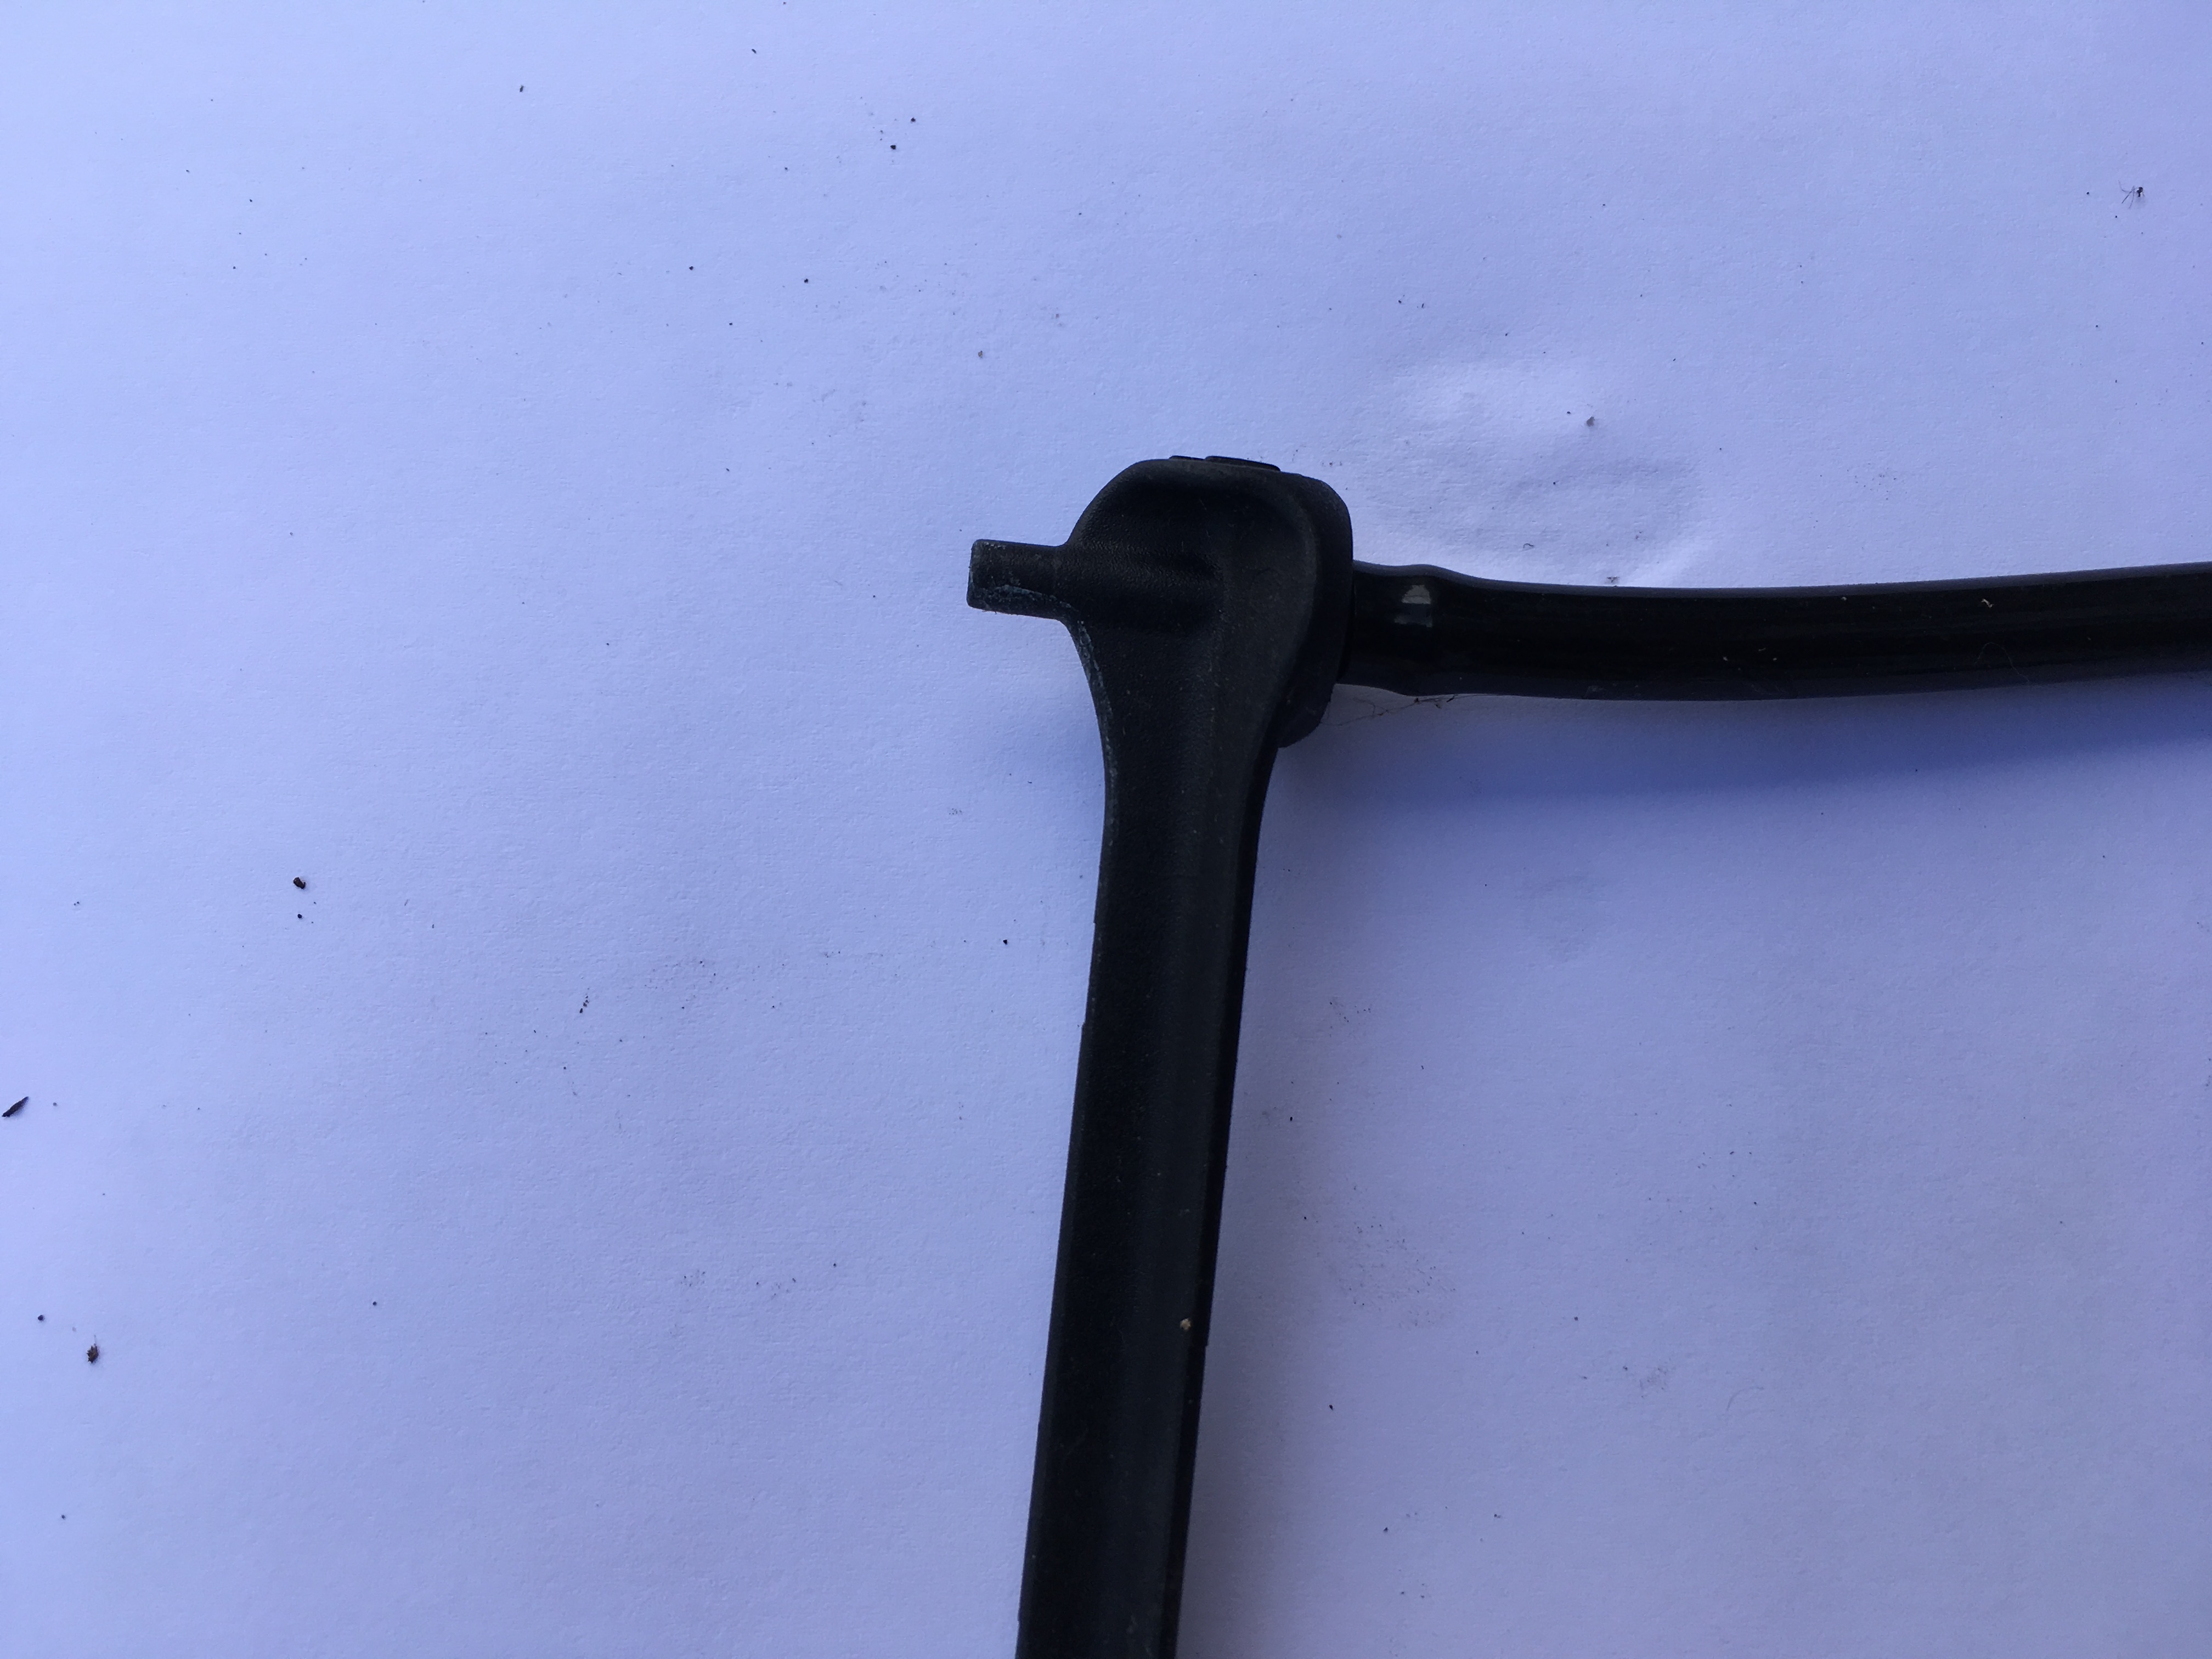
In the 13mm pipe you punch a hole using a tool provided
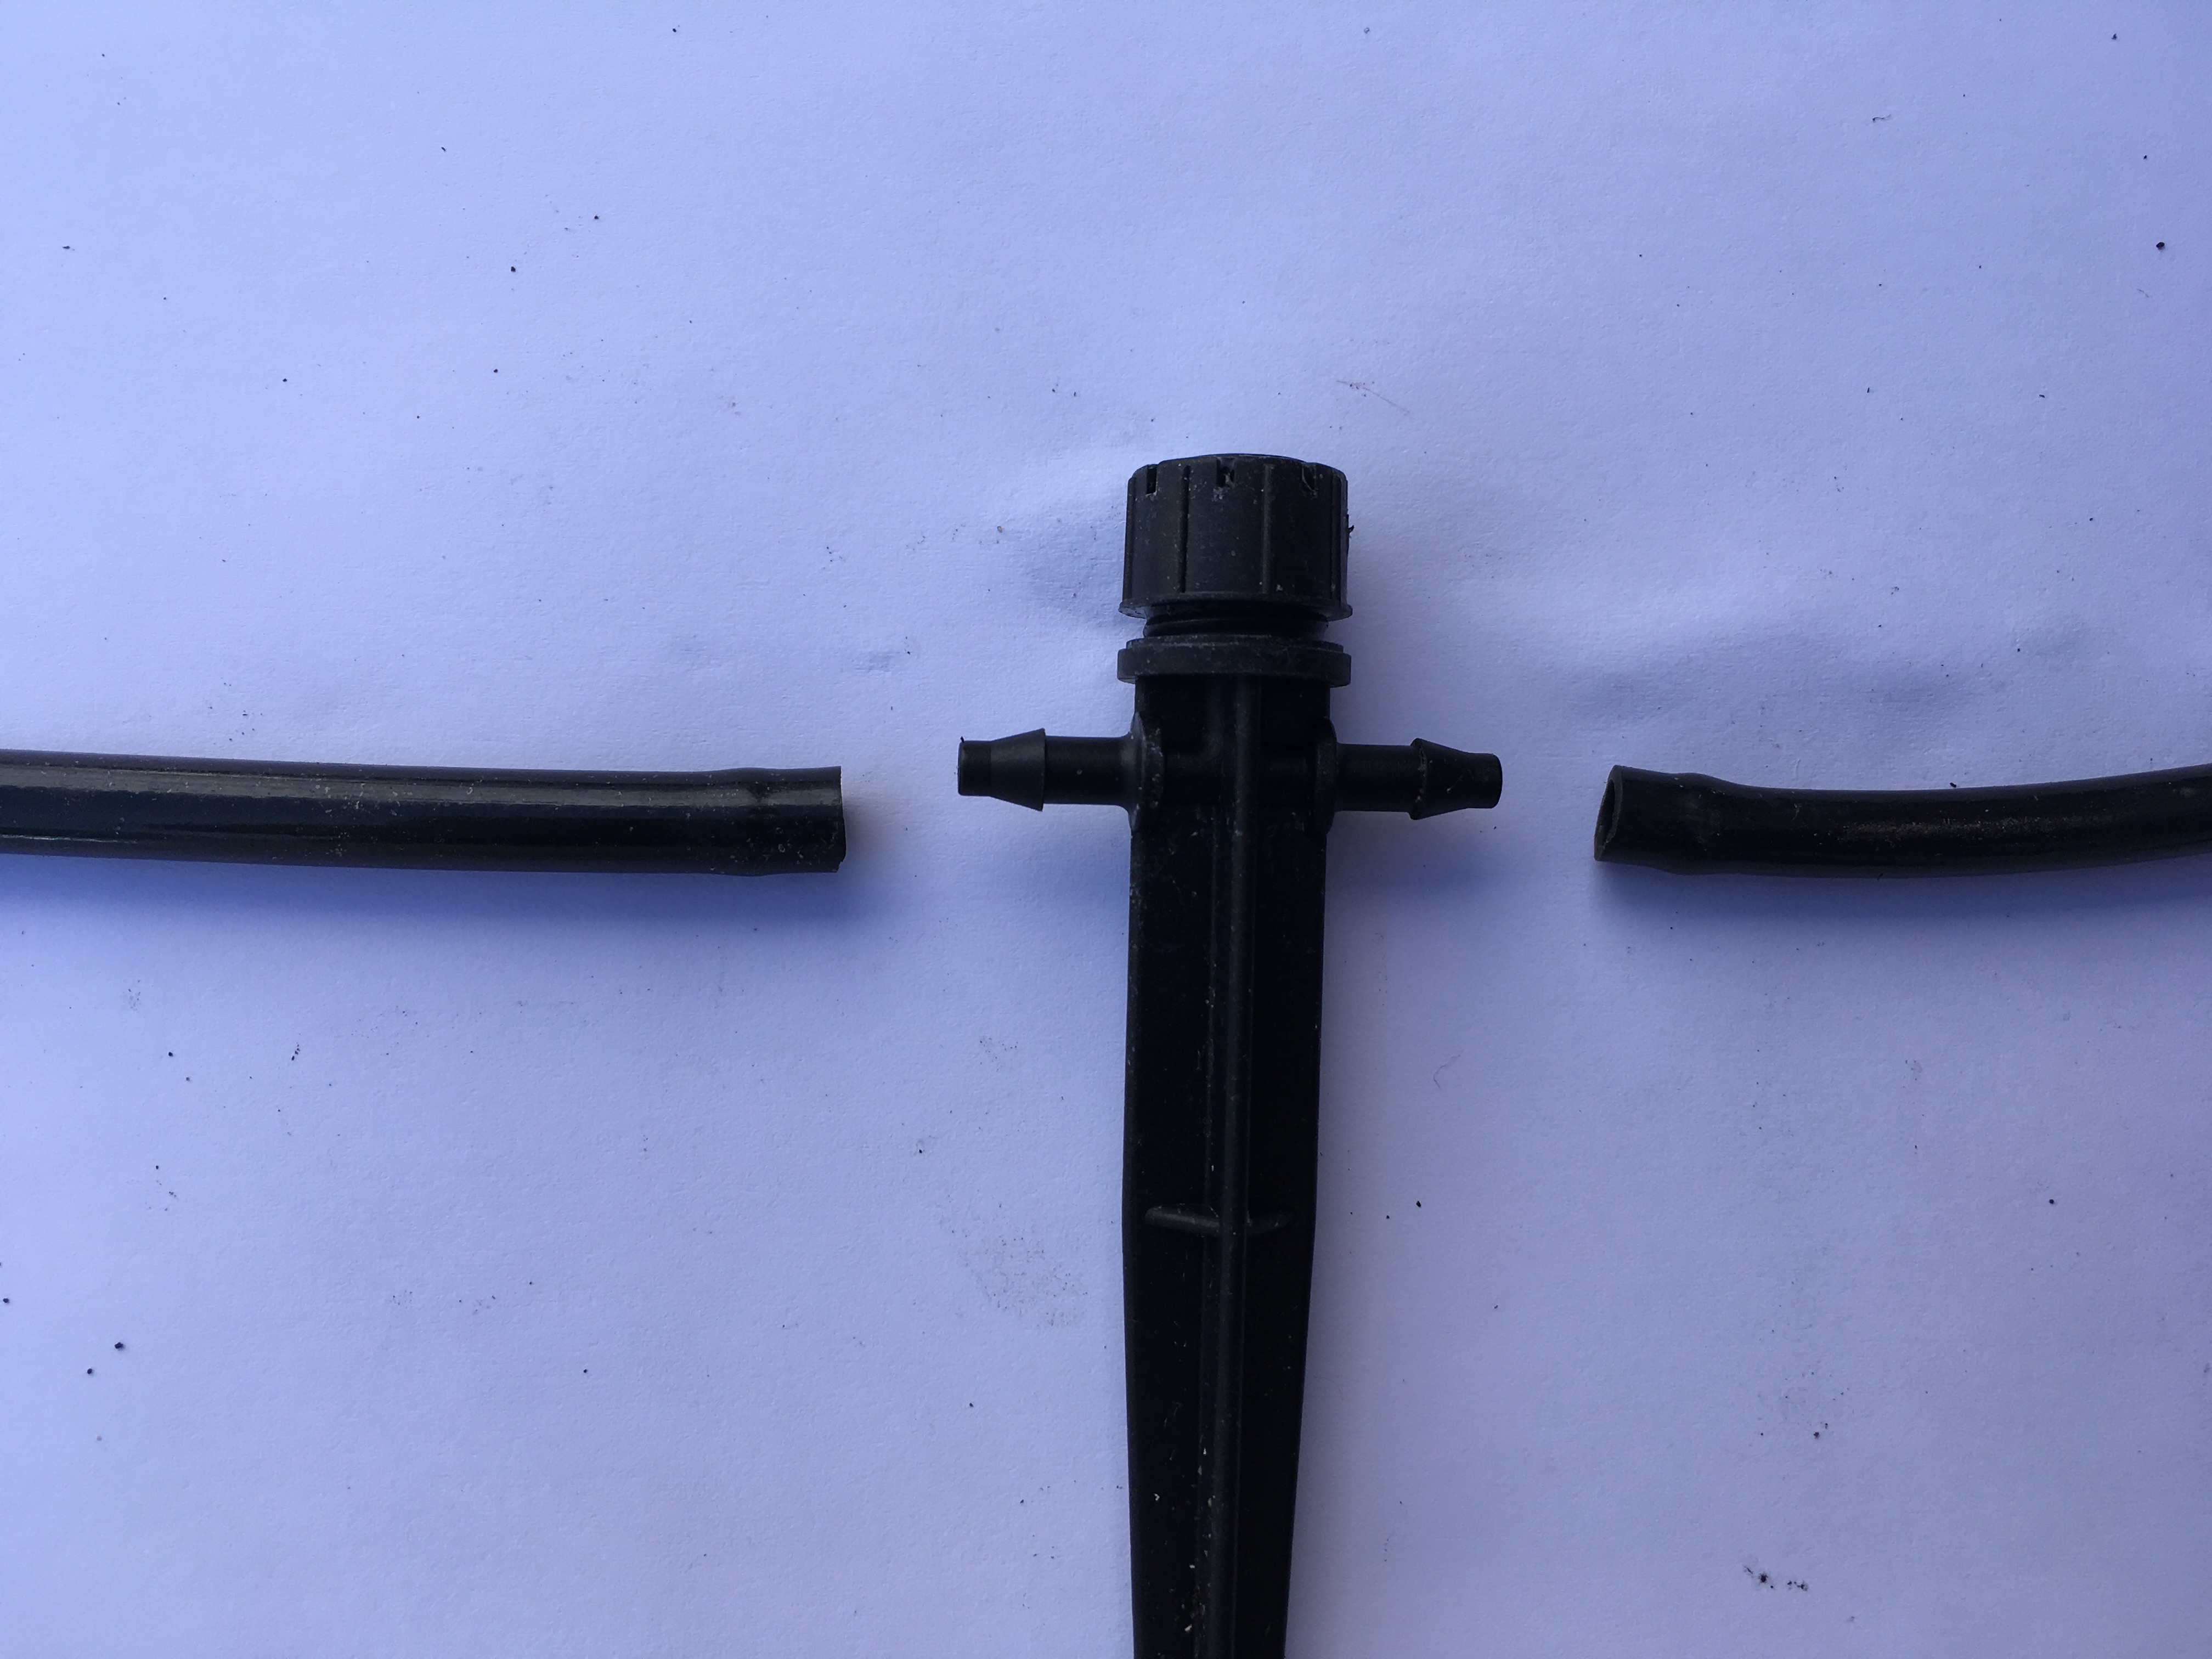
You stick a connector into the hole (the tool helps)
You can do this anywhere along the pipe you need
You attach a suitable length of 4mm pipe
A dripper is connected to the other end of the 4mm
This dripper has a spike on the bottom to stick into the soil
You can get several types of drippers, sprinklers, joint sprinkler.
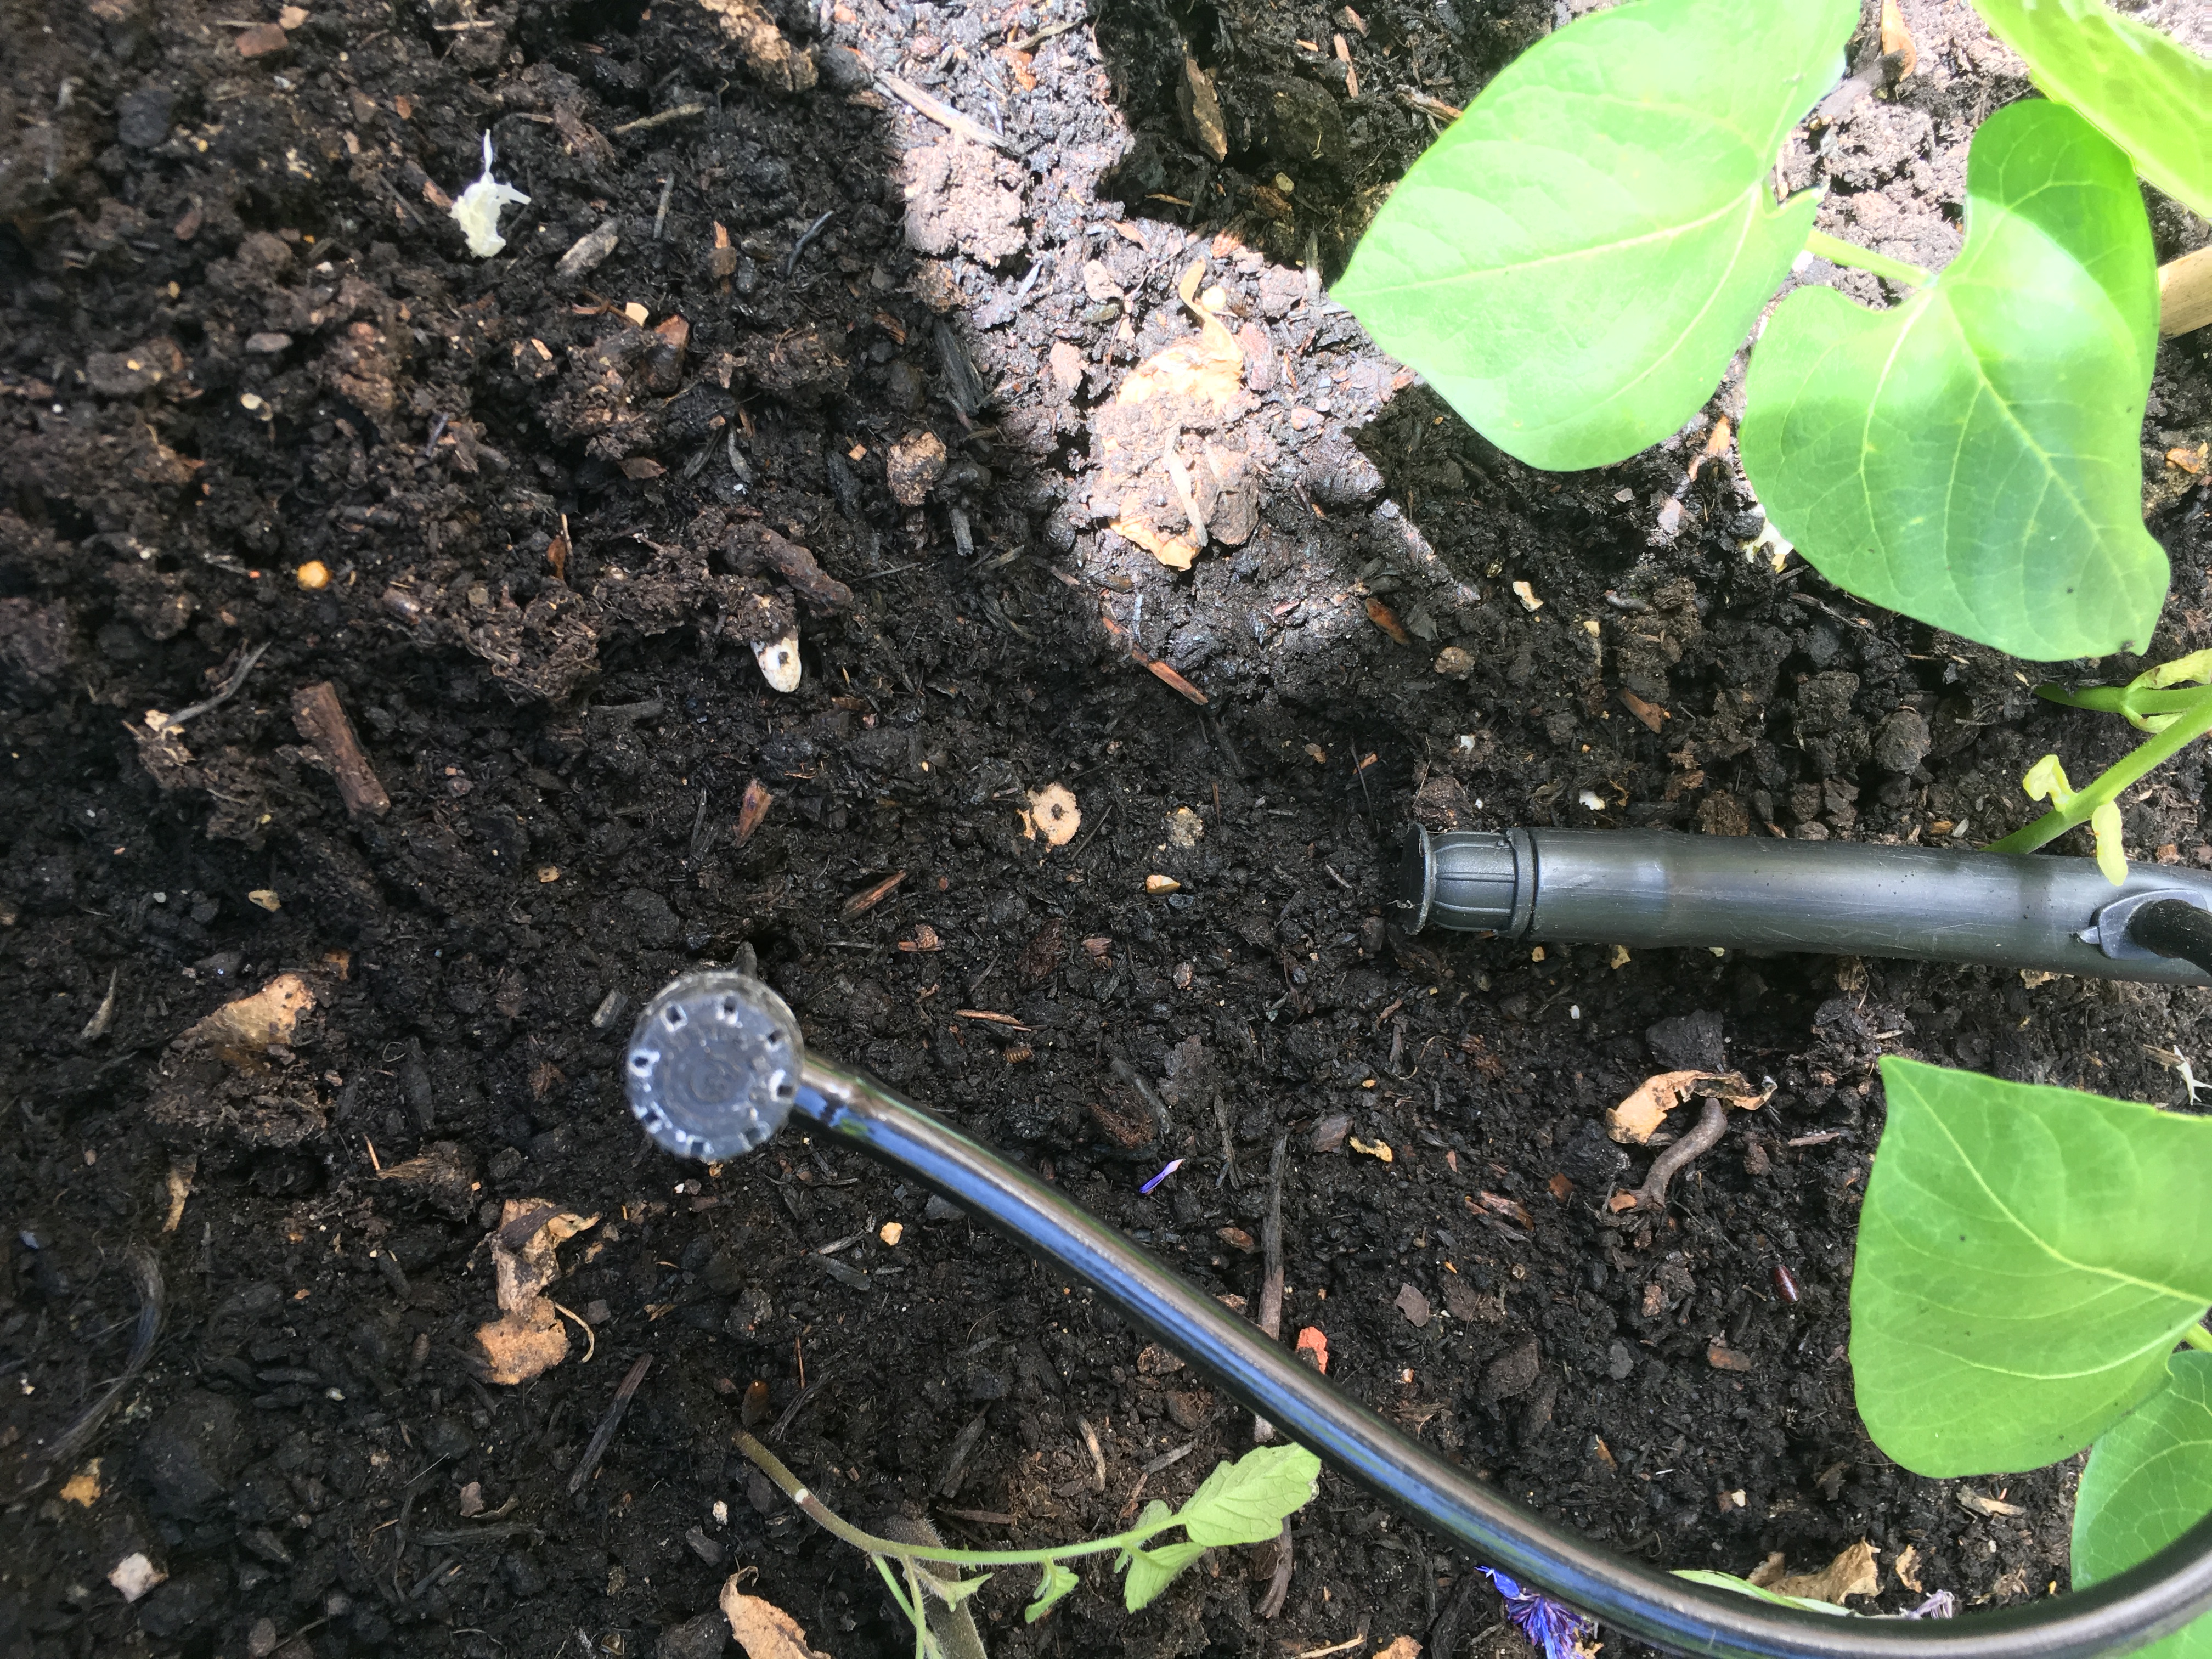
These can be connected to each other via 4mm pipe and you can get rows
Middle right you can see a stopper at the end of the 13mm pipe. If you look right of that you can see a connector with the 4mm pipe that leads to a mini sprinkler middle left. The top of the mini sprinkler can be twisted to increase or decrease flow.
These drippers also have the advantage of doing your watering for you at the turn of a tap. You could also set it up on a timer so you never need to do any watering. We absolutely love it. We leave the timer on constantly and keep the tap closed when the weather is rainy and just leave the tap open when it’s sunny. We’ve got a splitter so we have a couple of outlets from one tap and they can be opened independently on the timer.
This timer gives us 2 outlets. The right is connected to the irrigation system. The left is connected to a hose which is occasionally connected to a sprinkler or a cat scarer. You can press the MANUAL ON/OFF to allow flow for a chosen number of minutes. The 2 outlets can be chosen independently.
These are also great as we’ve started growing on the shed roof. It’s a really sturdy shed but I’m not comfortable with the idea of going up every day in the hot weather to water, or just spraying randomly, trying not to get doused at the bottom. I only put the veggies up there knowing that I could run a pipe up there.
For anyone who is concerned about the sweet pea flowers – yes I know that the ‘peas’ are toxic. This is why they’re on the roof. Little cannot get up there and they’re separate from the edible peas in the garden. You can see my little white sink basin. I was up here harvesting turnips and beetroots.
Sprinklers
These are of course the totally lazy and easy way to water
the garden. You should be aware though that this is one of the more wasteful
ways of watering as everything within the set radius will be watered indiscriminately.
Leaves get watered, which can also lead to disease such as powdery mildew
(happens in hot weather, when the plant is water stressed but had high humidity
around the leaves). If you’re busy or forgetful or lazy like me you can also
set a sprinkler on a timer.
This is a simple and effective one. The red tabs on the right allow you to widen the angle of spray so you can adjust these and the flow at the tap to try and cover a specific area.
With both the water drippers and sprinklers I have read that it’s better to water very early in the morning or late in the evening when the water doesn’t just evaporate straight away. I set the drippers to water in the evening for 5-10 minutes depending on how hot the weather is. The sprinkler isn’t usually connected unless we go away so that areas that don’t have drippers or any random little pots can get some water. Sprinklers are also great if you are have laid turf and need it to establish. Turf dies easily when not watered regularly and you don’t want to walk on it. Established turf doesn’t need regular watering unless you have prolonged dry period. We’ve got the sprinkler set to go each morning at the moment as I’m trying to grow short, edible flowers in my lawn. Morning is probably best so that the brassica leaves close to the lawn that have been splashed can dry and hopefully won’t get powdery mildew.
Water bottles
This is the first photo on here that isn’t mine. I had to take ths photo off amazon, but I doubt they’ll mind as someone might buy some after reading this.
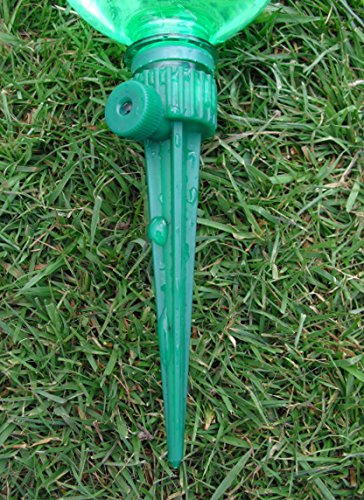
If you want to drip feed your soil you can buy dripper stakes that screw onto the tops of bottles. It’s something we’ve had in the past for when we’ve been away in the summer, but I’ve lost in the previous house move. We used to use these a lot as all of our plants were in pots which dry out quickly. They were really quite effective if you can get the drip slow enough. They basically screw onto typical plastic bottles. You start with a clean empty bottle, generally bigger is better as it lasts longer. You take a heated pin and pierce the bottom of the bottle with a tiny hole. You then fill the bottle, screw the dripper on and then drive the stake into the soil by your plant.
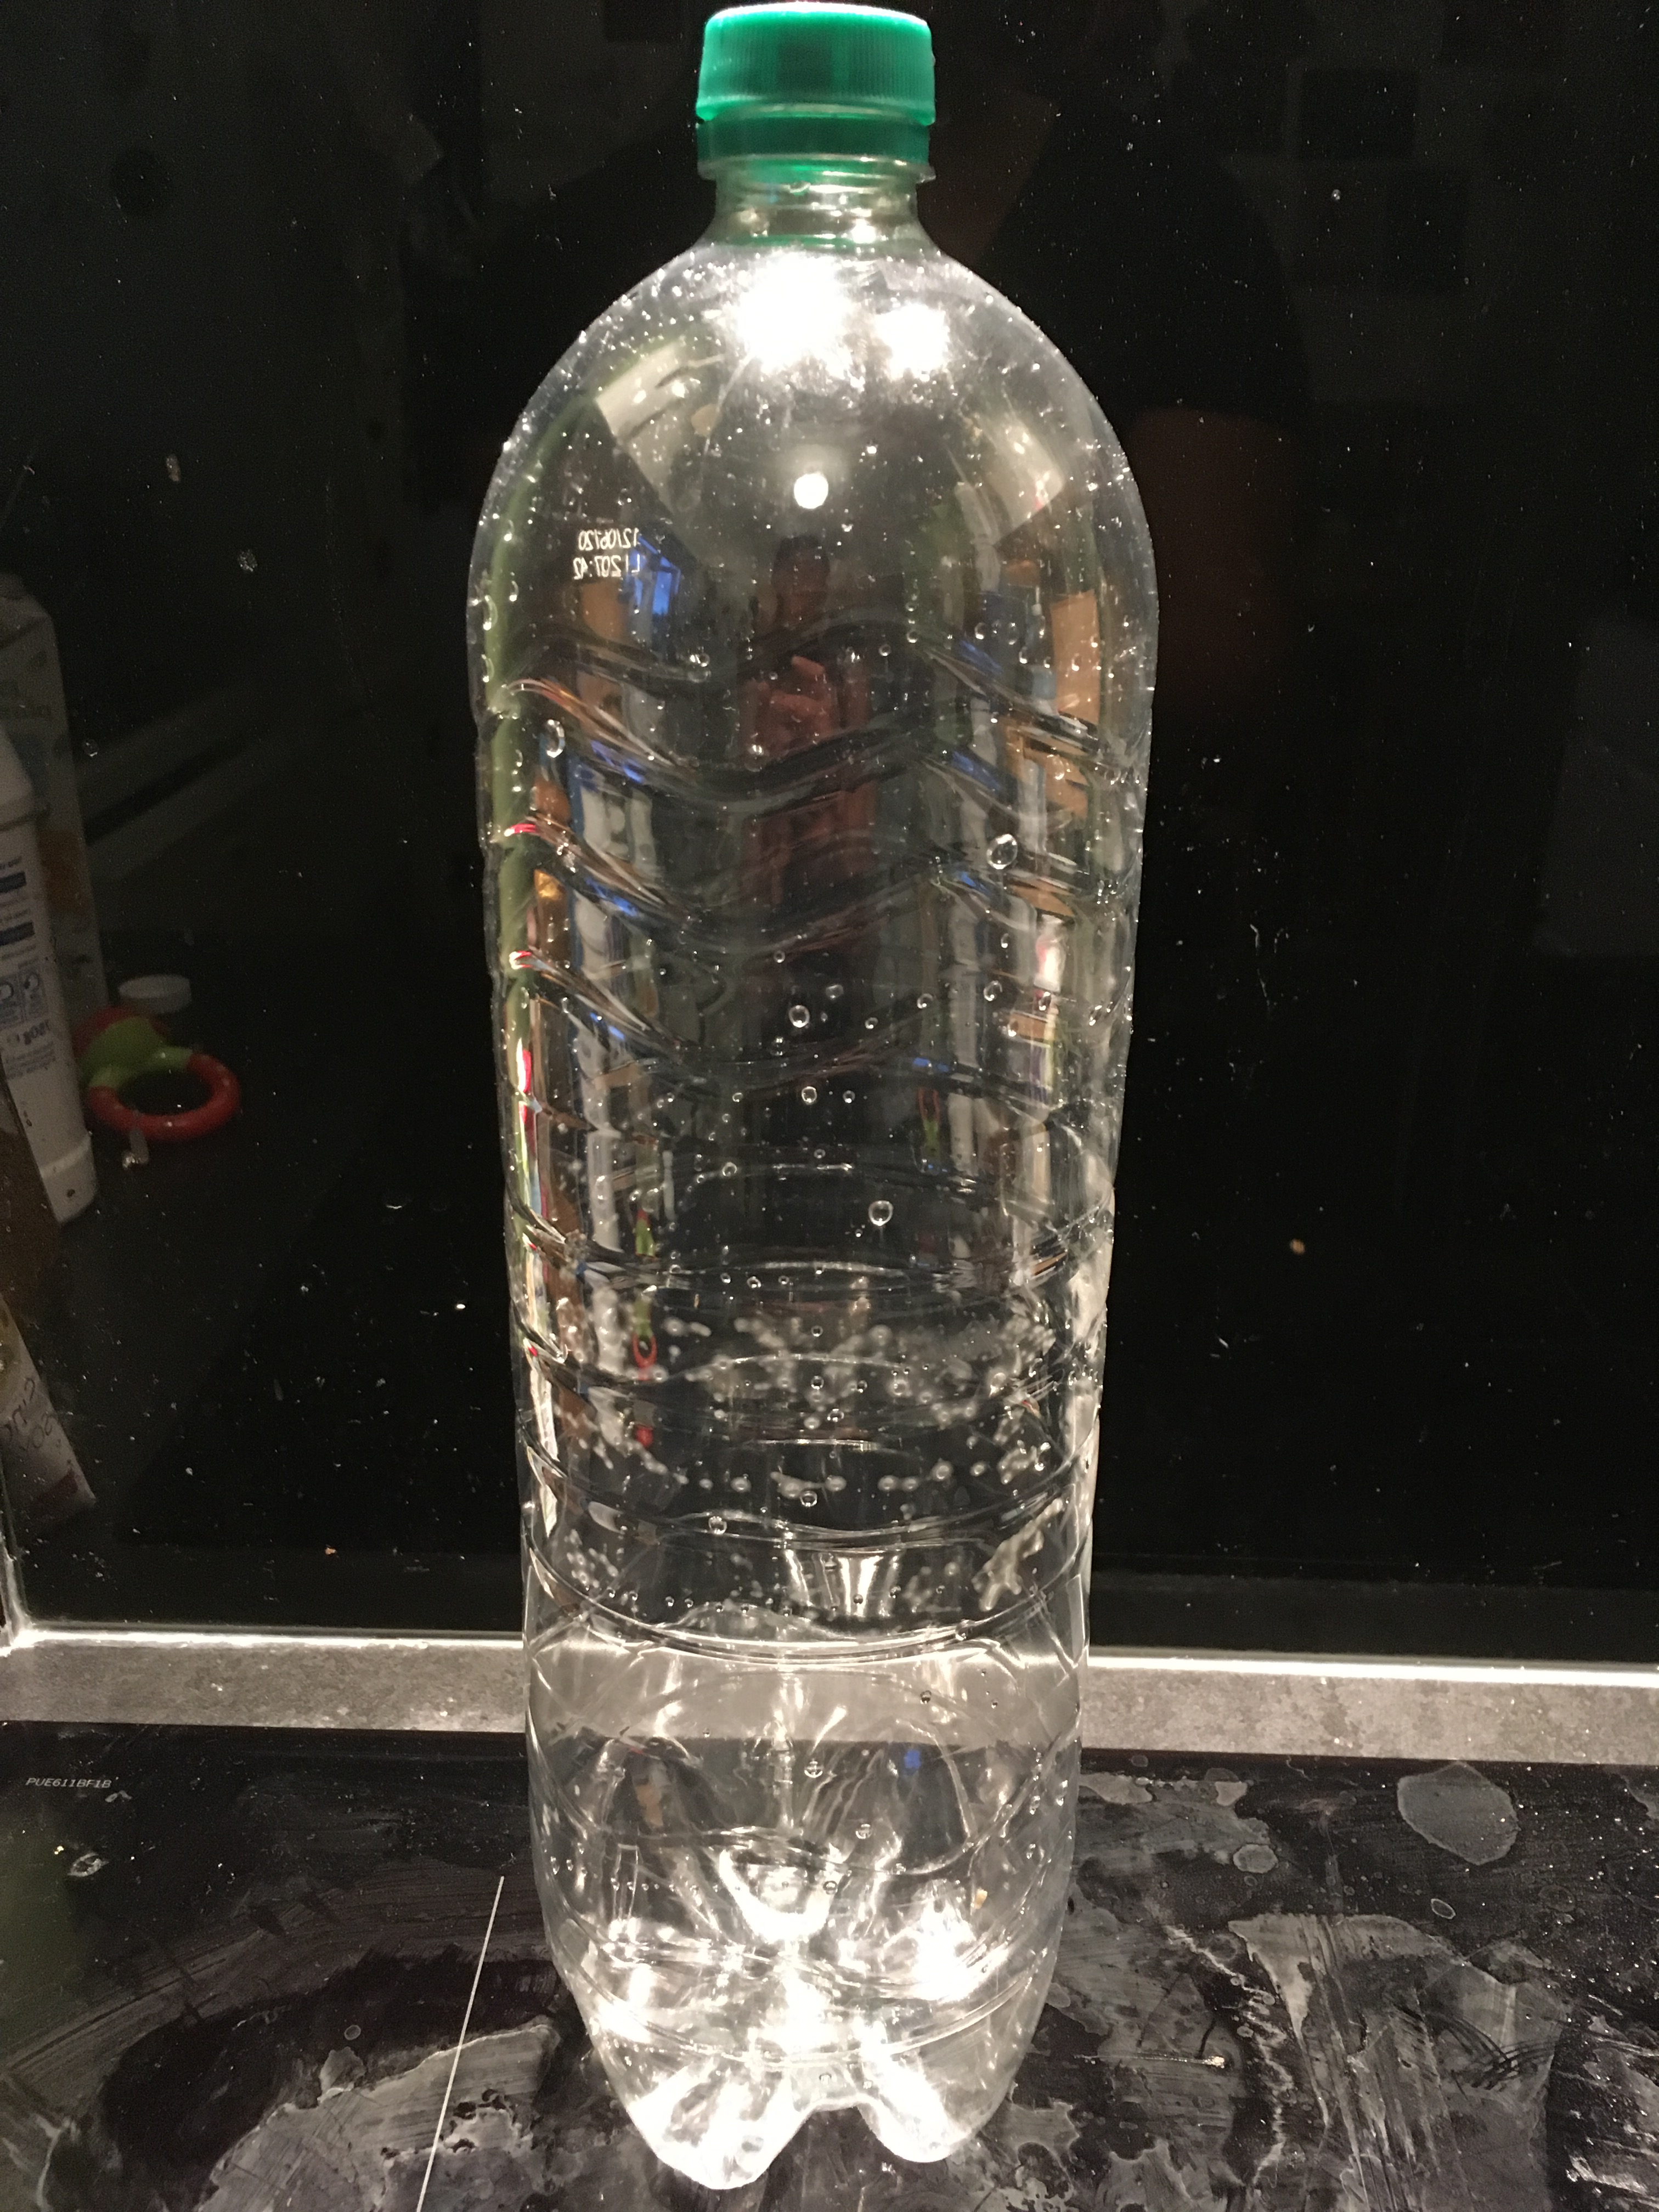
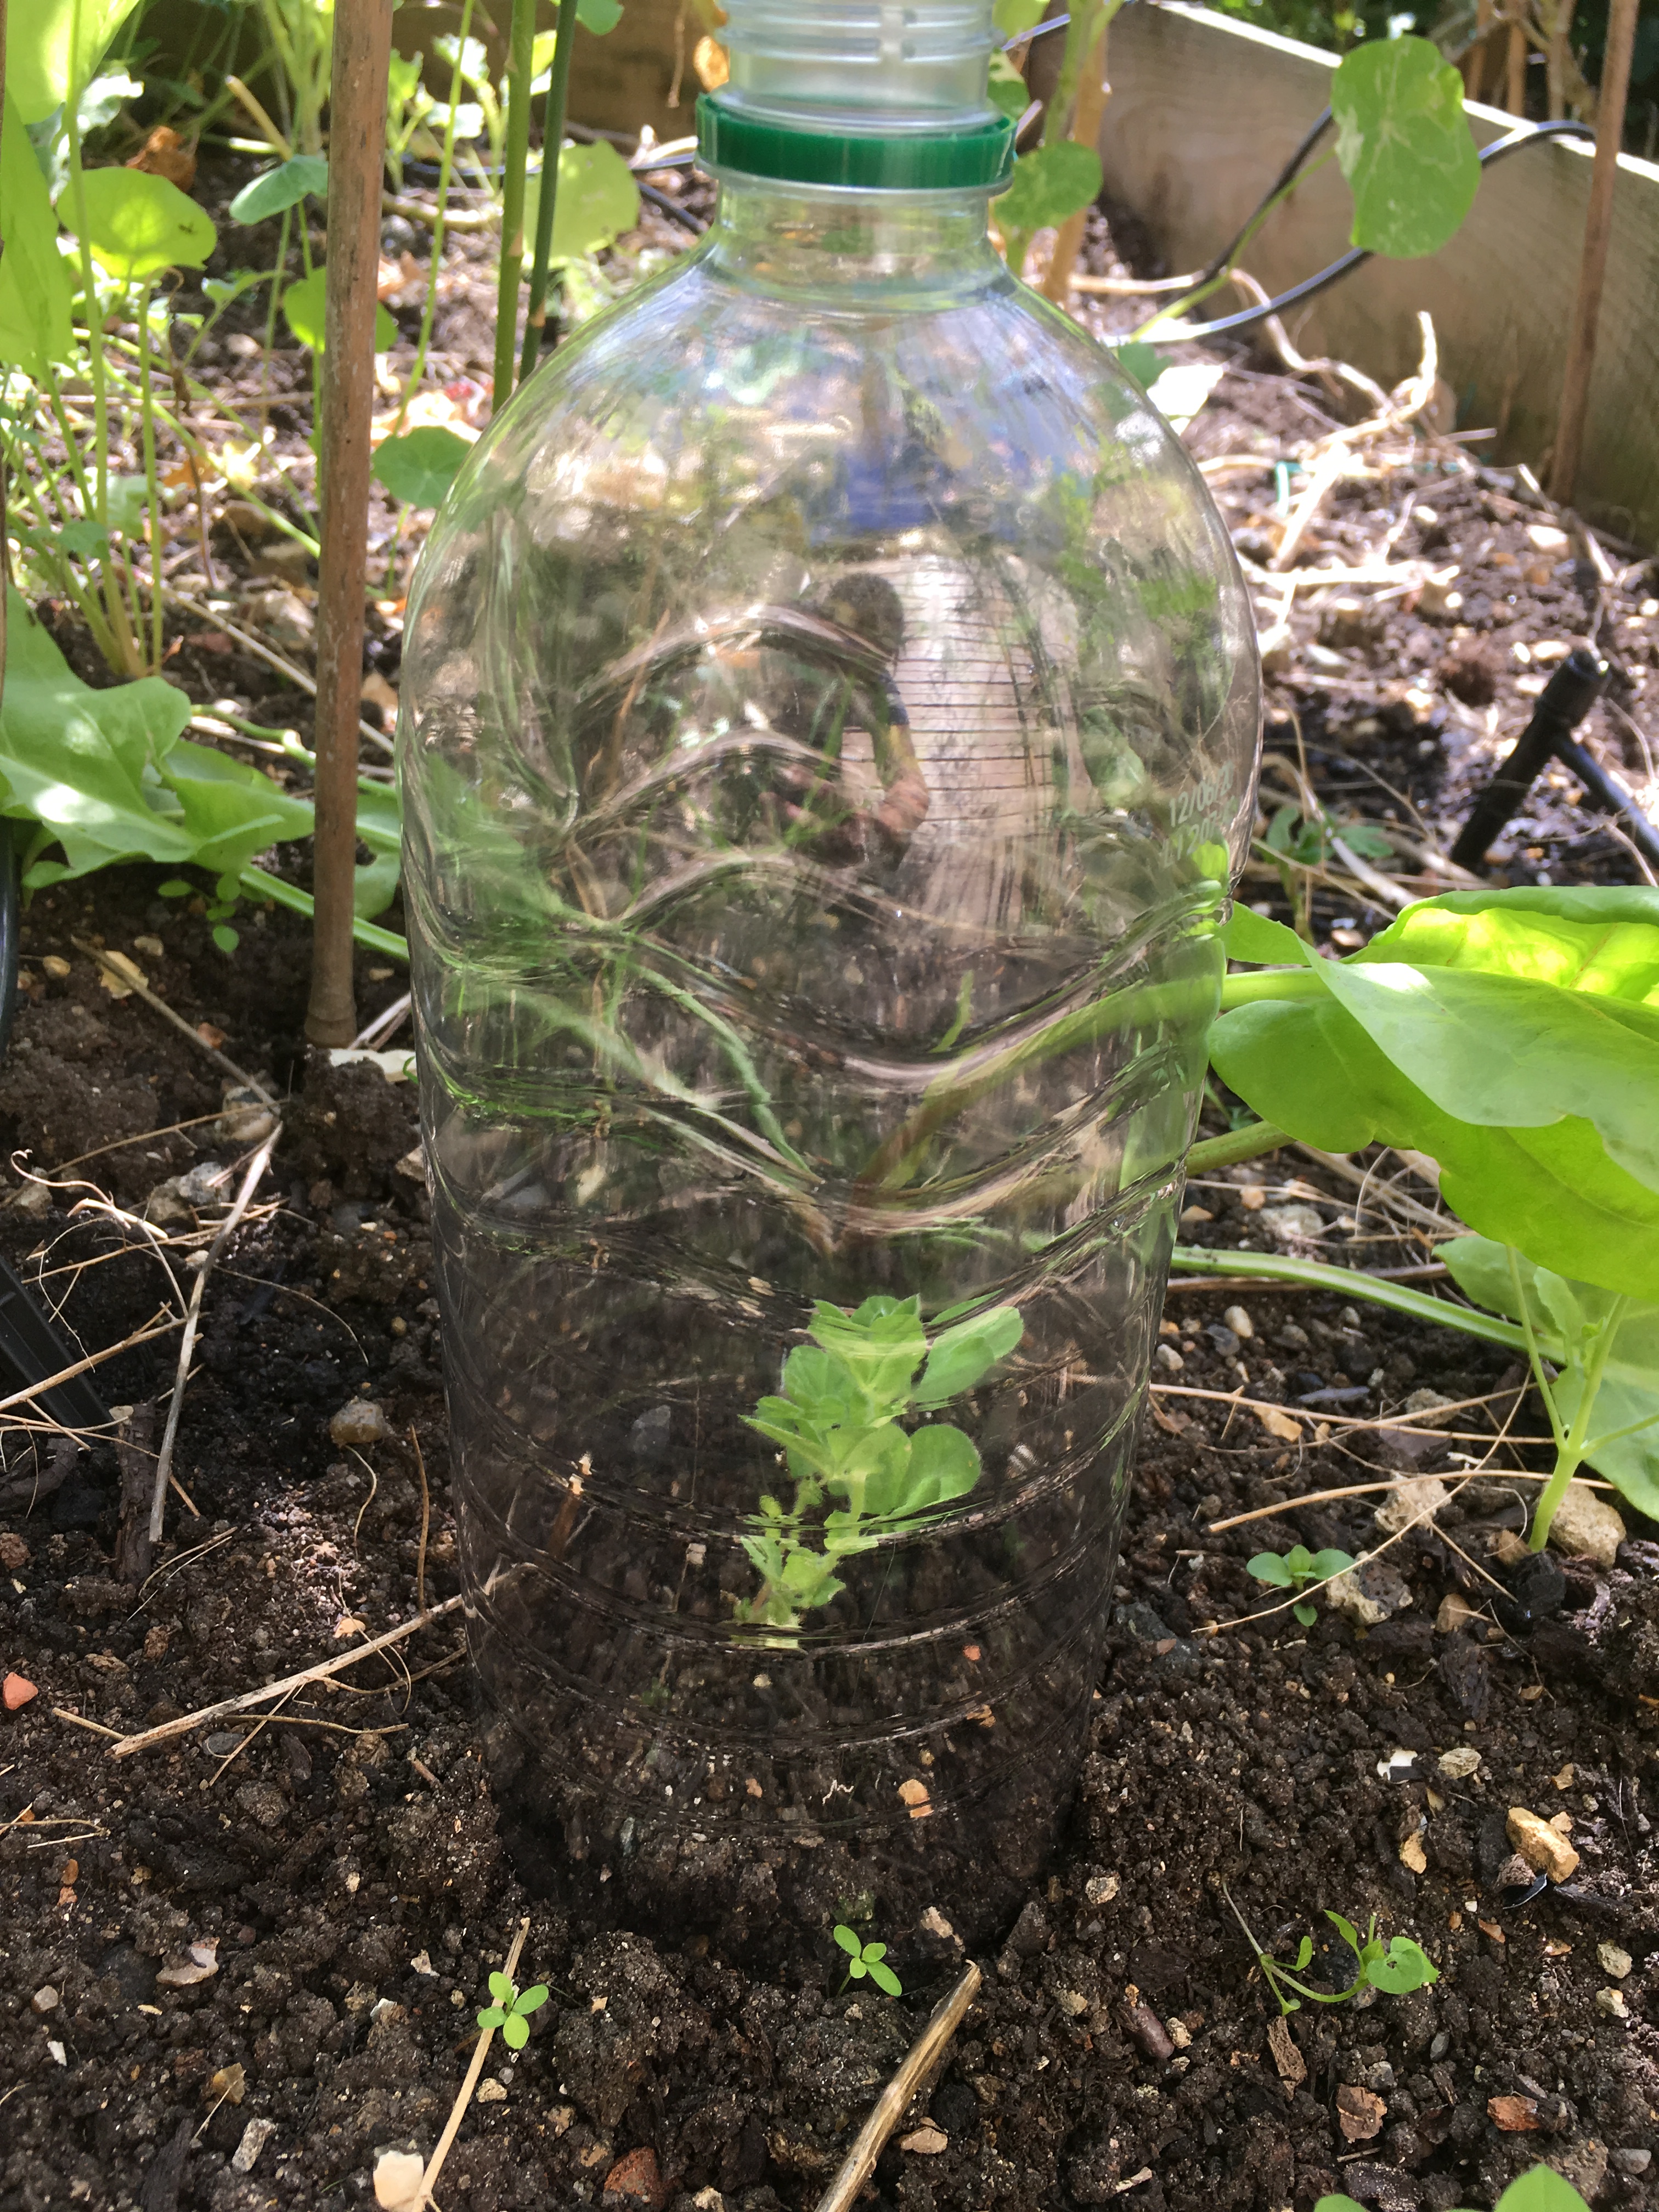
A free way to do it is to take a 2 litre drinks bottle with the cap on and pierce it as close to the top as possible and as close to the bottom as possible with a heated pin. You then fill it up and put it in your pot. The holes should both be as tiny as you can possibly manage. The water will stream out of the bottom hole and the top hole is to allow air to enter the top, otherwise the water stops exiting once the pressure becomes so low that the higher pressure in the air outside pushes back against the flow so after the bottle is about a third empty nothing more will come out.
Just an empty 2 litre bottle
Pierce a hole with a heated pin
You can see the stream on the left behind ‘you’
The stream is a little strong though, unless you can make a ridiculously smal hole. The bottle empties within 48 hours so the bottle drippers can be more effective. We rarely use these now as we have almost everything hooked up to another water source. You do also need to secure the bottle with a cane or stake of some sorts.
However you do water, please watch out for standing water
though. It will encourage mosquitos which do not make for a pleasant garden.
These three processes are connected by water. Plants need water for photosynthesis. Water is a waste product of respiration. Transpiration is a necessary movement of water to supply photosynthesis, keep the plant cool, move mineral ions and keep the plant’s shape.
Photosynthesis
This reaction is photosynthesis.
Chlorophyll is a green pigment that absorbs the light energy required for photosynthesis to occur. Therefore, any green part can photosynthesise but it happens mainly in the leaves. They have a large surface area and take in carbon dioxide through pores in the underside of the leaf called stomata (singular stoma). Water is absorbed by the roots and then transported to the leaves via vessels called xylem.
Glucose (the simple sugar that is synthesised) is then transported to all over the plant where it is needed via other vessels called phloem. Glucose can be used in respiration to provide cells with energy, or converted into starch for storage or into other organic molecules like cellulose, lipids (fats and oils) and proteins (though proteins will also need nitrogen from nitrates).
So, the requirements for photosynthesis and therefore the
creating of glucose needed for growth and respiration depends on the
availability of carbon dioxide, water and light.
Respiration
This is something that every living thing does in every single cell. It isn’t breathing. Plants can’t breathe. They have no lungs. What they do is respire, converting glucose into carbon dioxide and water with a release of energy. Creatures that do breathe do so to take in oxygen and give out carbon dioxide.
You may notice that respiration is the exact opposite of photosynthesis, except chlorophyll is not required.
This is why you shouldn’t keep plants in your bedroom at night. Like the husband, they will compete with you for oxygen. Respiration will happen constantly, but during the day the rate of photosynthesis out strips the rate of respiration, so it seems like the plant is just producing oxygen.
This energy produced is used to convert the glucose to other organic molecules and to take up mineral ions through roots. The concentration of minerals inside the plants are often higher than outside so energy is required to move against the concentration gradient. This would be like having a sink full of water with food colouring in it, putting a colander in the water and wanting the food colouring to accumulate in the colander. It’s not something that happens of its own accord.
Transpiration
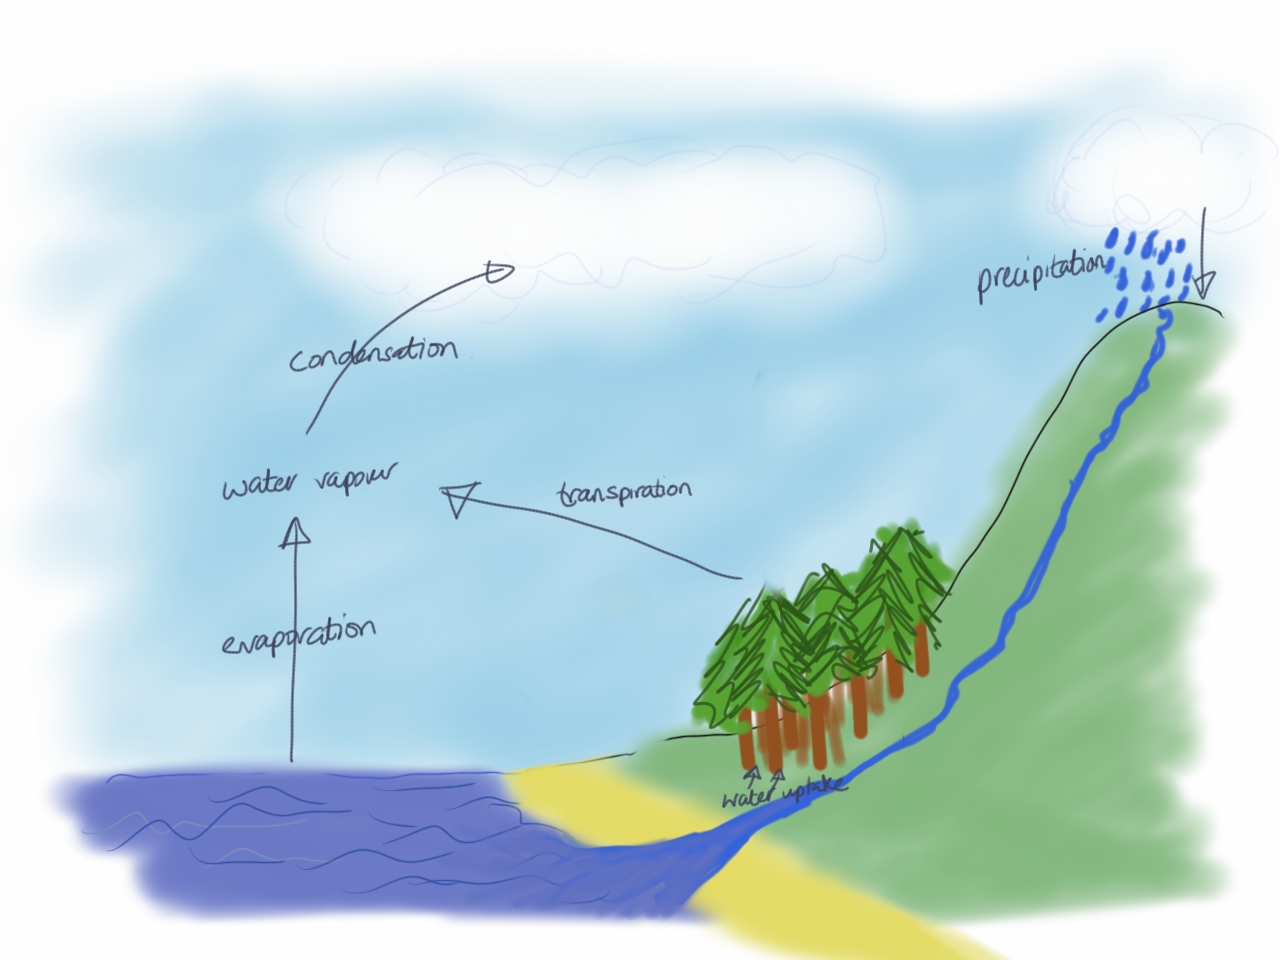
This is a simplified water cycle. It doesn’t include what happens to ground water and how it can be filtered into underground storage. Respiration will also create water vapour but it is very little in comparison to the transpiration of all plant life. It doesn’t include any ice forming or melting or how ice can form from water vapour in cold temperatures (frost).
If you’ve ever seen a water cycle you will know that water
vapour in the air increases through evaporation and through
transpiration. Water is evaporated from the leaves of all plants. The movement
of water through the plant is called the transpiration stream, which is
important for:
Supplying the leaves with water for photosynthesis
Carrying minerals ions dissolved in the water (this would be how the plant gets nitrogen in the form of nitrates to make proteins or how the plant gets magnesium which is a component of chlorophyll).
Like sweating for us, water evaporates from the leaves, cooling the plant
Water is required to keep cells of the plant turgid, which is when a plant cell is ‘full’ of water. When the cells are not turgid the plant loses structure. This would be why your basil goes floppy when it’s lacking in water, but goes all rigid again after you’ve given it a drink.
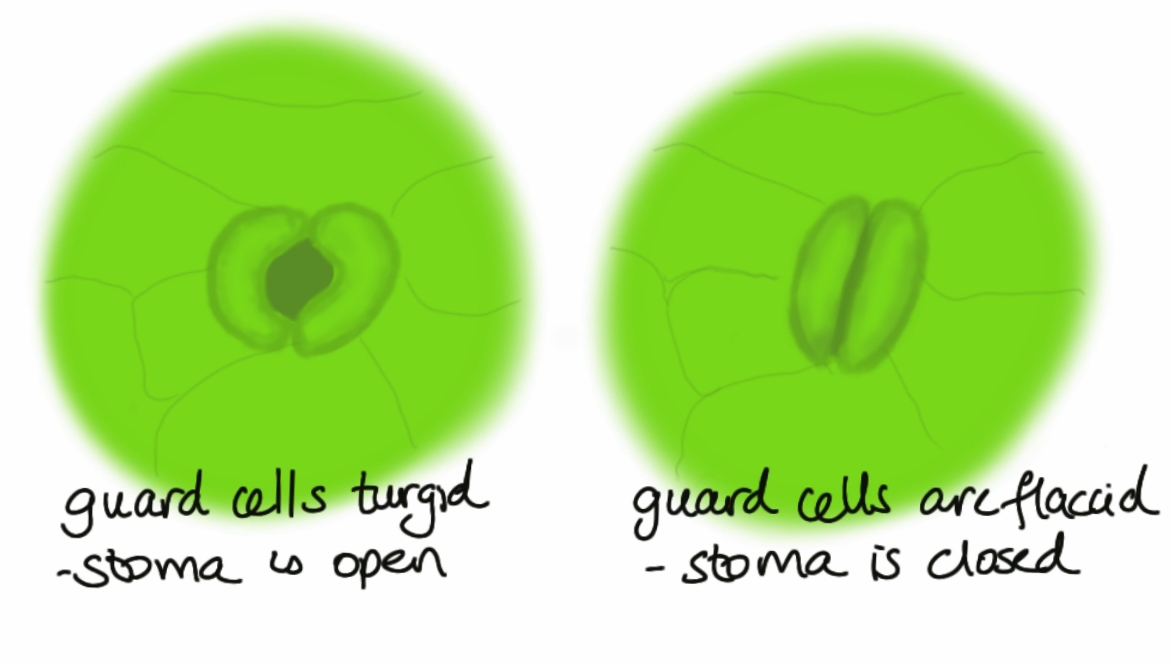
The water, absorbed by the roots, carried by the xylem will
evaporate out of the stomata. The stomata are opened and closed by banana
shaped cells called guard cells. When the guard cells are turgid, the stomata
open. They lose turgidity with lack of water or in the dark. A plant cannot
photosynthesise without water or without light so the stomata should close to
avoid loss of water through transpiration.
In summer when the sun shines the brightest and the weather is warmest photosynthesis happens at a quick rate and therefore so does growth. This means that the limiting factor will be water. So, water, or the lack of it, will control how fast your plants grow. It’s like having a load of baking ingredients and wanting to bake as many cakes as possible. If you only have 2 eggs and each cake needs 2 eggs then the number of eggs you have limit how many cakes you can bake. If you then buy a tray of 30 eggs you’ll find that there’ll be another ingredient that will limit how many cakes you can make. Similarly, once the plant has enough water to ‘keep up’ with the sunlight provided, adding more water won’t increase growth. Maybe something like amount of chlorophyll becomes the limiting factor.
Also in summer, plants will transpire more in order to stay cool and just by having the stomata open for photosynthesis there will be loss of water out of these pores.
When those heatwaves hit you need to make sure your plants have a suitable source of water not just to avoid plant-acide to also to take advantage of the supply of sunlight to give lots of fantastic growth.
If you’ve been on this blog before, you would have realised that I have a passion for growing food. This passion is partly fuelled by environmental concerns and this concern is partly fuelled by a love of science. I say partly because there are other reasons for growing food and other reasons to worry about the environment, but those discussions are for another time.
For now, let’s just say I love science. I love figuring out how stuff works. In another life I was supposed to be a secondary school Chemistry teacher, which basically means teaching all three sciences these days. There are loads of topics in GCSE Chemistry, Biology and Physics that are connected to gardening and/or can inform on how our lifestyles impact the environment.
Through the next year I’ll add relevant topics to explain why plants need water and other nutrients, how inheritance works and even things like pH (how acidic or alkaline something is). I’ll highlight some of less obvious problems. For example, most gardeners are aware of why pesticides are bad, due to food chains and webs, but not that many understand the problems of fertilisers. The immense amount of energy required to manufacture the fertilisers is often overlooked. If fossil fuels are burnt to make this energy then we have the release of carbon dioxide (greenhouse gas), carbon monoxide (toxic gas) and sulphur dioxide (creates acid rain). In addition, in order for the fertilisers to be taken up by the plant they need to be soluble (can dissolve) in water. If they’re soluble then they can be washed away by the rain/watering. The excess fertilisers can be disastrous for some ecosystems.
All of the topics will be GCSE level so you might know it all already, or maybe you learnt it all so long ago that you’ve forgotten it, or even, like some of the teenagers I tutor, you once crammed for the exams and by the time you collected your results all that info was deemed unnecessary and erased from your consciousness. So I’ll use the proper terms for things but explain them as I go. I can only apologise if this leads to over explaining things that you already know or if it seems a bit condescending.
I’ll try and keep them relevant to other posts but if you have any topics you think I should do, please feel free to let me know.
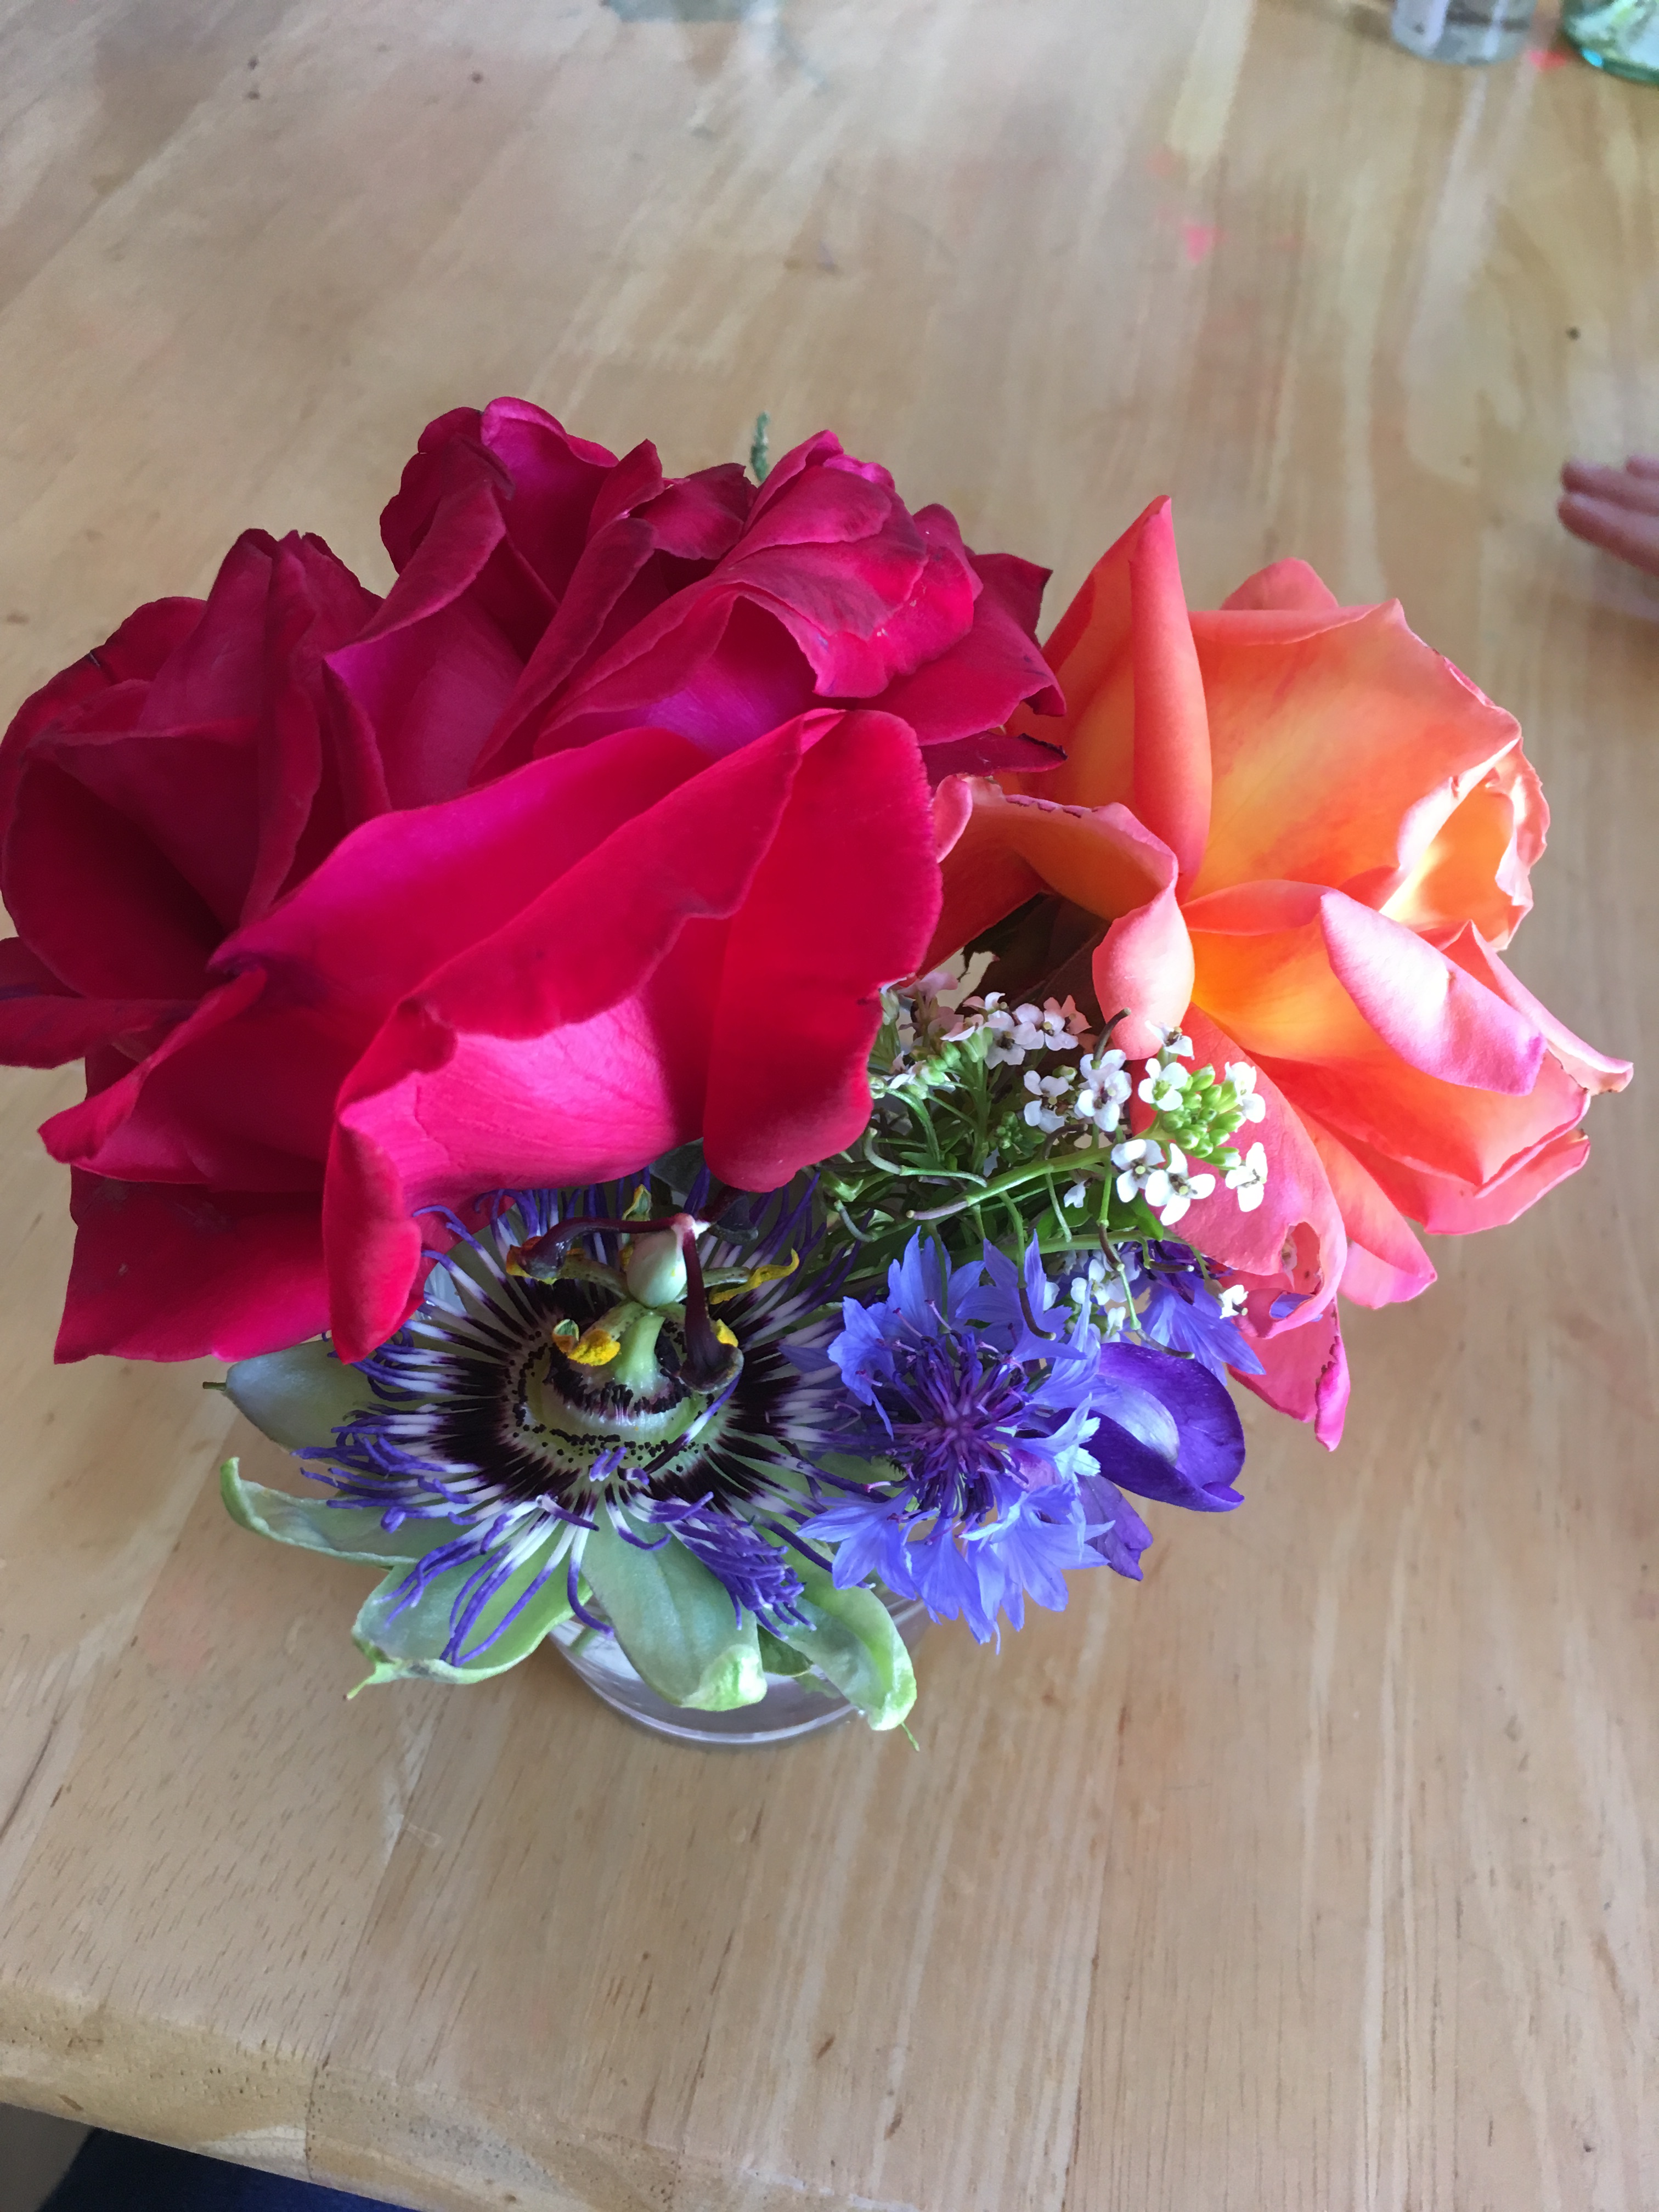
Pick them, eat them, press them and bathe in them. It’s safer to do all these things with edible flowers to avoid poisoning or dermatitis. Beware of even the ubiquitous daffodils!
Pick them
The harder thing is stopping my 3 year old from picking them. We’ve made it a blanket rule that she can’t pick flowers beyond our garden without checking with me first. This is both out of common courtesy and for safety. Please be warned that there are many common flowers that are poisonous or have noxious chemicals. Bluebells, snowdrops, hyacinths, crocus and daffodils are flowers often seen in gardens, but they all contain toxins. When we first moved into our house my little one took a shine to the daffodils. I didn’t think anything of letting her pick and play with them – like I did as a child in my own parents’ garden. She developed a rash where she had rubbed it on her skin. After a bit of research I found that daffodils have calcium oxalate crystals in their sap which irritate the skin – something well known to daffodil pickers and florists. We grow all flowers that are safe to touch. The next challenge was to teach her which of the flowers would turn into fruit and was therefore off limits.
We pretty much
continually have a glass on the kitchen table that has the kid’s latest
pickings. It’s good for her to get to know the local flora and she likes the
colours and smells and textures. She has also learnt to exercise caution as
even edible flowers, like borage and roses, can have defence mechanisms like
little prickles and thorns.
Eat them!
Artichokes
Borage – taste a bit like cucumber raw
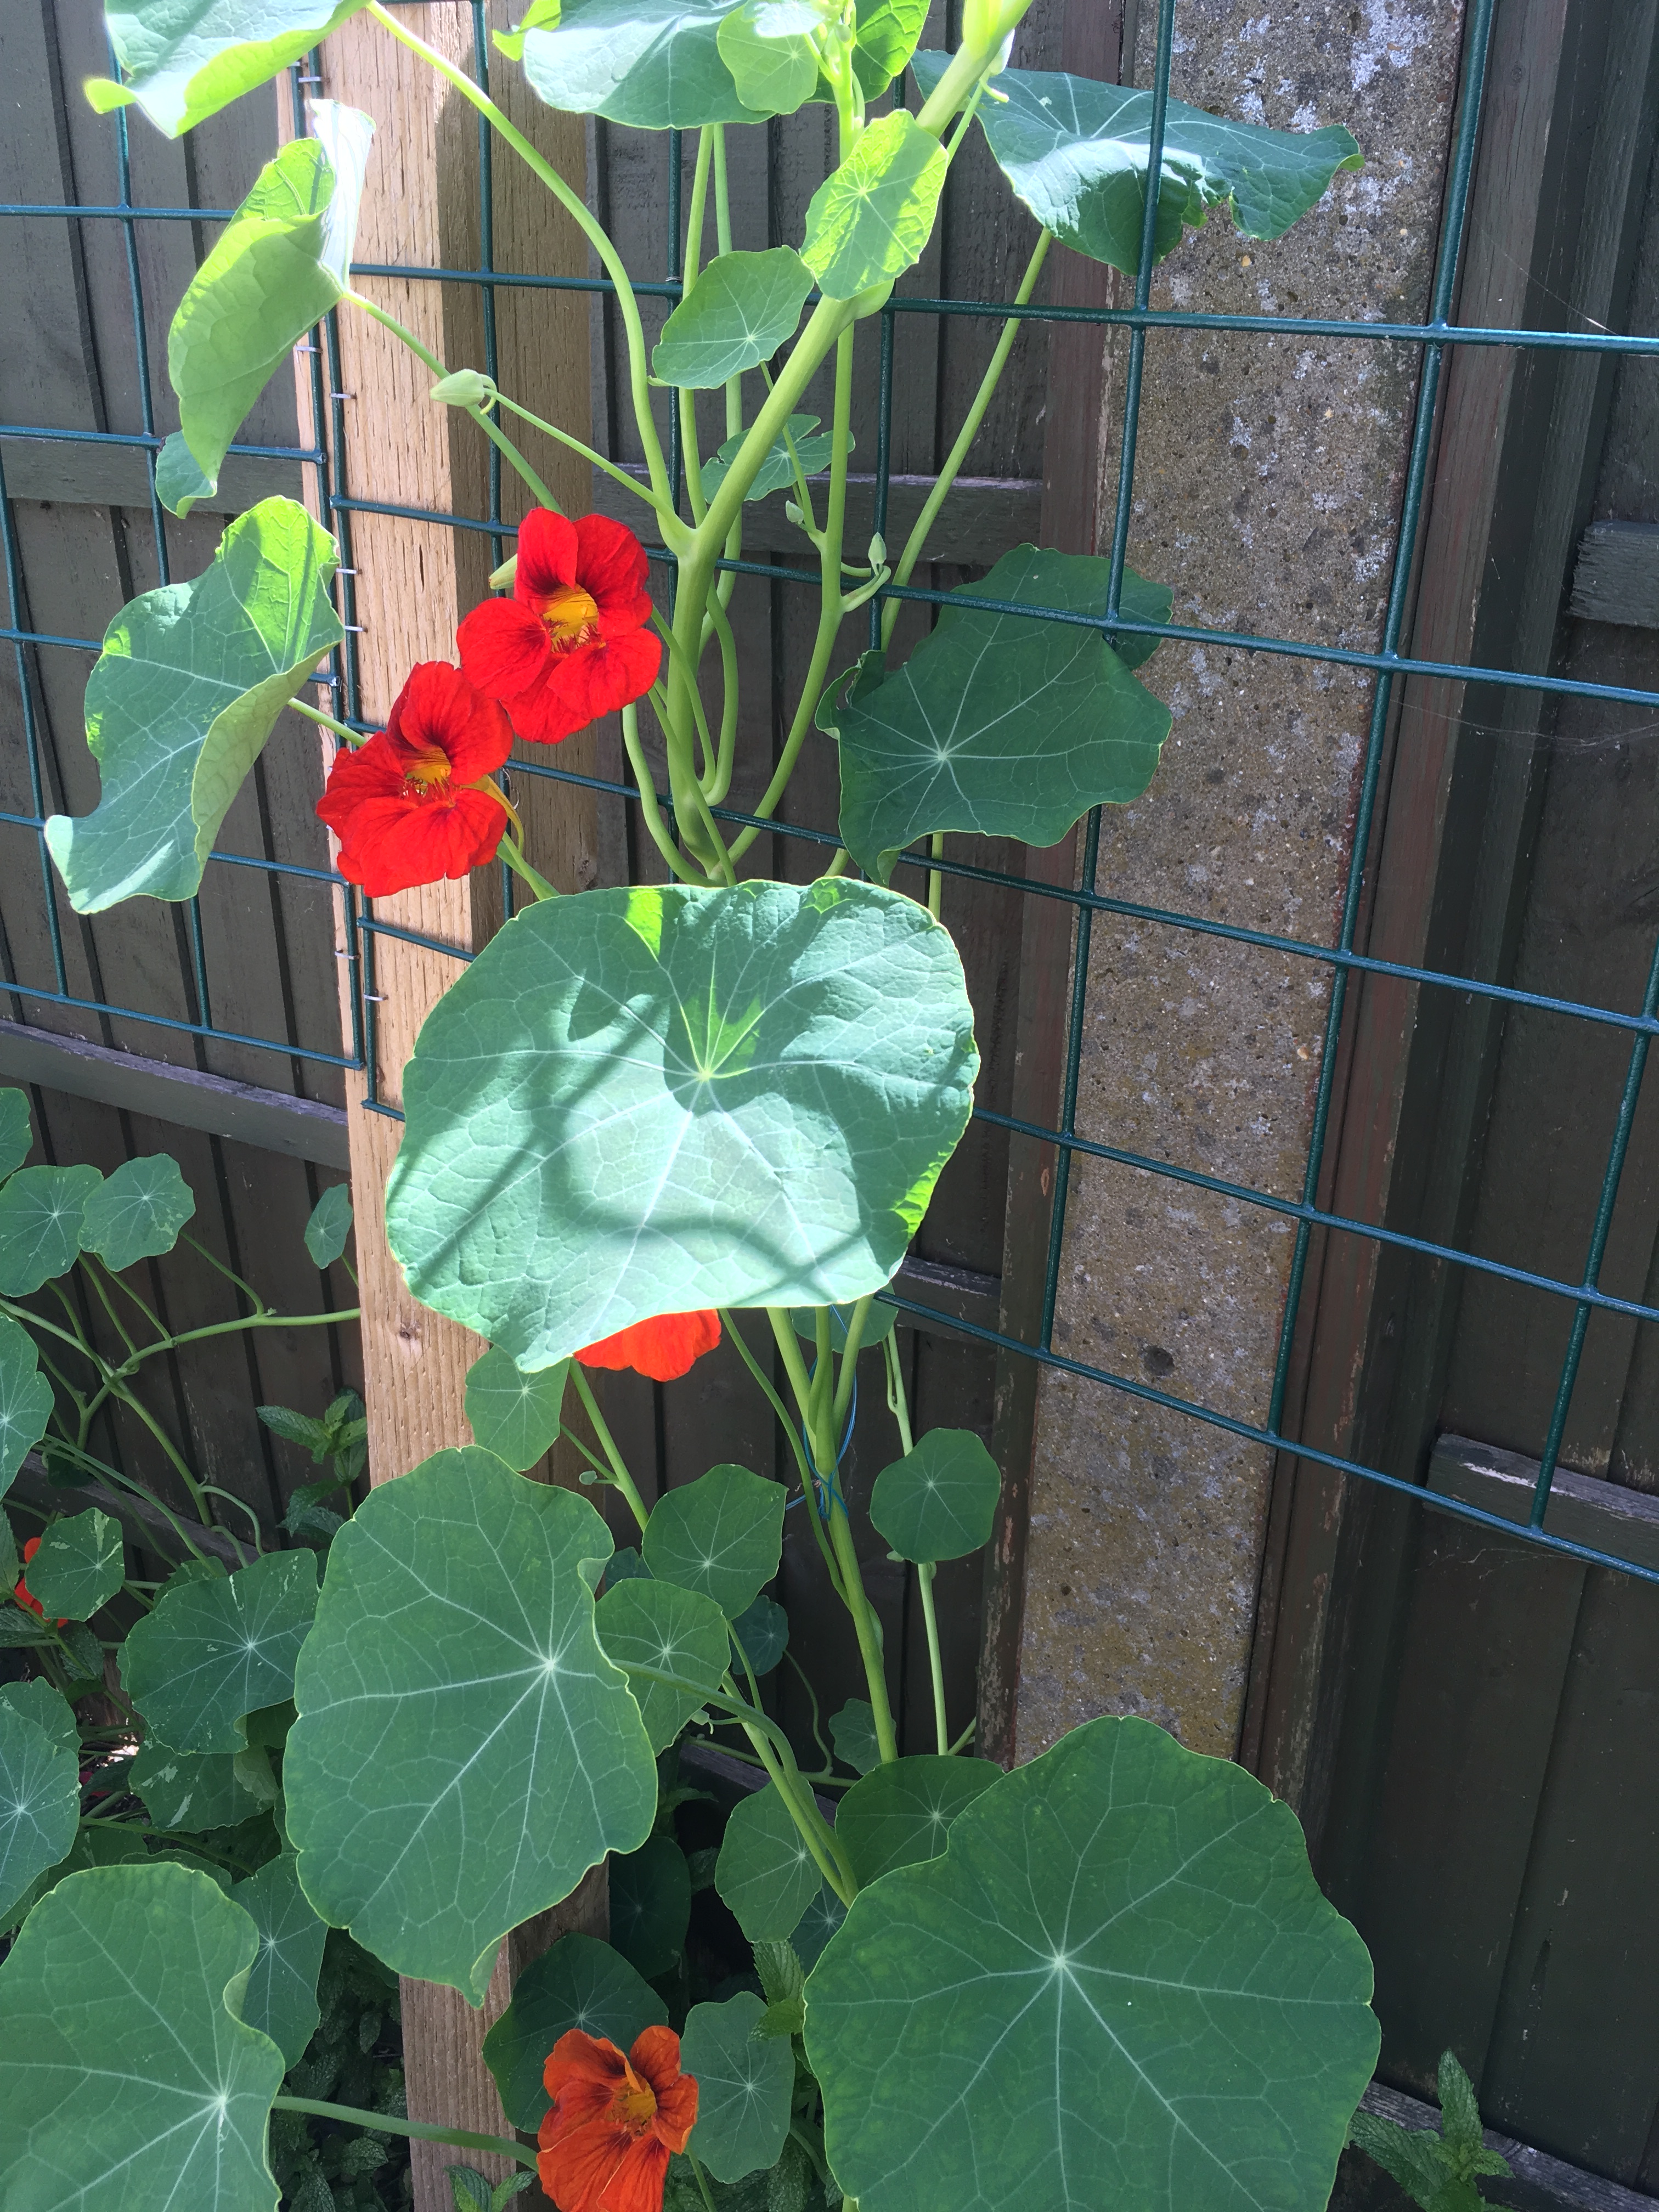
Nasturtiums are quite spicy
Winter purslane eating is very much encouraged
Apple flowers are off limits
It took a while to ensure that she only picks the safe things to graze on. Whilst we grow mostly edibles (we have grown sweet peas on the roof out of her reach and we also grow star jasmine – both for the fragrance) it’s worth nothing that edibles like tomatoes and potatoes have poisonous leaves, passiflora caerulea does have edible fruit, but the leaves, flowers and unripe fruit are poisonous, and asparagus has poisonous berries.
She loves the flowers from borage, winter purslane, mint, dill and basil, though to be honest these last 2 barely make it to flower as she also loves eating the leaves. With nasturtiums she will pinch off the nectar containing cone to suck. She’s not keen on the cornflowers, calendula, watercress, coriander or brassica flowers when they grow. She loves the artichokes and chard flowers when cooked. This is the first year that we’re trying to grow violets, red clover, daisies, chamomile and bellflower in the lawn. I’ll have to let you know how they fare and how tasty they are (or aren’t).
In addition to education on what is edible, it’s important that they learn that flowers may sometimes be covered in pesticides so they cannot go around eating flowers outside your own home environment.
It sounds like the risk isn’t worth it but any adult who forages had to start learning it at some point. I believe it’s important for our kids (and everyone) to make the connection between what they eat and how it’s produced. With our little one sometimes she eats enough borage and winter purslane flowers (and leaves) that I don’t have to worry about her vegetable intake.
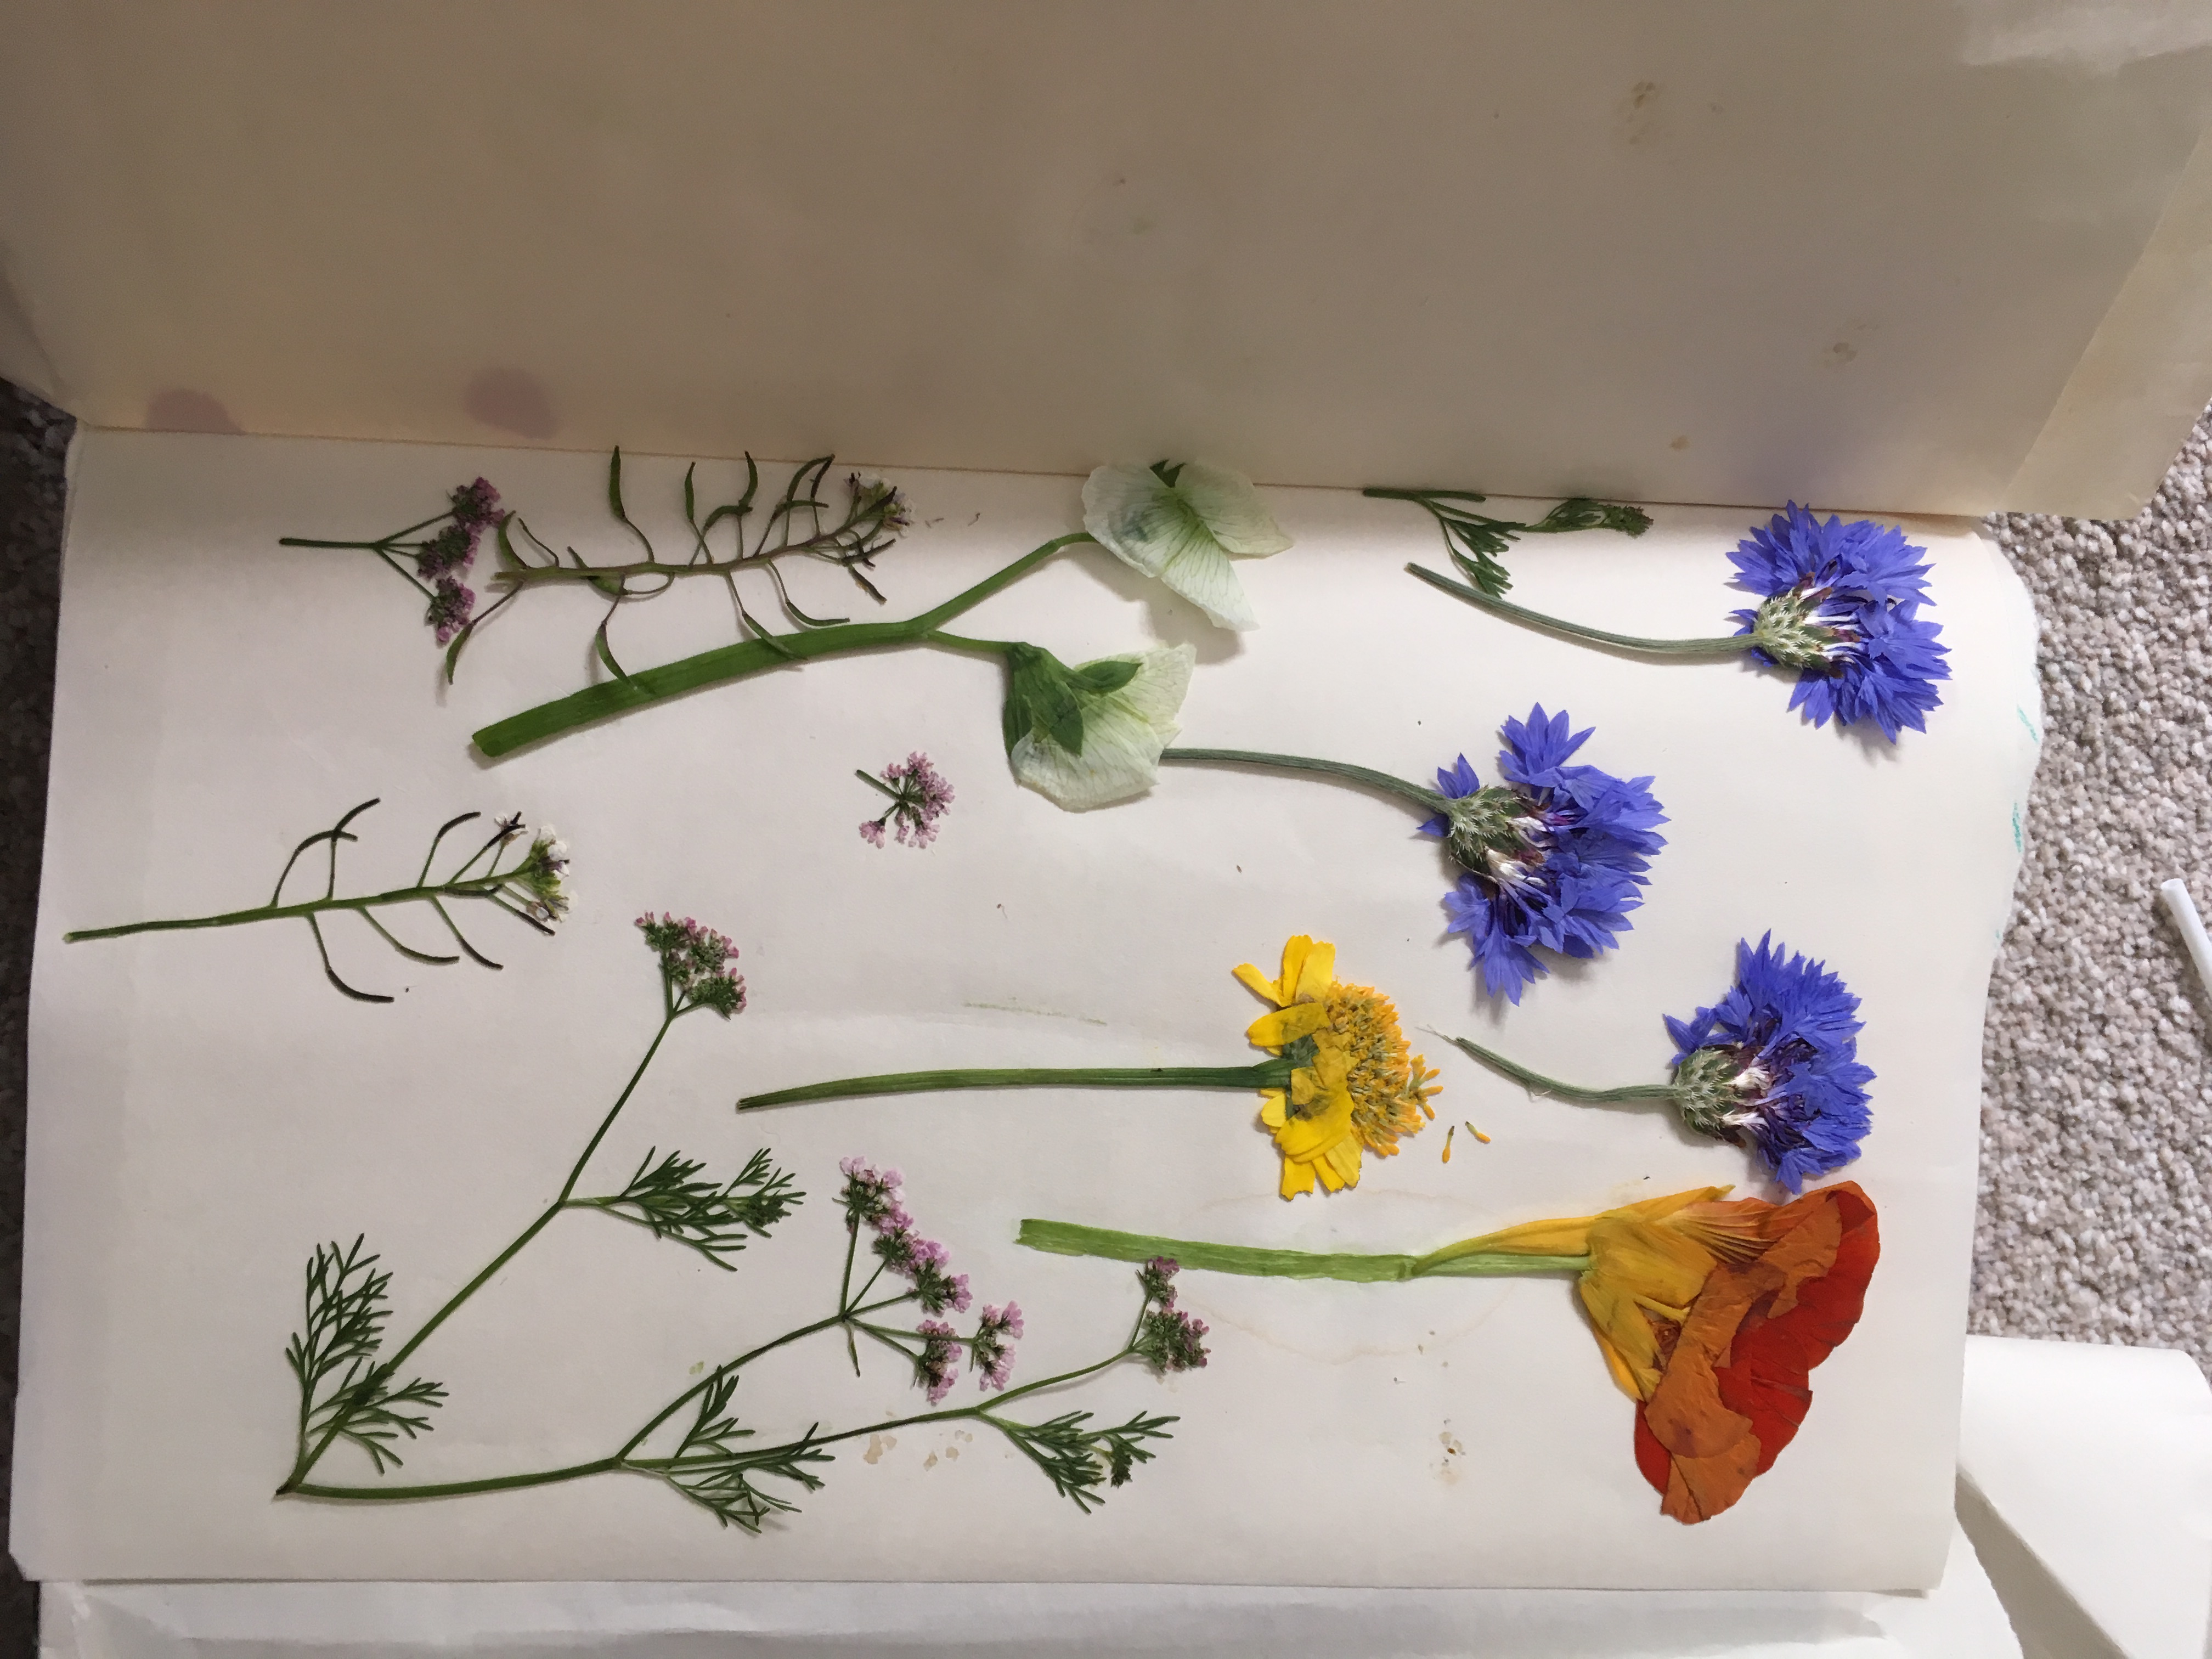
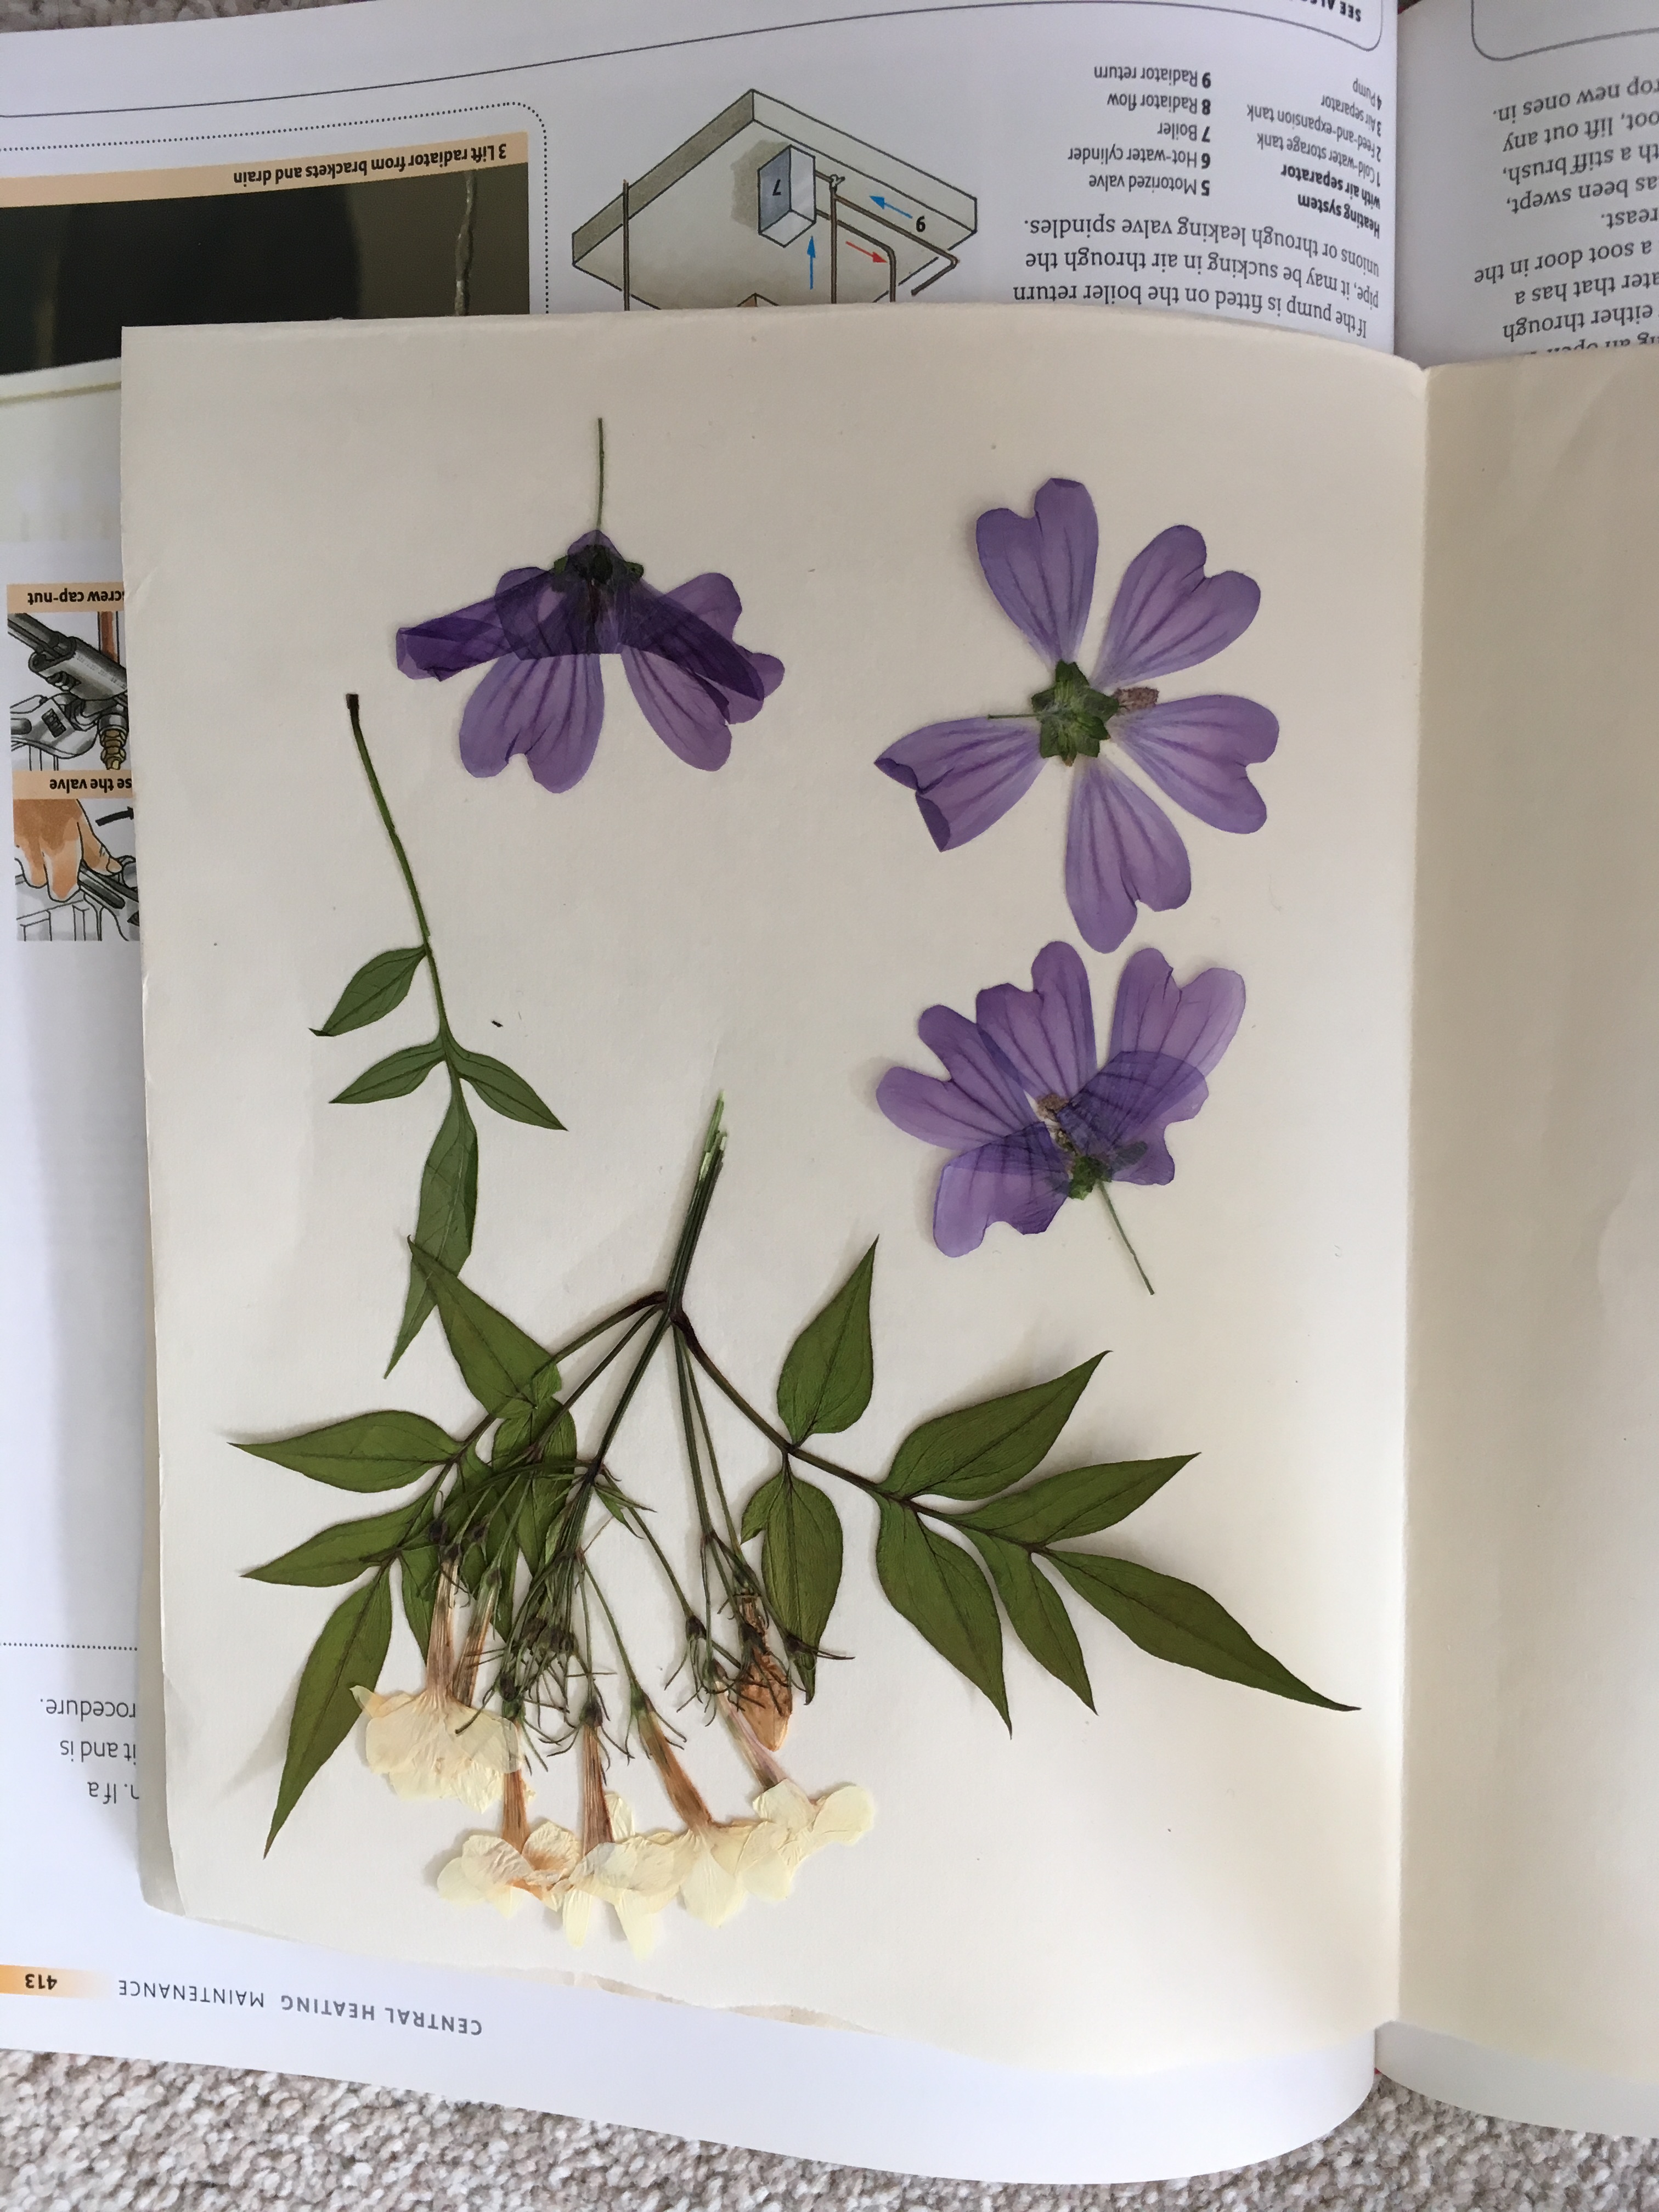
Press them
This was something we did as kids. Life is very different these days. Our kids are initiated into technology so early. I won’t lie (please don’t judge me), my one was already tapping away on my phone by her 3rd birthday. So, it’s nice to do activities with her that I did during my own childhood. You just need to arrange them between pieces of paper (something that is a little absorbent is best), enclose that in a heavy book, stack more books on top and leave for about 2 weeks.
Place some absorbent paper in the pages of a heavy book
Lay your flowers down
Add a weight. A small child is less reliable than a stack of other heavy books
After a week or so they look like this…
…or this
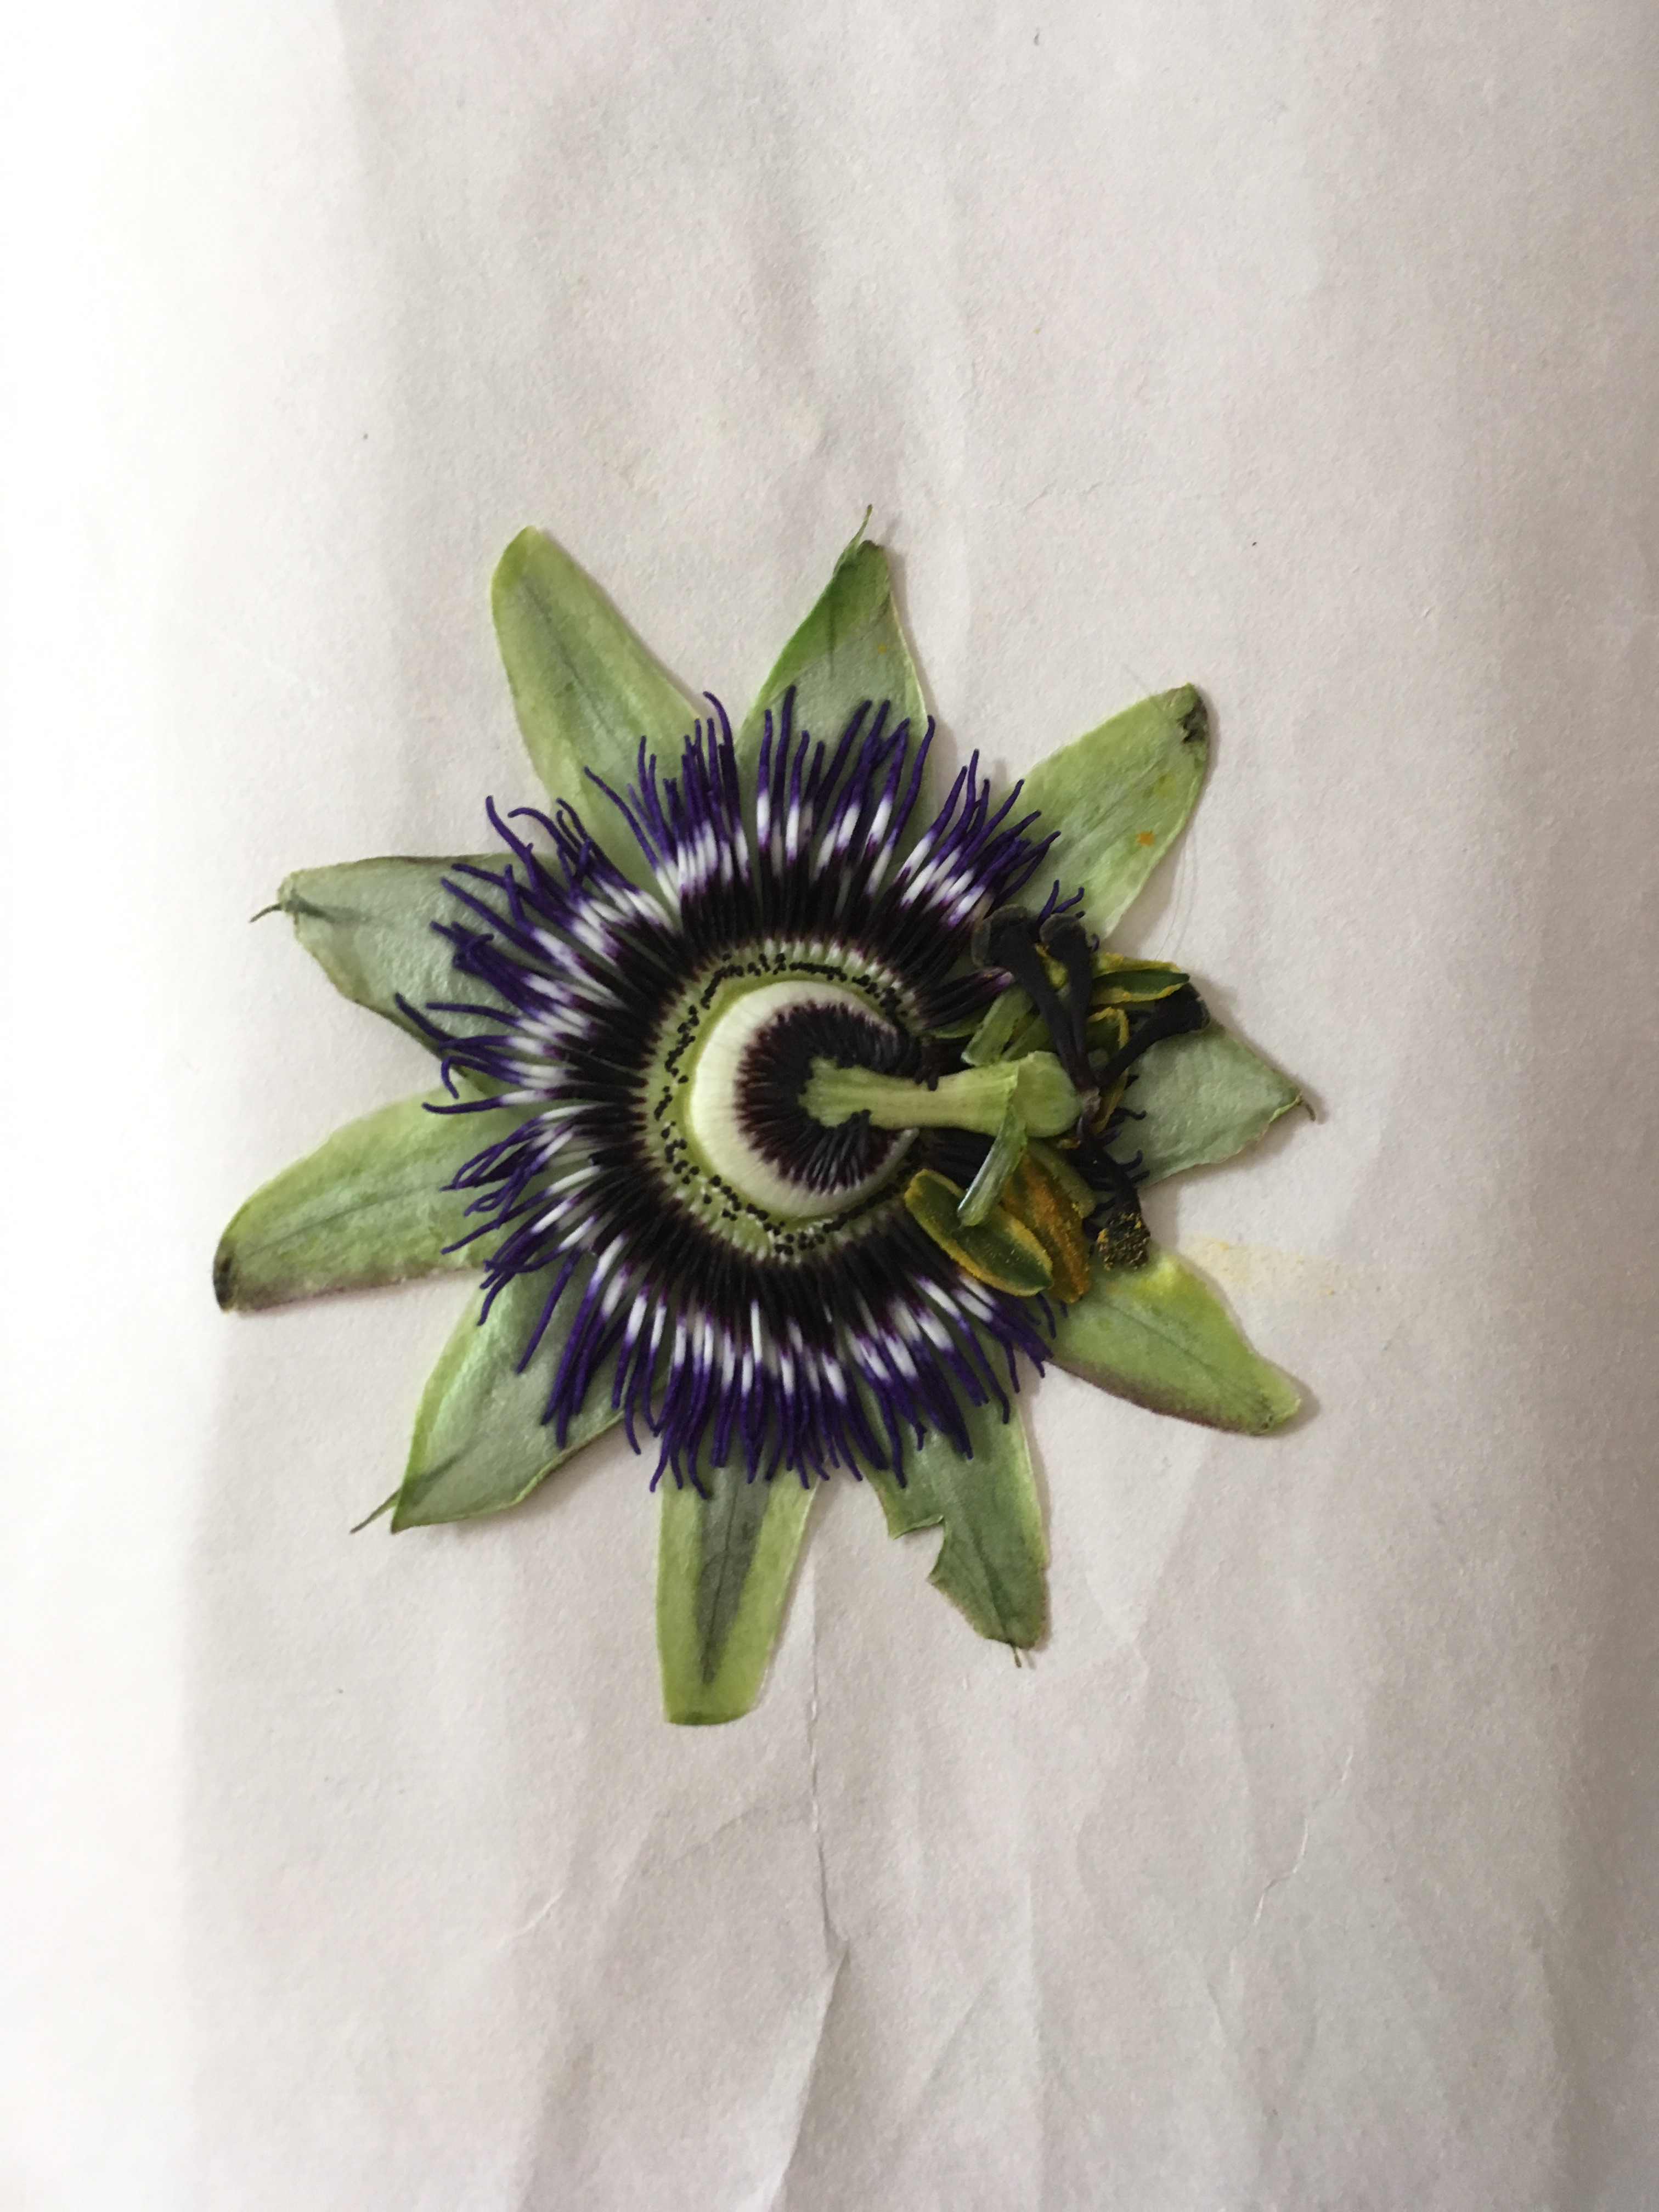
Fleshy flowers like passion flower will need about 2 weeks minimum.
Little one loves to make cards
This was for my birthday.
Bathe in them
My little one has eczema that stems from allergies. This means a bath every night in plain old water with a soap substitute but sometimes to make it interesting we’ll throw in something from the garden. There are plenty of things that look and/or smell good. Here’s where you must do a bit of research and exercise caution (see details about daffodils above). Generally, we follow the rule, if you can eat it, you can probably bathe in it and don’t go overboard. If unsure put a bloom or two in for the first bath. Excess may cause issues (like a bath with half of my mint patch would certainly cause eye irritation, if not skin irritation) and besides I’d like to keep some of my flowers in the garden.
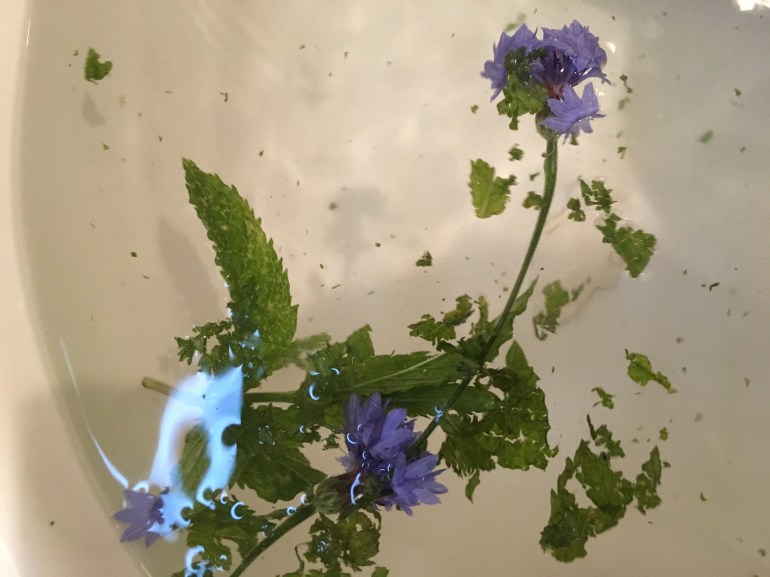
Cornflowers and mint
calendula and mint
rose and rosemary
lavender with a couple of drops of food colouring.
A strainer like this…
… will keep your pipes from getting clogged
Bee Happy
So as a last thing, it’s quite nice for our little one to get to know about bees, how amazing they are and how much we rely on them for pollination. She’s learnt not to harm them or be scared of them and she’s rather fond of them.
bumble bee visiting our lavender
don’t worry… not actually a hornet… it’s a hornet mimic hoverfly which is another pollinator
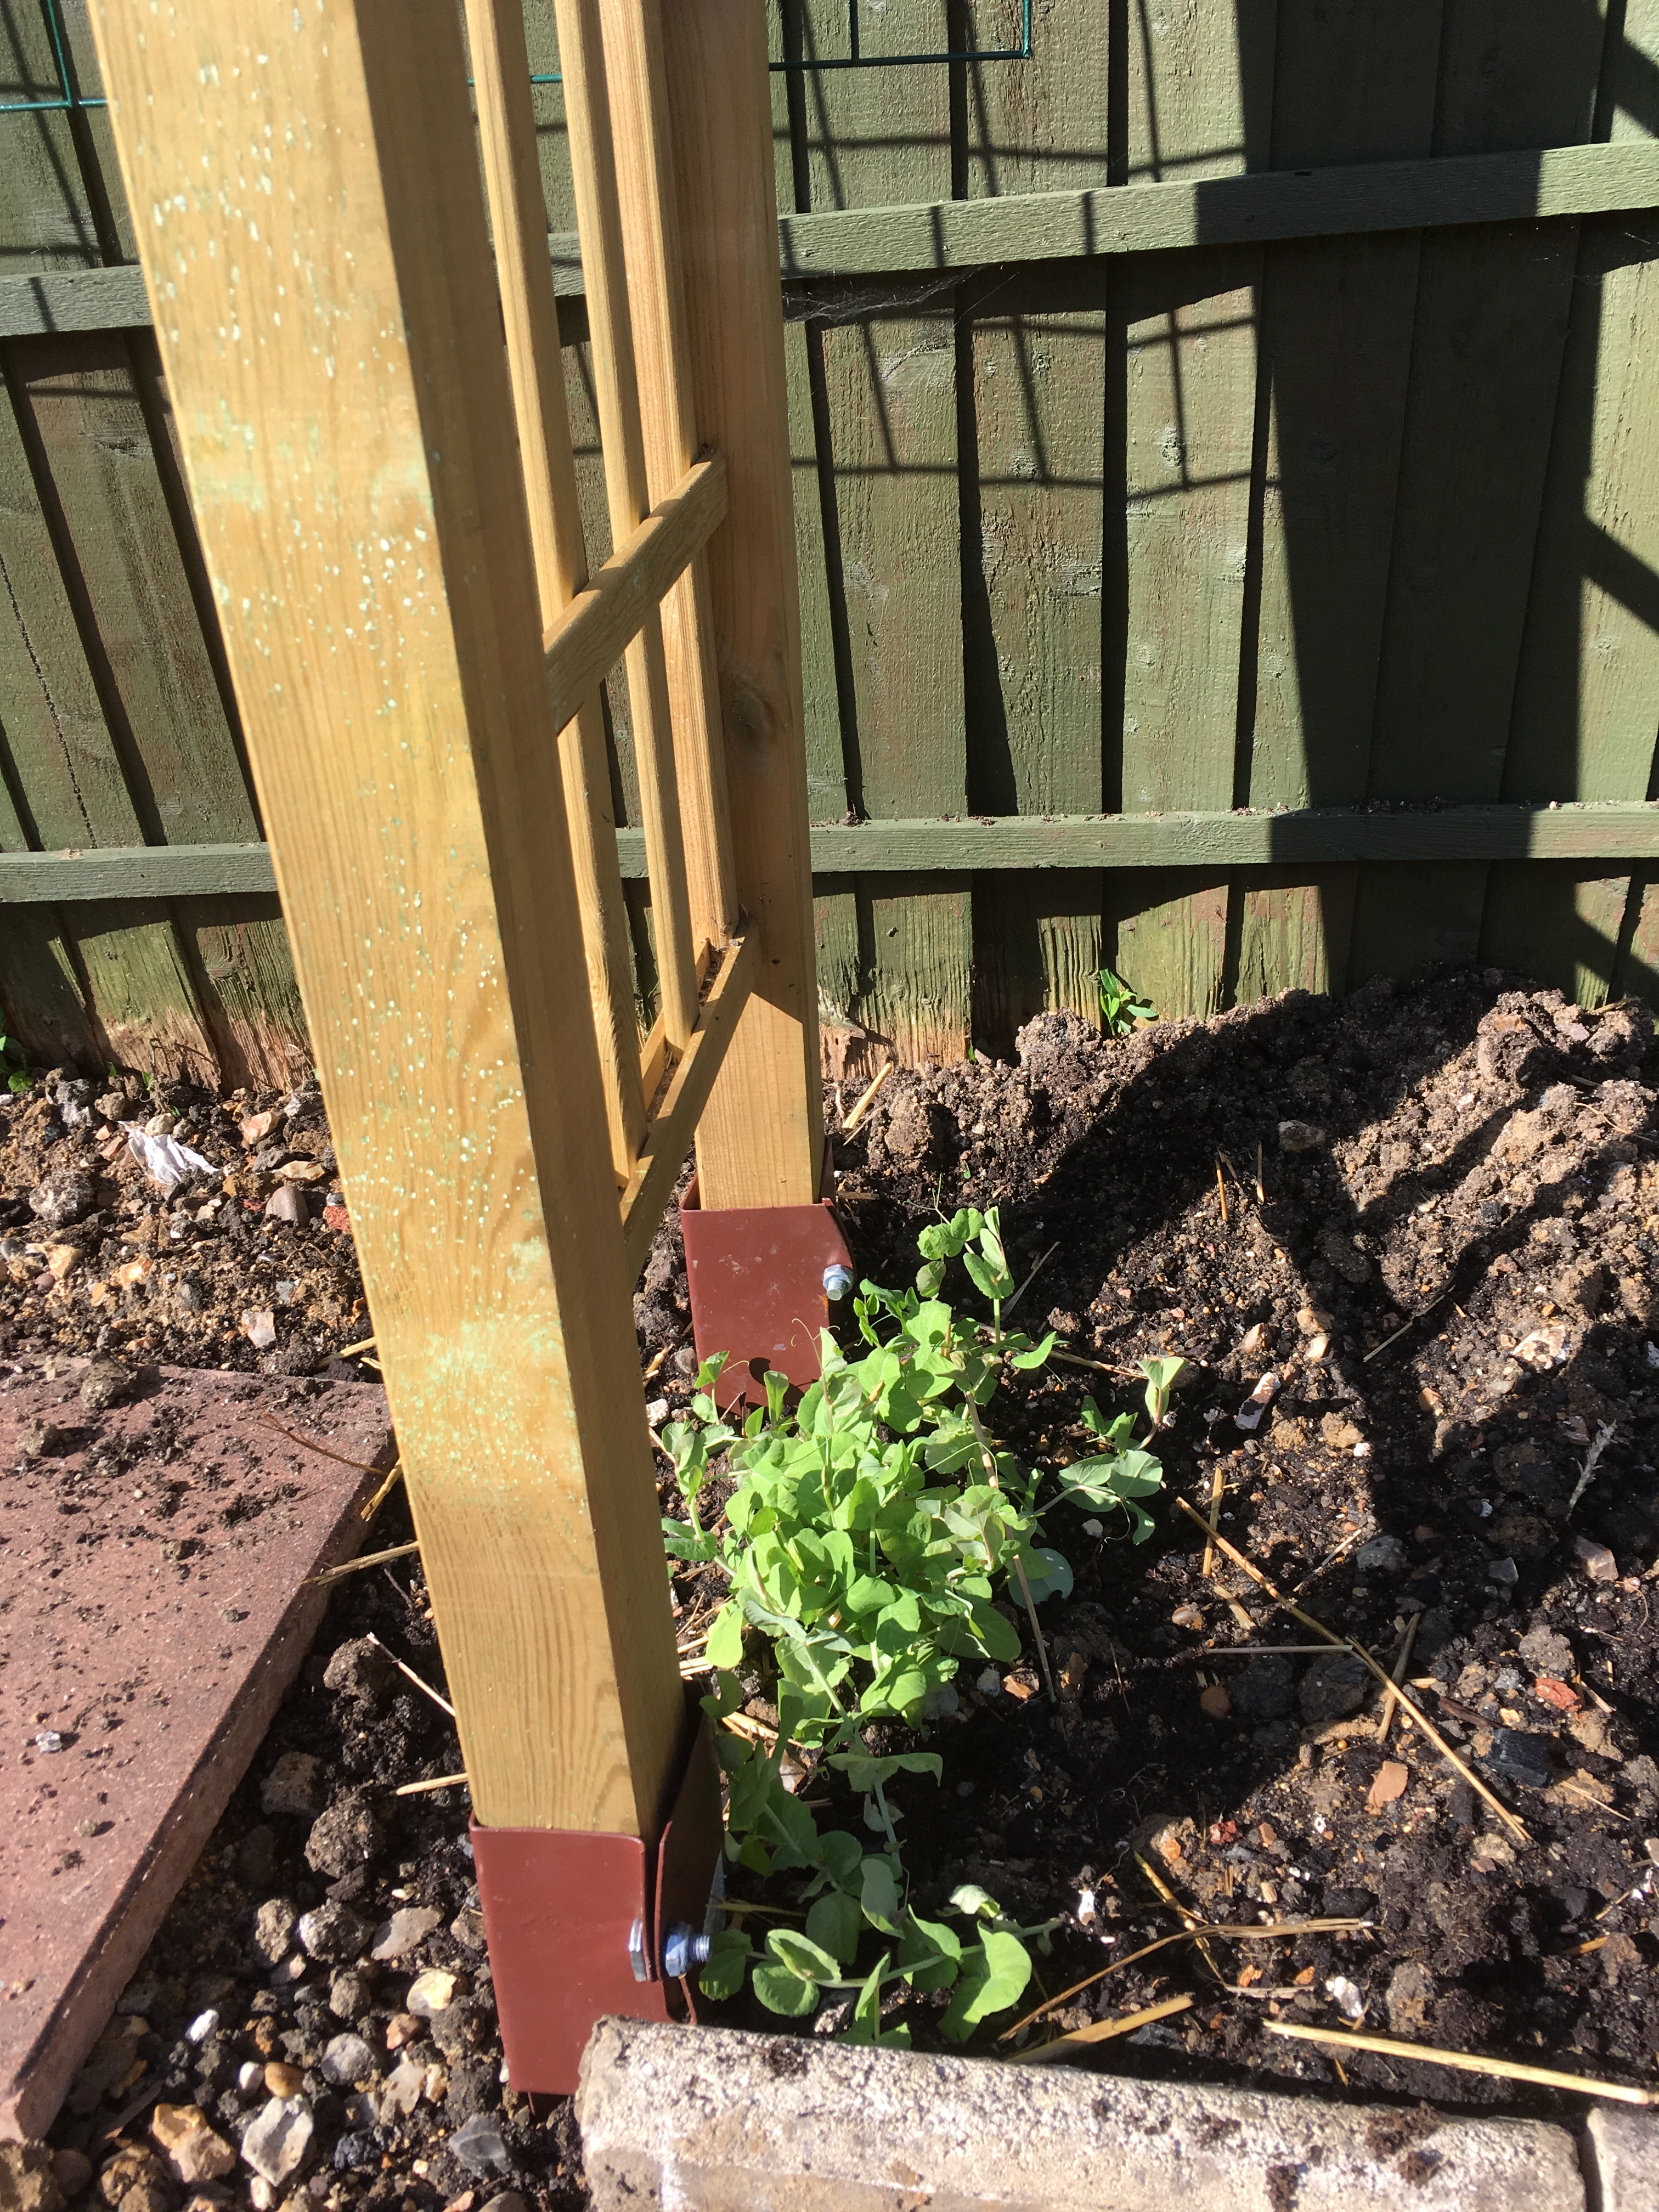
As legumes they are a good crop to plant before
brassicas in crop rotation. They can be sown generally March to July in
successional sowings to provide a long and bountiful harvest. Depending on the
variety they do well in part shade to full sun but with support can grow to
around 6ft in order to reach extra sunlight. This height makes them an
efficient use of space in small gardens.
Legume family
Most of the legumes are pod producing plants that harbour nitrogen fixing bacteria in nodes in their roots. These bacteria convert nitrogen into nitrates, which is the form necessary for assimilation of nitrogen into plants. Nitrogen is a necessary component of protein molecules which, I assume, is why peas and beans are a good source of vegetable protein. It has been said that legumes are good for crop rotation due to these high levels of nitrates. However, most of the nitrogen will be in the plant structure so in order to benefit from this, after the plants have finished producing, they should be chopped down and buried back within the soil to decompose.
I am often enthusiastically recommending growing peas and beans to any poor soul who stumbles across my path. There are several reasons:
They’re productive and tasty
You need to pick varieties that you like, though the catch 22
is, how would you know if you like them until you’ve grown them and eaten them?
Please excuse the round courgette plonked on top. This is one day’s harvest from about 15 plants. At this peak time we were collecting this amount every other day.
Out of the beans I would recommend ones with edible pods, like runner beans and French beans. The long pods, especially runner beans, means that each pod provides a larger amount of food in the growing space and for your effort. I’ve grown a few varieties of runner beans and they generally taste the same so I would just say find a string less one and if unsure if a pod is ready, pick the pods early as opposed to late. Picked early they’re sweet and tender but you may not be getting as much food out of it as you potentially could have. Picked too late the pods are fibrous and the beans are floury, and therefore, worthless. I think there’s more of a variety in taste in French beans and I would recommend ‘Blue Lake.’ If anyone has any varieties (for any legumes) they’d recommend, feel free to drop them in the comments. Reviews are always appreciated.
As much as I like shelled peas, if you’re looking to get as
much food, as easily as possible then sugar snap peas are the way forward.
Mangetout are not bad for more food per pod, but they go very quickly from too small
to too chubby with tasteless peas and fibrous shells. Sugar snaps still have tasty
peas when the pods are ready to burst. The case may be a bit tough, but then they
become no different to shelled peas.
If you want extra food out of your peas, the young shoots and
leaves (the much paler green ones) are tasty in salads and stir fries.
They’re good for vertical gardening
You will get a decently long harvest from both beans and peas if you keep picking the pods. Once a plant has some fully developed seeds it’s happy to give up the ghost. They can also be planted in succession to provide food for longer, but I think this is something for people with a large garden or those that are well organised.
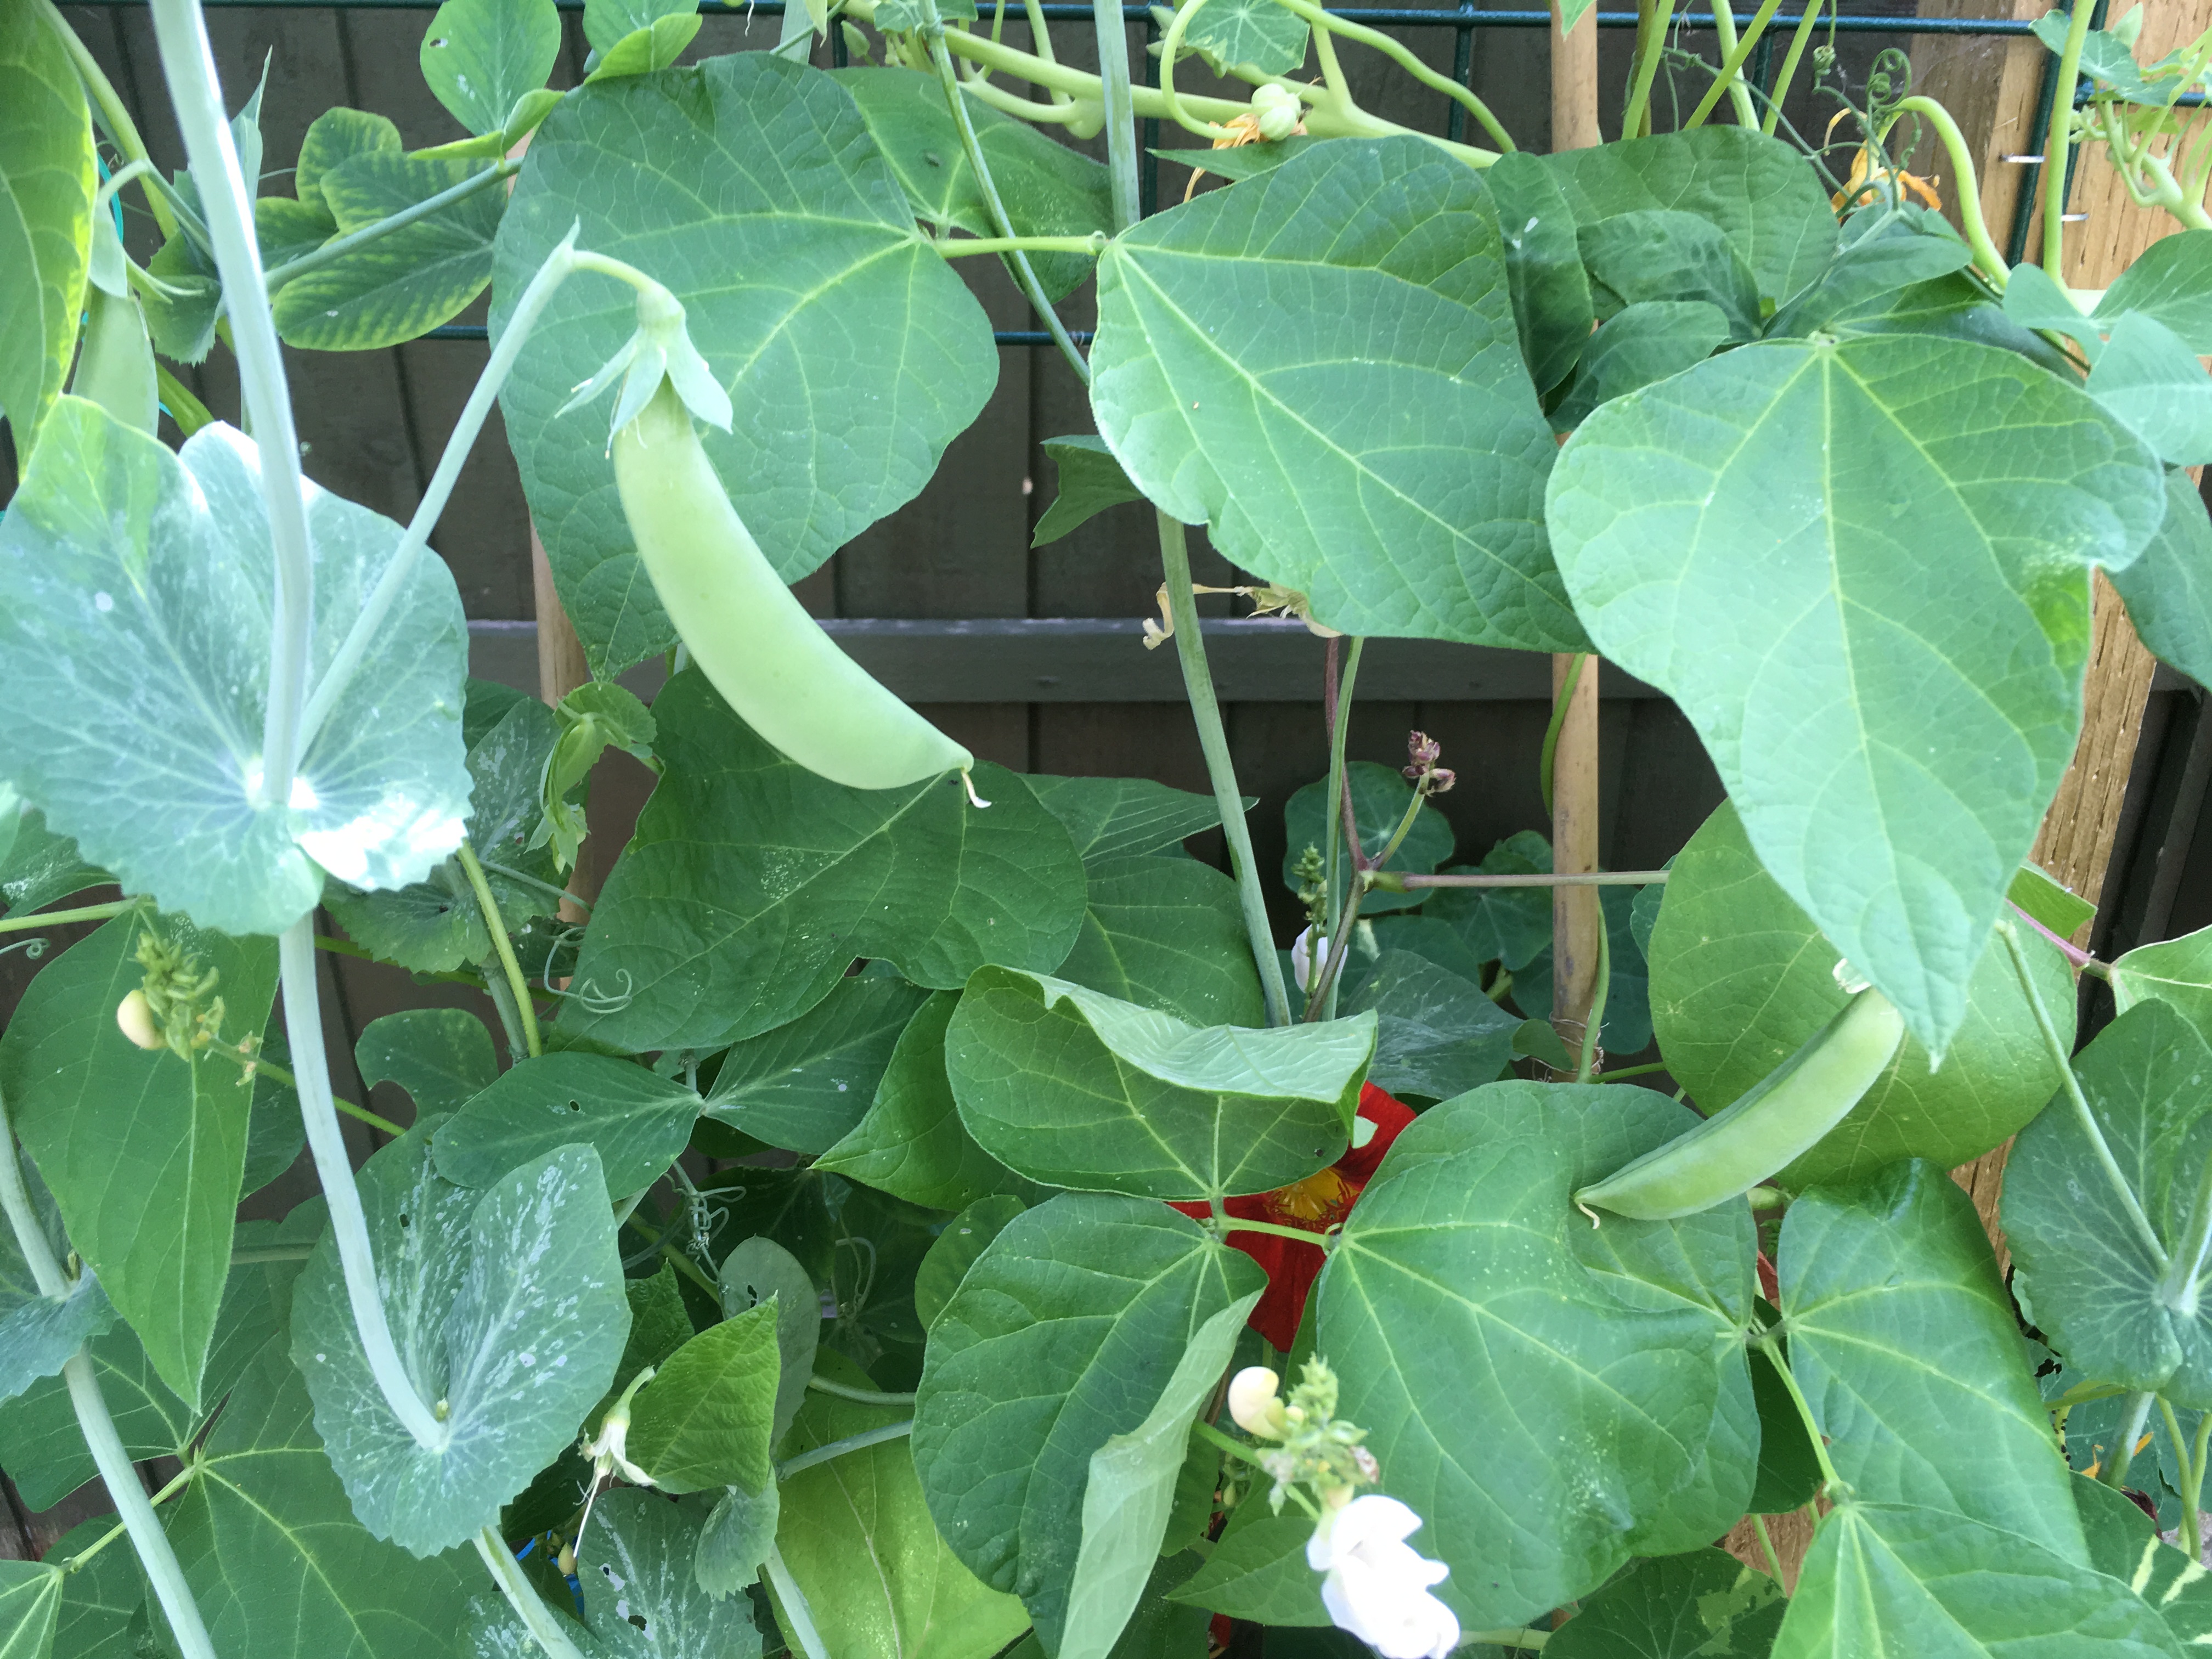
These sugar snap peas are not quite ready yet. You can see runner bean leaves all around as they were planted about a month after so that they could take over as the sugar snaps were dying. In reality the sugar snaps became over run by the runners very early on and were probably less productive because of it.
In a small garden you can grow vertical plants on all sides. This can cover unsightly fences or provide a privacy screen and means that you grow more food in a smaller space. I love that they have a small footprint and so take up little space. With their height, even if they start in part shade, they can always grow higher rapidly to make the best of their circumstances. So they also utilise garden space better. Runner beans can still do very well in part shade. Peas need full sun.
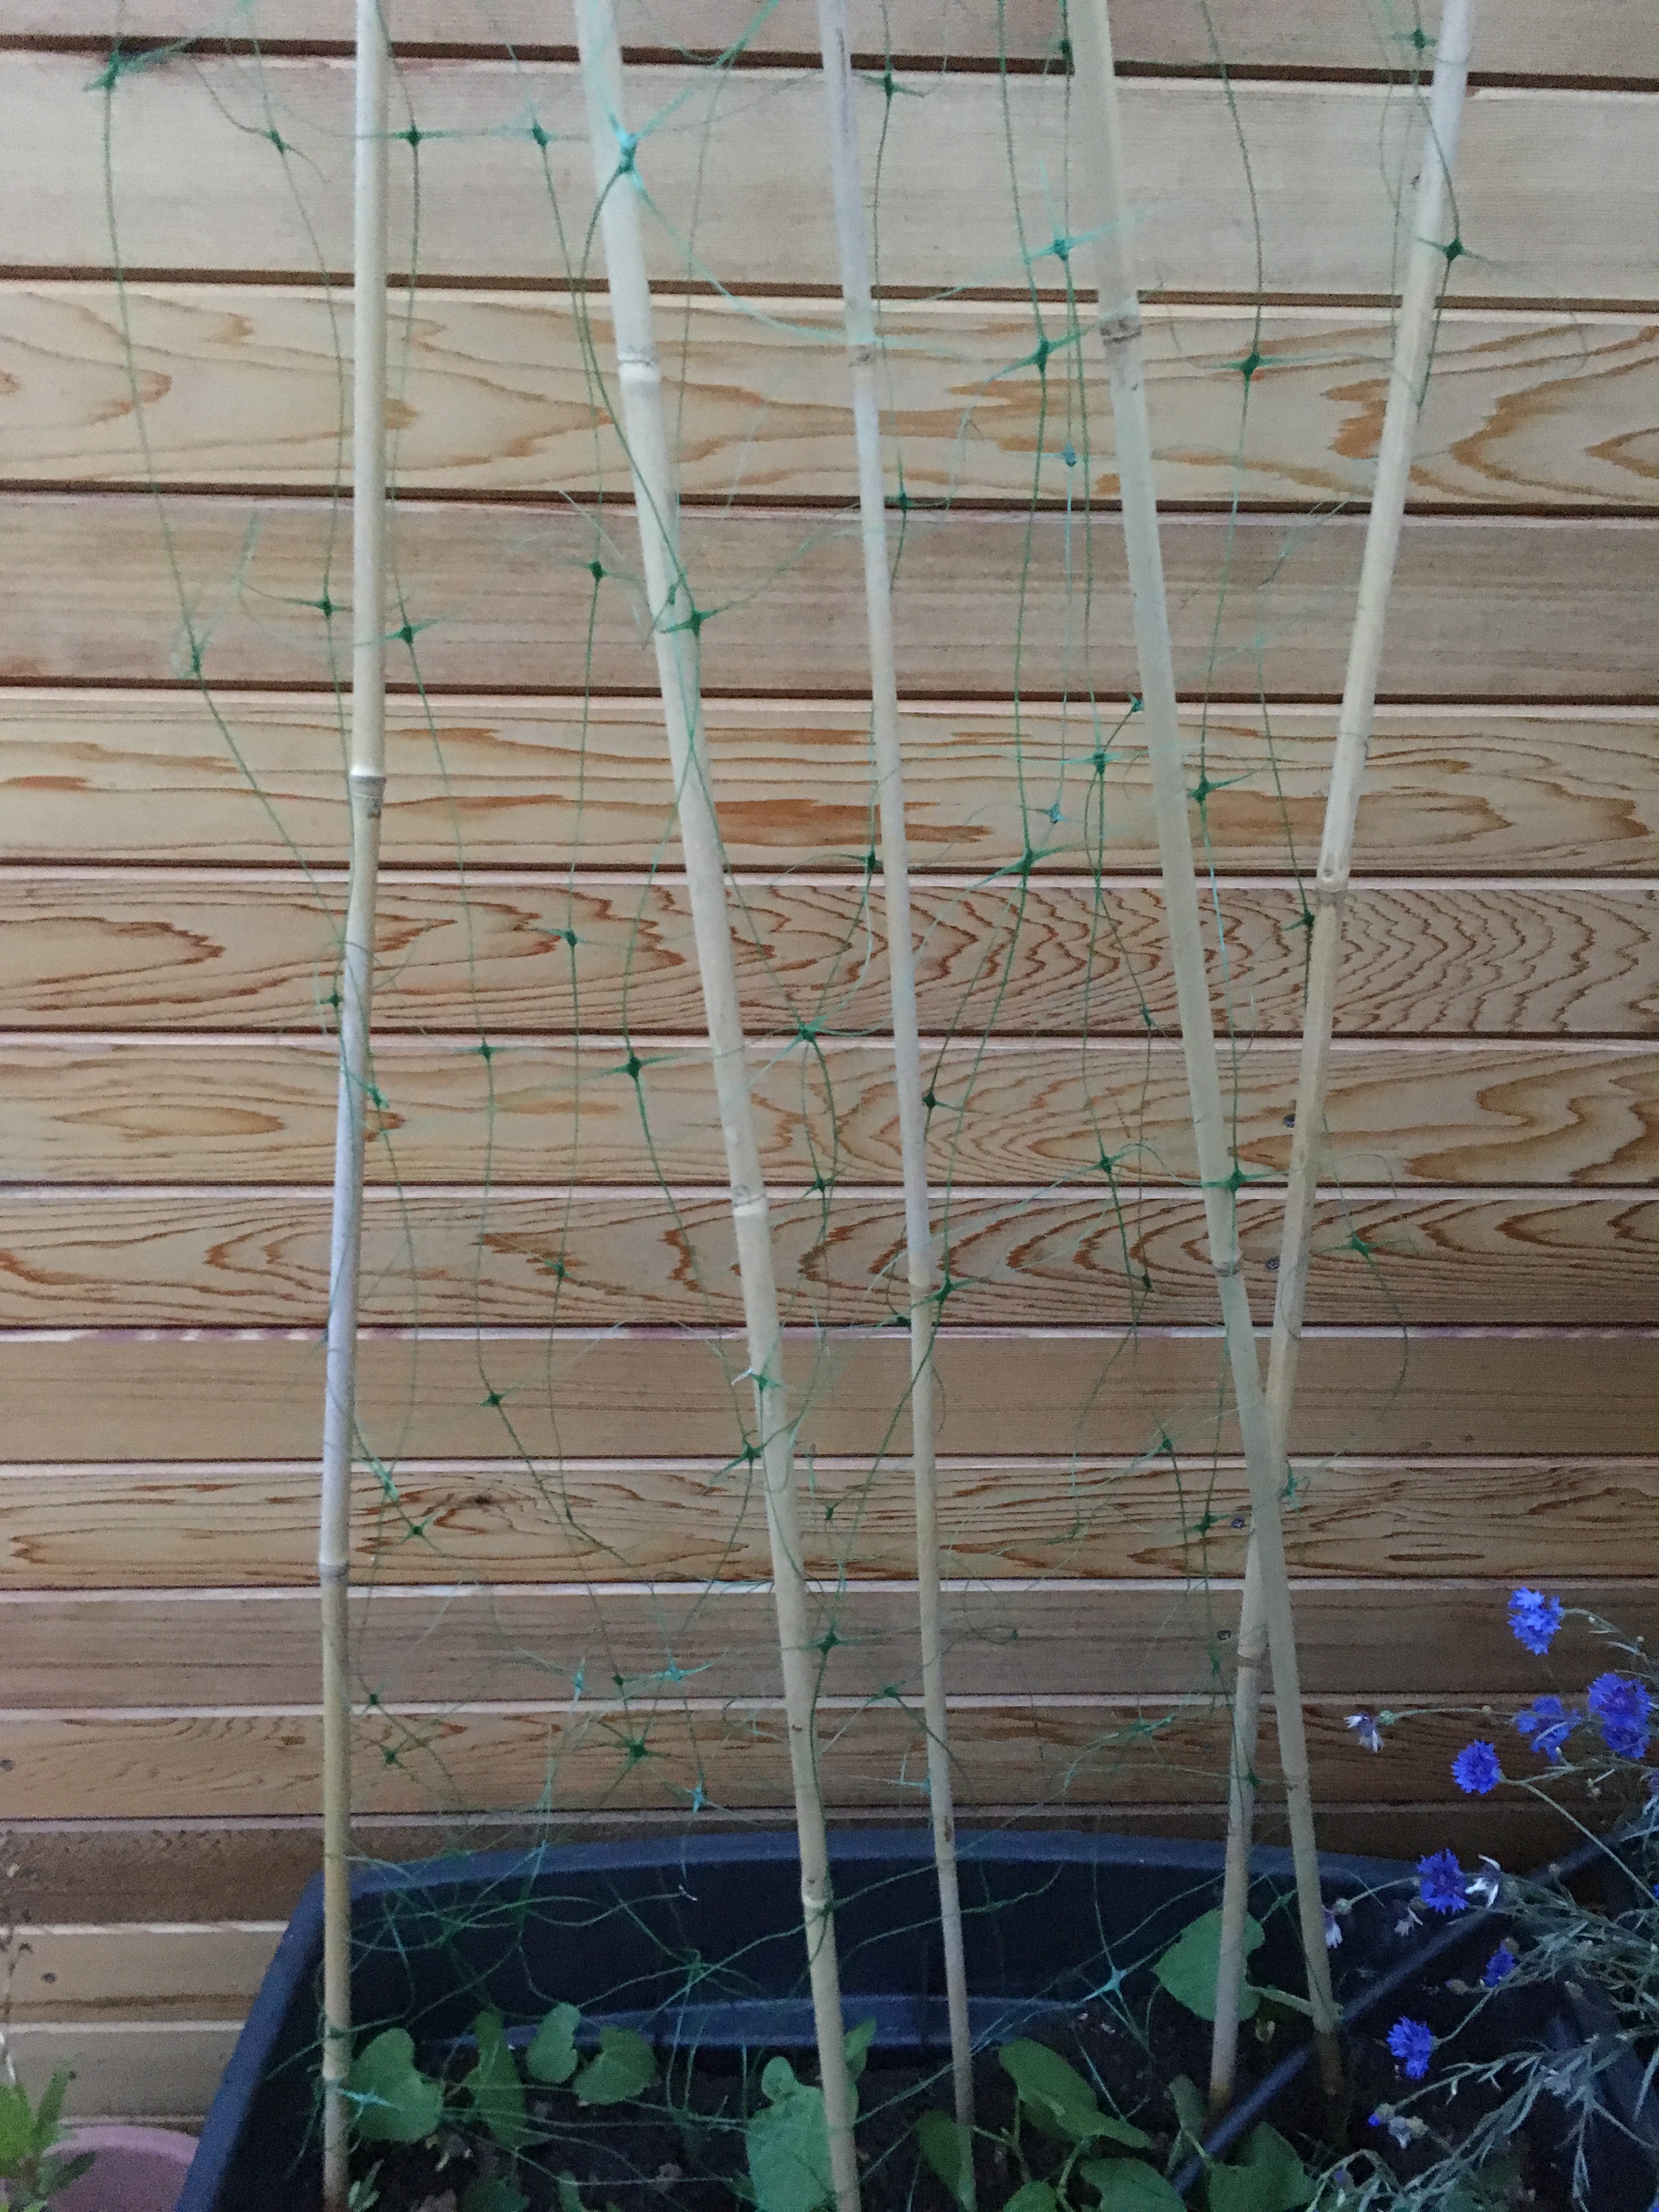
Runner beans and French beans will wind around a cane with little coaxing. Peas, however, have tightly curling tendrils and don’t do well with thick supports like trellises.
You can see the curling stems …
… so runner beans scramble up structures well
These tiny curled tendrils are so small…
….that they never made it up this.
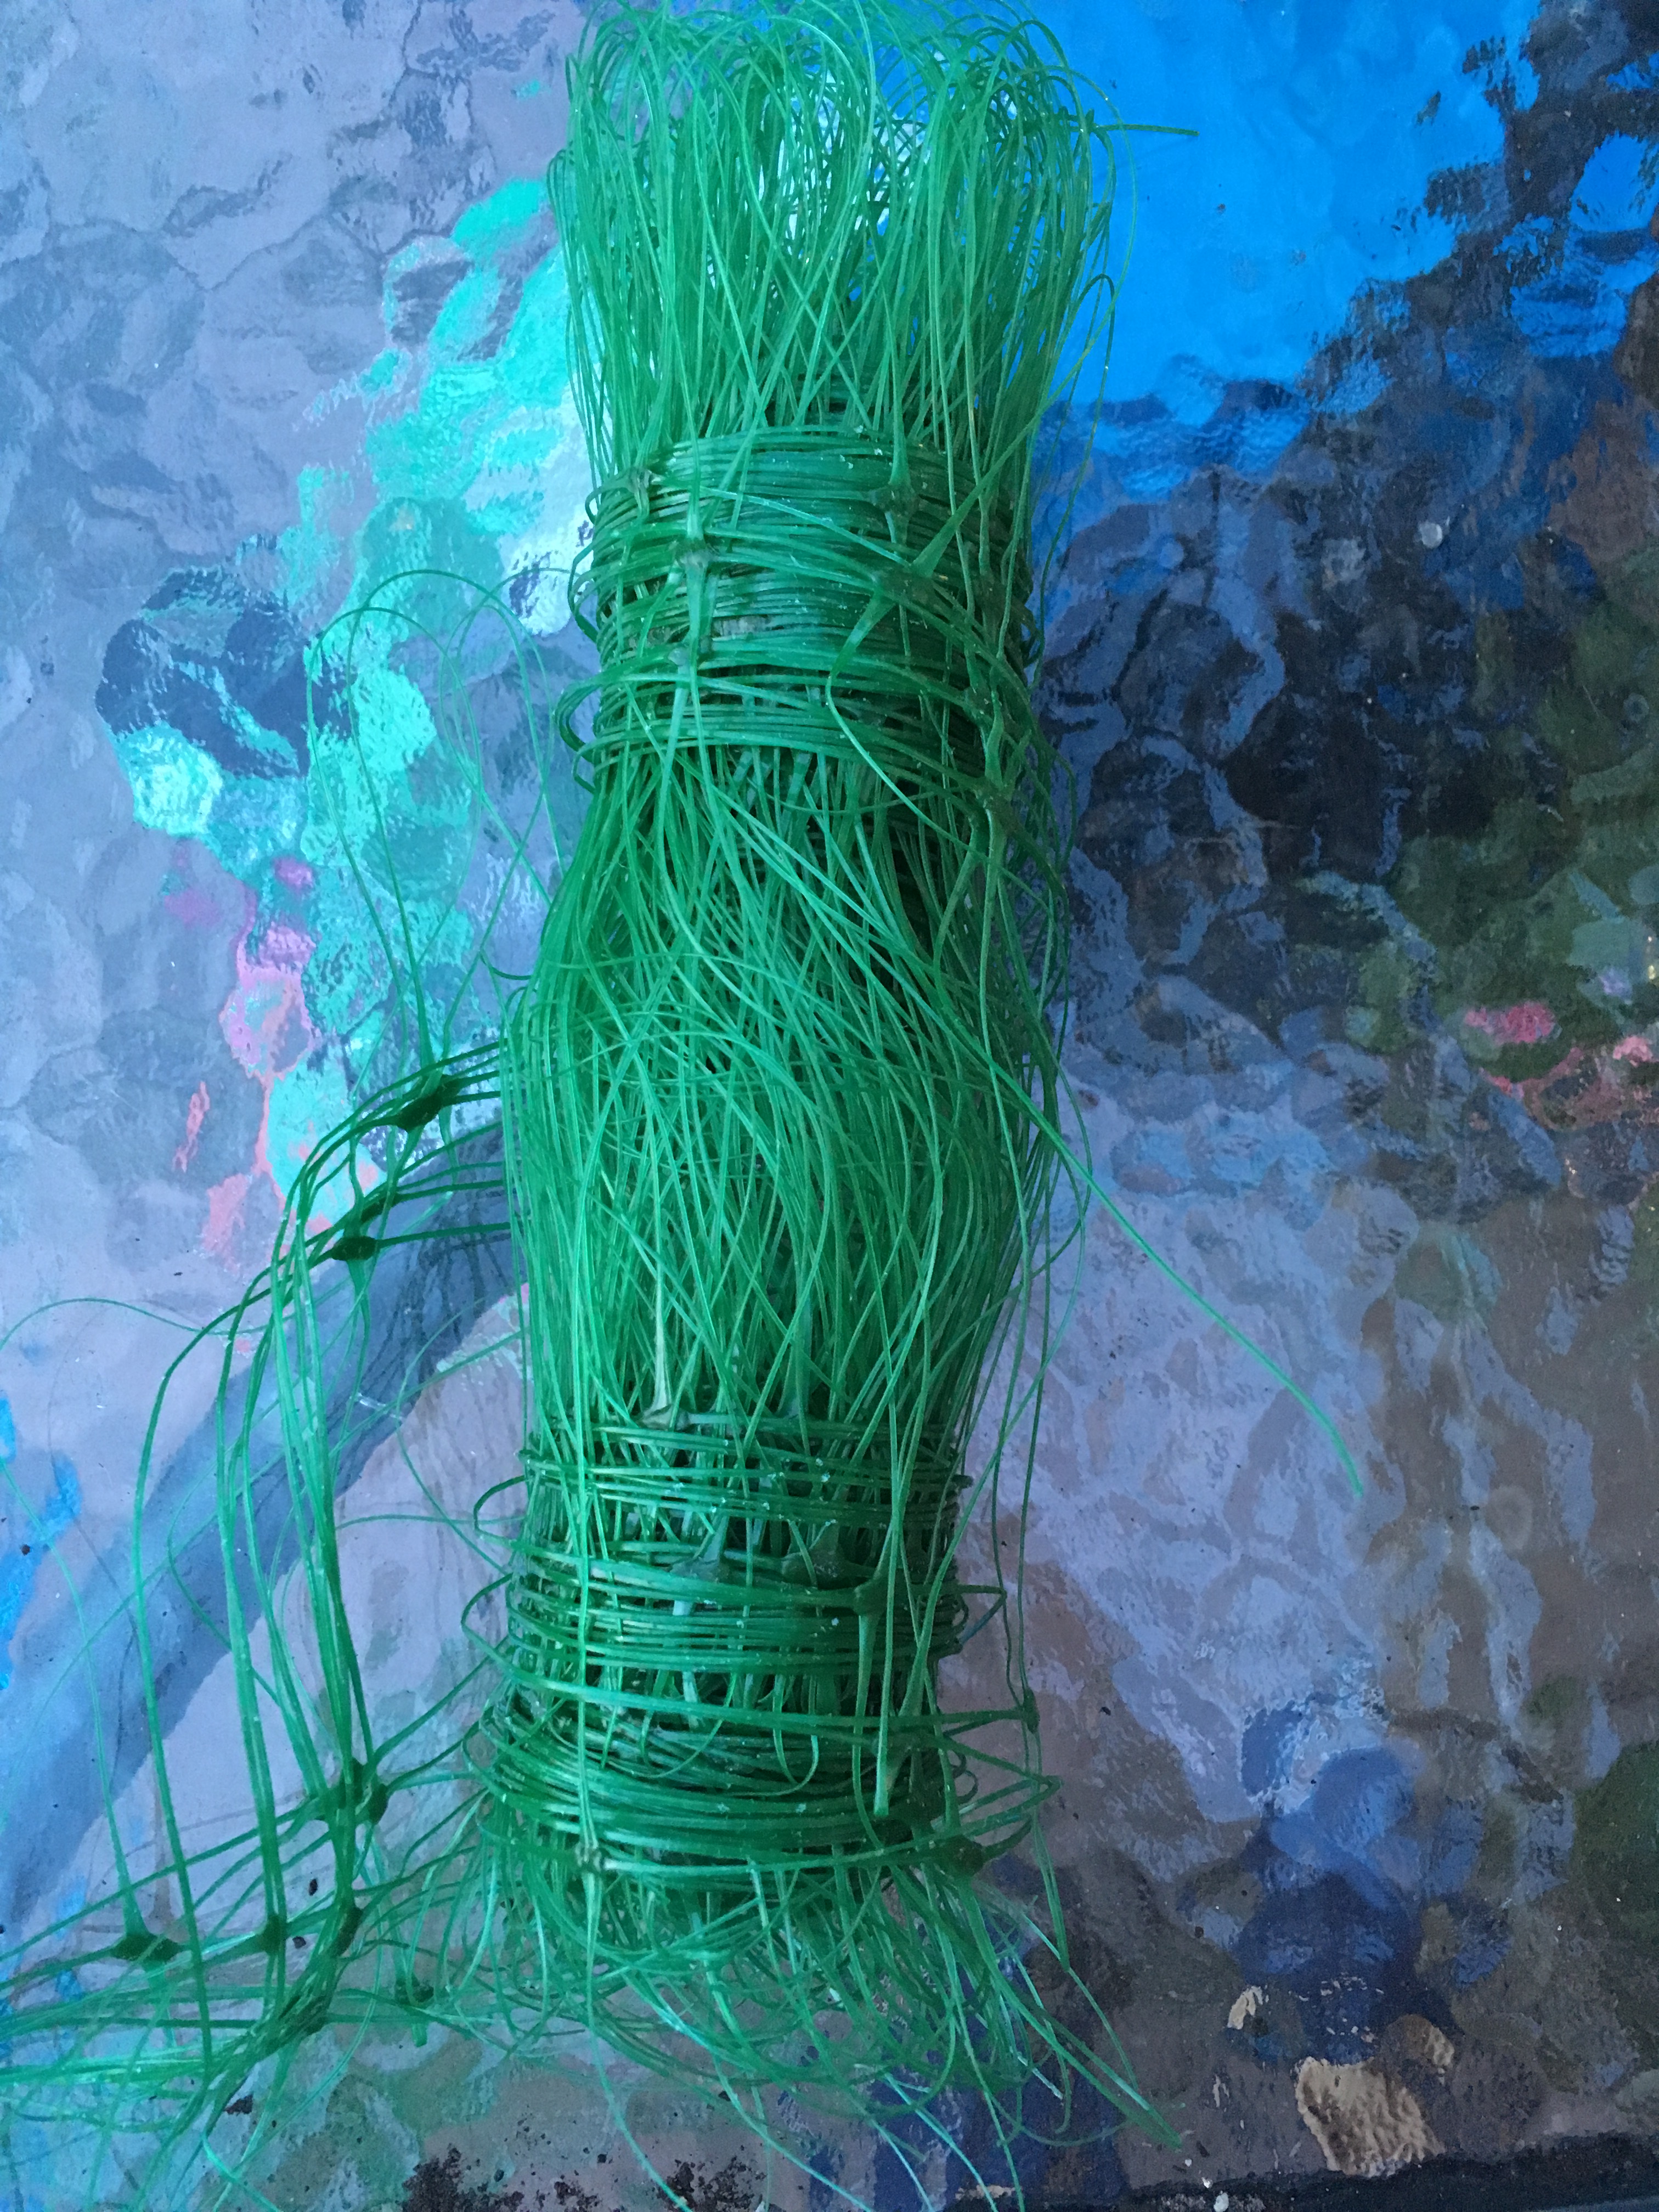
Pea and bean netting is very cheap and you can wrap this around some bamboo canes, giving you a much larger area of support and very thin strands for the tendrils to curl around.
It comes in a roll …
… but can be used over a large area.
They’re easy
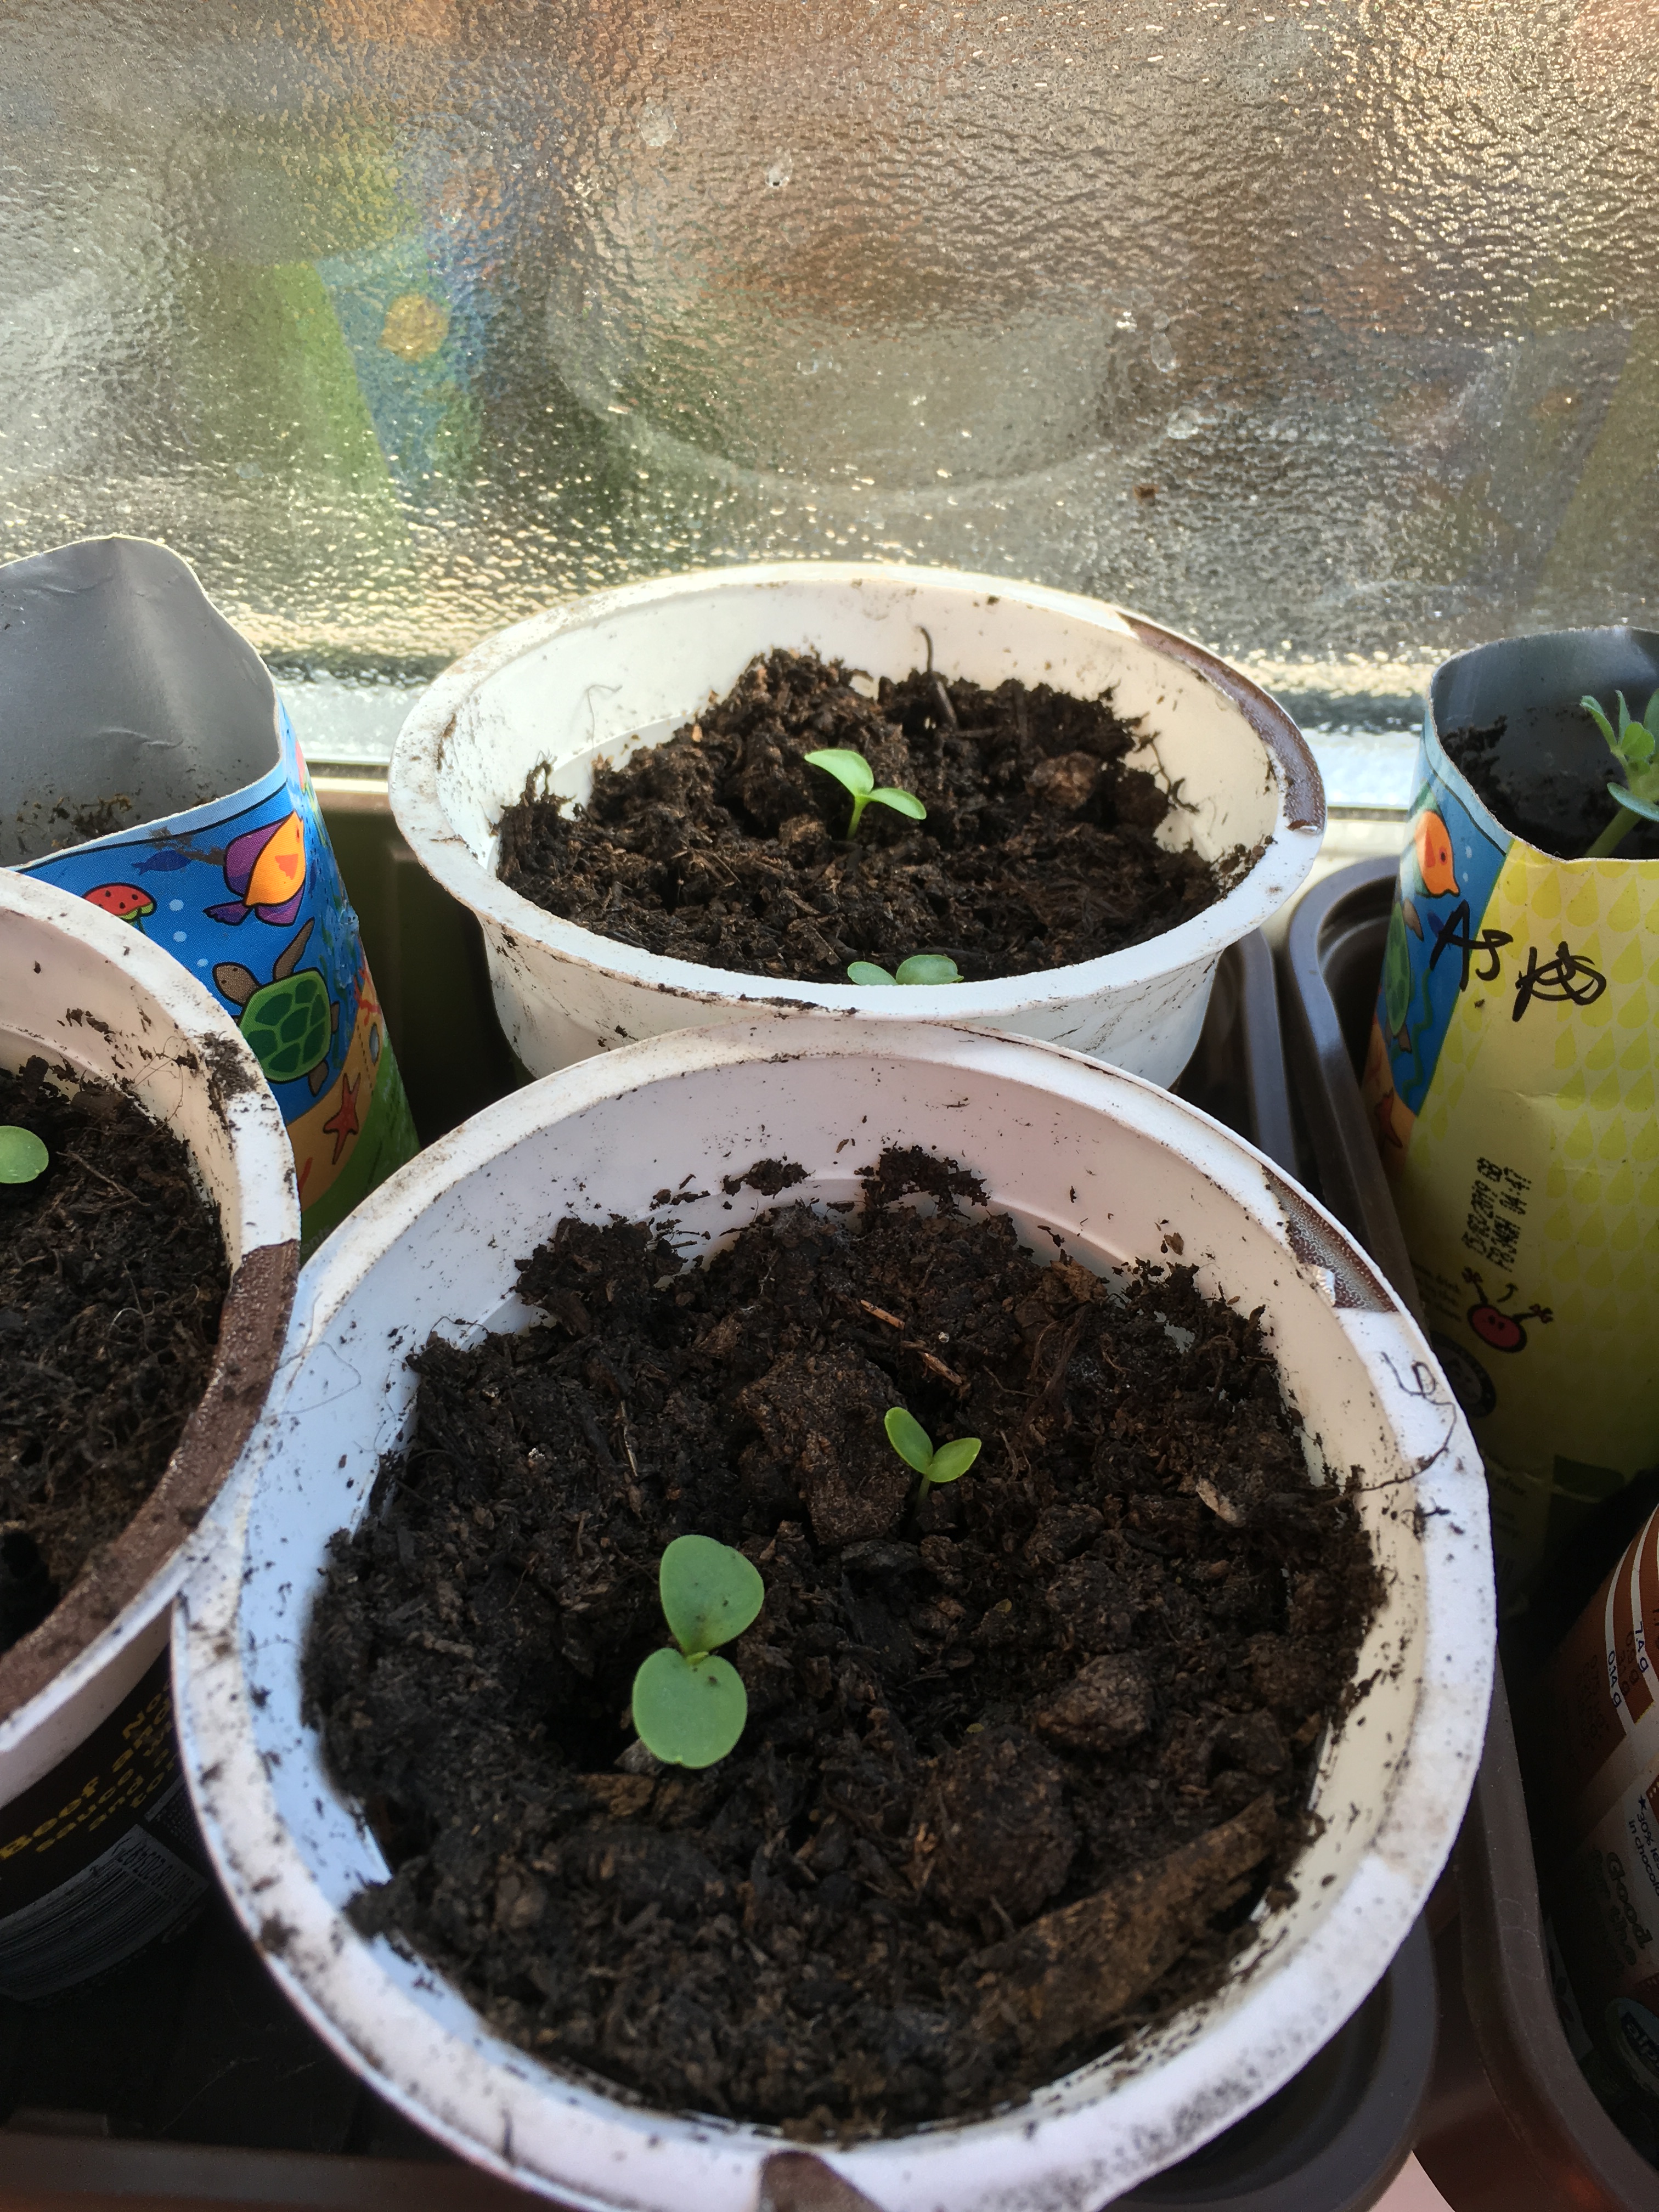
They have nice big seeds that are easy to handle. You can sow them indoors in early spring. I suggest one or two seeds in individual pots or in loo roll tubes. You can sow them in situ in warmer weather. I still recommend in the pots though if you want to avoid the mice getting your seeds or slugs and snails devouring seedlings. They grow so fast and you don’t have to wait a long season for a harvest.
They have a very long sowing period. Check the back of your particular pack for instructions but most will fall somewhere between April and July. Generally peas need an earlier sowing than beans but if you’re a bit late with sowing you can always aim for pea shoots if you think the pods won’t mature before the cold weather hits.
They’re cheap
A large pack of seeds is very cheap, and they are so easy to grow that it is rarely worth buying plug plants. Each seed will provide a large plant that provides many pods. In addition, it is easy to harvest seeds from current plants for the following year. Peas and beans tend to self-pollinate and so tend to remain true to the parent plant. Of course, there can be variation within a variety. Here follows my anecdotal warning. Back in the early days of flat renting I had a small outdoor space. I grew mangetout and they were prolific and tasty. In the first year, there were a couple of shorter, less appetising looking pods that I figured wouldn’t make good eating and were best left to grow seeds. Those seeds were taken and grown the following year. Again, I only saved the most unworthy pods for seeds. Four years of growing the same mangetout from its seeds I wondered why on earth I was growing this mangetout. All the pods were short and stubby. Some of the pods only housed one pea! The plants didn’t last very long. They were pathetic. It was only after I’d thrown away all the plants and vowed never to bother with mangetout again that I realised that it could be because I had bred them that way. Maybe I had encouraged this trait of very small pods. I also didn’t know back then that you needed to keep picking in order to keep the plant producing. So, whilst it is possible to collect seeds you do need to question whether it’s worth the effort.
Runner beans can be perennial in milder areas. I have left runner
bean plants in the soil when I was too lazy busy to pull them out. I was
surprised when the dead looking stems sprouted shoots and leaves the next spring.
This gives an early harvest the following year for free!
These runner beans started sprouting leaves and flowers from old stems early April. In the bottom left you can see the old brown stems with little growth.
If you haven’t grown them before I hope this has inspired you to give it a go. You don’t need much space. The picture above was from an old place which was a front paved ‘yard’ with this north facing fence. Despite that you can see them encroaching on the bike shed on the right. I would also swear that freshly picked peas and beans taste so much better than the ones bought in shops…. and of course… there’s no packaging or food miles!
My method for novices deterred by the perceived effort, cost or time taken to grow seeds, though I’m probably upsetting experts with my inability to follow instructions.
Collect toilet roll tubes, tetra pack cartons and plastic tubs for free and environmentally friendly containers.
Choose seeds wisely
Fill with normal compost
In the recommended month sow 1-8 seeds (depending on plant) in each container, picking a suitable container for each plant.
Place on a windowsill / warm place and keep the compost damp.
When planting out pop the whole toilet roll in the hole so you don’t disturb the roots. When planting Tetra Pak you can cut off the bottom and put the whole carton into the soil to provide a bit of protection from pests.
It’s easy to be overwhelmed with all the information on different months
to sow, types and mixes of potting soil, necessary temperatures, levels of
light and water requirements, seeds that need soaking, scratching or a cold
spell in the fridge. Then after all that, planting those seedlings outside
requires another long list of requirements.
If you have the time, the patience of a saint and all the fancy equipment, like under pot heating, growing lights, a greenhouse, cold frame or even things like perlite and vermiculite then following all the guidelines could give you perfect results.
The question is: ‘How much worse will it be if you don’t follow
instructions to the letter?’ Seeds may take longer to germinate. Fewer seeds may
germinate. Seedlings may be weaker. At worst, nothing grows, and you’ve wasted
the cost of a few seeds.
If you have a lack of space like me, I would advise starting most plants indoors. This provides a good start and ensures that something is actually growing before it takes a spot in the garden. You then also have spares for gaps as they appear. Planting straight into the ground can also lead to small stalks of nothingness – evidence of marauding molluscs. More mature plants are less susceptible or recover better.
My runner bean stalk of nothingness.
This was a kale I thought would do OK. It did not.
Also, my neighbour reminded me last week that those new to gardening can find it difficult to distinguish between intentional seedlings and weeds. Once you’ve been growing a while, you’ll be able to tell the difference but until that time – by growing everything in separate containers you’ll have no issues with identification.
1. Find containers
Toilet roll tubes – great biodegradable modules that you pop straight into the ground. It doesn’t disturb the roots and it’s a good way to reuse waste packaging. These are only suitable for fast germinating and growing seeds like peas and beans as the cardboard can go a bit mouldy and fall apart if left damp for too many weeks. Name and date the tube in pencil.
Mushroom boxes – stack the toilet rolls in here so that they don’t fall over and have somewhere for their water to drain into.
Plastic pots – pierce the bottom. A bradawl is the easiest, or even a pin heated with a lighter will do.
Couldn’t find the bradawl. Used a nail.
Heat the pin.
Pierce straight away.
A pin pierced hole is small, but it does still drain.
If you have very small spaces use two pots together. Pierce just the inside one and the outside one collects the excess water.
Tetra Pak cartons – If you pull out the side tabs and flatten the top they cut easily. You can also cut a corner on the bottom to allow for drainage.
Both shapes are great.
Flatten the top to cut straight across with scissors
Also cut a bottom corner.
Make sure you put into a tray for the excess water. If you don’t cut the drainage hole your plants can easily be waterlogged which can lead to a premature demise.
Make sure you wash the plastic pots and Tetra Pak cartons thoroughly before use. You can write names and dates with a permanent marker. Place these in the mushroom boxes or a tray of some sorts to avoid water draining everywhere.
You now have many randomly sized pots for free and even better you’re helping the environment. You haven’t bought a plastic pot, made from crude oil, that uses energy and creates carbon dioxide in the manufacturing. You are reusing something pre-made for another purpose and when you’re finished with it you can wash it and still put it into your recycling.
2.Choose your seeds wisely
Don’t be tempted to plant the seeds out of an apple you just ate or out of the butternut squash you had for dinner. Despite being an advocate of free or cheap growing, this is not usually a successful way to grow food. The first issue is that a lot of tasty fruit doesn’t provide you with seeds that are ‘true’. That seed will have the half the DNA of the mother plant but the pollen that led to fertilisation could have come from any of the species including crab apple. You might be lucky enough to get a tasty undiscovered variety, or you could get something sour and gross. This gamble would be fine if you didn’t have to wait several years for the first apple to find out. Your butternut squash may produce fruit (yes – squashes are technically fruit) in the first year but it, again, may not taste as good. If the original was grown in another country your new plant may also not be suited for your climate. It may grow but might not fruit. It also may not be disease resistant.
Buy from a reputable supplier. Spend time reading the back of
packs and choosing types of edibles and varieties that will work in your garden
for its conditions. It may be worth noting that if you live in a paved or concreted
yard – you could grow amazing summer squashes or aubergines. Generally, cities
are warmer than the countryside and when there is a lot of concrete absorbing
and radiating heat it can push the temperature higher still. You won’t, however,
be able to grow deep rooted plants like artichoke without a ridiculously large
pot.
Sow things that work for your soil and circumstances. E.g.
Tomatoes (or squashes, cucumbers, peas, artichokes) need full sun.
Runner beans (or brassicas, watercress, aliums) still do well in partial shade
Caucasian spinach (or winter purslane) for deep shade
If you want pumpkins but lack space, mini pumpkins can be trained vertically
If you have the space bushy nasturtiums look fab.
If not you can get trailing/climbing varieties that will cover a trellis and taste just as good.
Seeds come in ridiculous quantities for small garden growers. I
would never be able to plant 15 courgette or tomato plants in a year. I’d
manage maybe 2 or 3. Kale comes in packs of something like 50 and at a push I’d
manage maybe 10 plants. A great way to lower costs is to swap seeds or even
plants with a neighbour. Seeds usually have plant before date, usually a couple
of years after purchase.
Sort your acquired seeds into the months to be sown in. Sowing at
the right time is something that I do believe is important. By sowing at
the correct time, you ensure the soil outside will be suitable (frost free and/or
warm enough) by the time your seedling is big enough to go out there. You also give
your new plant a long enough period to grow and fruit to ripen before the
weather turns cold. I.e. If you sow a tomato seed in January the plant will
have grown far too big and probably died before the weather is warm enough to
plant it outside. If you sow it in August by the time the plant has matured
enough to flower the weather will be turning too cold to set or ripen fruit. I’m
not too strict about dates though – if something should be sown February to
March, I’ll still merrily sow it in the first 2 weeks of April. I would just
maybe leave those plants indoors for a little longer so that they can catch up.
This is my crude, but effective, seed filing system. In early Jan before I start I sort everything into the month I’m going to plant in. If I sow something that I think I’ll want to sow again in a later month e.g. peas, beans and coriander rather than put it back into the original envelope I’ll put it into the next month I’ll want to sow it in. That’s why every Jan I need to resort.
Unless you have lots of experience for now avoid the seeds that need scarification (scratching the surface of the seed) or stratification (a period of cold).
3. Fill containers with Compost
The cheap and lazy me uses whatever giant bag of compost I happen to have open at the time. I feel it’s more efficient to sow everything in 30 pots in one go once or maybe twice a month. E.g. early March I may sow 5 containers of runner beans, 5 sugar snaps, 5 fine beans, 2 tromboncino, 2 pumpkin munchkin, 3 cherry tomatoes, 2 thai basil, 3 basil and 3 coriander. I’m sure each type of plant would have its own ideal type of potting soil but it’s so quick, easy and cheap just to fill all the pots with the same soil. Let’s face it – if it can’t grow with the decent compost I provide indoors, then it sure as hell isn’t going to make it in my terrible clay soil outdoors.
4. Sow your seeds
I don’t believe in thinning. The idea that you sprinkle lots of
seeds into a tray of compost, wait for them to grow and then prick individual
seedlings into their own pots sounds like an inefficient use of time and
resources. So many seedlings get squished or die in the process and roots get
tangled. I also don’t have the heart to kill a food plant when the books say
sow 2 or 3 together and pinch off the weakest 2.
How many you sow in each pot depends:
Things that will grow into tree/bush type things and you want to keep indoors for as long as possible like tomatoes, artichoke, pumpkins and other squashes, physalis, etc I’d stick to one seed per larger container.
Things that you just want to make plug plants for like kale, swiss
chard, rocket, nasturtiums, you can do one seed per small container.
Things that grow tall and thin like cucamelons, peas and beans I
tend to do 2 or 3 to a container.
Tender herbs that get cut down quite quickly (basil, coriander, dill) and so don’t get chance to grow very large I’ll sprinkle maybe 5 or 6 seeds in one.
I’d suggest planting a few more containers than you need in case
you have a couple of dud seeds. You then also have a spare or two if you do
plant out your first seedlings and they get ravaged by the slugs and snails.
You can always give these away or do a seedling swap.
Label them so you know what you have. If you’re fastidious: plant, variety and date. If you’re me there’ll be an unintelligible scrawl on the side naming many different plants after I’ve used the same container a couple of times.
5. Leave to grow
Windowsills or any sunny spots will do. Keep the soil damp. Some seeds germinate almost immediately whilst some take a little longer. There may be containers that continue to look barren. Not all seeds within a pack are viable. Some plants are just harder. I’ve failed to germinate perilla, tomatillo and pomegranate this year. Following instructions to the letter may have led to success. Then again, it may not have. If you think something hasn’t grown pop something else into these pots. Because I like to keep it easy, cheap and avoid anything too time consuming I give up on the harder to grow things. There will be some things that are better (though more expensive) bought as plants.
6. Choose a spot suitable for your plant
You can ‘harden off’ your plants by putting the containers outside during the day and bringing them back indoors for cold evenings. If the nights aren’t freezing, I have often skipped this step with little or no damage. You will have to see for yourself how necessary this is for your garden. If unsure plant one straight into the ground and see if it’s doing OK a couple of days later.
These two tomatoes at the base of the two canes were sown at the same time and planted out at the same time. The one on the left though had a tree collard that was too close. I removed it when I could see there was a problem but it still hasn’t recovered.
Ensuring enough sun, space and supports if necessary, gives you less work in the long run. If your plant is susceptible to slugs and snails, then you can cut the base off the container so you have a couple of inches of container as a barrier, but the roots still have soil access. You can put slug tape around the container or cover with the top half of a bottle to stop them getting in. I only bother with really precious plants that are very attractive to critters.
Just half a pot in the ground
This carton has a ring of copper slug tape
2 litre bottle cloche
After all that it’s worth noting that carrots, beetroots and turnips are best sown in situ. Because they are easy small plants grown in larger quantities, they are just a faff to put in containers first. Beetroots will need thinning no matter how careful you are as each ‘seed’ is actually a cluster of seeds.
Then after that has been said, by growing perennials or self-seeding varieties you cut out all the above work. However, perennials usually take much longer to establish themselves and become productive. To get self seeders into the garden of course you need to sow them first. Things like peas, beans and squashes don’t have a perennial version and they can provide you with food as you wait for your perennials to get going.
So, being end of June, there’s still time to sow some kale or Swiss chard for eating in spring, or peas (including sugar snaps and mangetout), beans (runner or French), beetroots, kohl rabi, , quick growing herbs (like basil, dill, coriander) or salad leaves for something yummy this year.
Today, out of that list I’ve only sown peas, but I’ve also sown an array of edible flowers that should hopefully make it into the lawn (more on that later). All of those would germinate in situ in this lovely weather, but the lawn flowers seedlings would never survive being trampled and I’m sure those little slimers are just waiting to take the growing tips of my beans! Grr…
Short version: Grow perennial kales and collards for an easy life. In addition grow annual kales for eating through winter. Eat all bits of any brassicas that aren’t too fibrous. Daubenton’s kale is amazing – unless of course you dislike the taste of brassicas. If that’s the case then maybe this post isn’t for you, unless you can be convinced that home grown tastes better than shop bought.
Brassicas and St Bernards
So kales and collards are brassicas. These also include cabbages, broccoli, cauliflower, Brussel sprouts, the odd-looking kohl rabi and the Chinese sounding kai lan. You may find it surprising that they all belong to the same species, all with 4 petals in their flowers. If you remember your GCSE Biology you will know that that ‘same species’ means they can pollinate each other. It’s like dogs. All dogs are the same species despite how very different looking the breeds are. A chihuahua and a St Bernard could mate to produce puppies but I couldn’t begin to imagine what traits the offspring would have.
Brassicas, like dogs have diversified through human intervention. People have chosen traits that they like and through cultivation (or breeding in the case of dogs) have selectively grown (bred) a variety (breed) that has the desired characteristics. Some brassicas are grown for their flower buds, like cauliflower and broccoli. Some are grown for the succulent stems like, kai lan.
Given that they are all the same species and all parts of the plant (except the roots) are edible, I’d like to encourage you to try the bits of brassicas that you may not usually eat. It’s good for your bank account and it’s good for the environment. Obviously there are some bits that are not worth eating. You’ll not be surprised to hear that walking stick collard stems are really very tough. Feel free to try broccoli leaves or the flowers of any the brassicas. This year we have begun roasting the cauliflower leaves (shop bought I’m afraid) that we used to throw away. We literally pull the leaves off, wash, chop into 1-2cm width sections, toss in oil and a pinch of salt and roast on 190oC (fan) for 20mins. You can even roast them with the cauliflower florets and stem cut into around inch sized pieces. We find them tastier than the florets but tougher on the teeth.
To Grow or Not to Grow?
Being all the same species, it does mean that they generally do well in the same conditions. They are decently shade tolerant and are good for winter growing. They also favour alkaline soil. Now which of the brassicas are the easiest to grow?
Cabbages
The books all go on about cabbages and Brussel sprouts. I always see the seeds in the shops but I don’t know a single person who grows them. I attempted to grow cabbages, once about 11 years ago. They took an awfully long time. I patiently waited the suggested time, cut off my shot putt sized head, removed the lacey looking caterpillar eaten leaves, removed the leaves with little holes in, removed some more leaves, cut the now closer to tennis ball sized cabbage in half to find some more little worm like things. I was still determined to eat what I could salvage. The other 3 cabbages that I had managed to grow did not fare much better, but at least I was mentally prepared. I have not planted cabbages since. A red cabbage grew of its own accord last year but it didn’t even make it to my kitchen as it was so infested.
Brussel sprouts
My last pathetic plant of last year’s crop that by March still had no buds. At all.
I’ve grown about 20 Brussel sprouts plants in the course of 3 years. No matter how long I wait, I only get pathetic pea to marble sized buds. The buds eventually start to open instead of getting any bigger. Out of all the plants, in the whole time, I may have had about 5 respectable sized sprouts.
I could do the research and learn how to grow cabbages and sprouts successfully (maybe), but I just don’t see the point. They take forever to grow, they have a fairly large footprint, if they’re tasty they get eaten by something else first, you have to practise good crop rotation and they have to be planted every year. They also haven’t tasted any better than shop bought cabbages or sprouts.
Kales and Collards
Here begins the brassica love. So – about a year and a half ago I was looking for perennials to make life easier, something to keep the garden green over winter and something to cover the hungry gap. In my hunt I found kales and collards.
The Annuals
Clockwise starting top left: Red Russian, Pentland Brig and Cavelo Nero in a large pot by our front gate. These are about 3 months old and are crammed into the space. I’m hoping the Cavelo Nero will grow nice and tall and leave more space at the bottom for the others. I’ll eat whatever is growing the most into submission to allow space.
There is a plethora of annual (or biannual really) kales and collards seeds available in shops and online. Some of them are quite beautiful and come in pinks, whites, purples and greens. I, therefore, don’t understand why anyone grows ornamental cabbages.
Kales are fab! You sow the seeds. If you need to thin the plants, you eat the spare seedlings. Once you think the leaves are big enough and the plant has enough to spare – you start taking the leaves. The plant continues to grow, and you continue to harvest over a long period. You avoid a glut that needs storing and one of my favourite things about harvesting kale is that you are providing maintenance as you do so. Let me explain.
If you’re waiting for a plant to mature before you harvest, like cabbage, you don’t really pay much attention to it. If you’re regularly picking from a plant, as you look for leaves to harvest you may see slugs, snails or caterpillars that need picking off. If a leaf is badly infested with aphids and you don’t want to eat it, you can remove it and bin it. If you have a leaf with a few unwelcome guests, you can harvest it and give it a good wash before cooking. The pests are now going down the plug hole and are no longer in your garden.
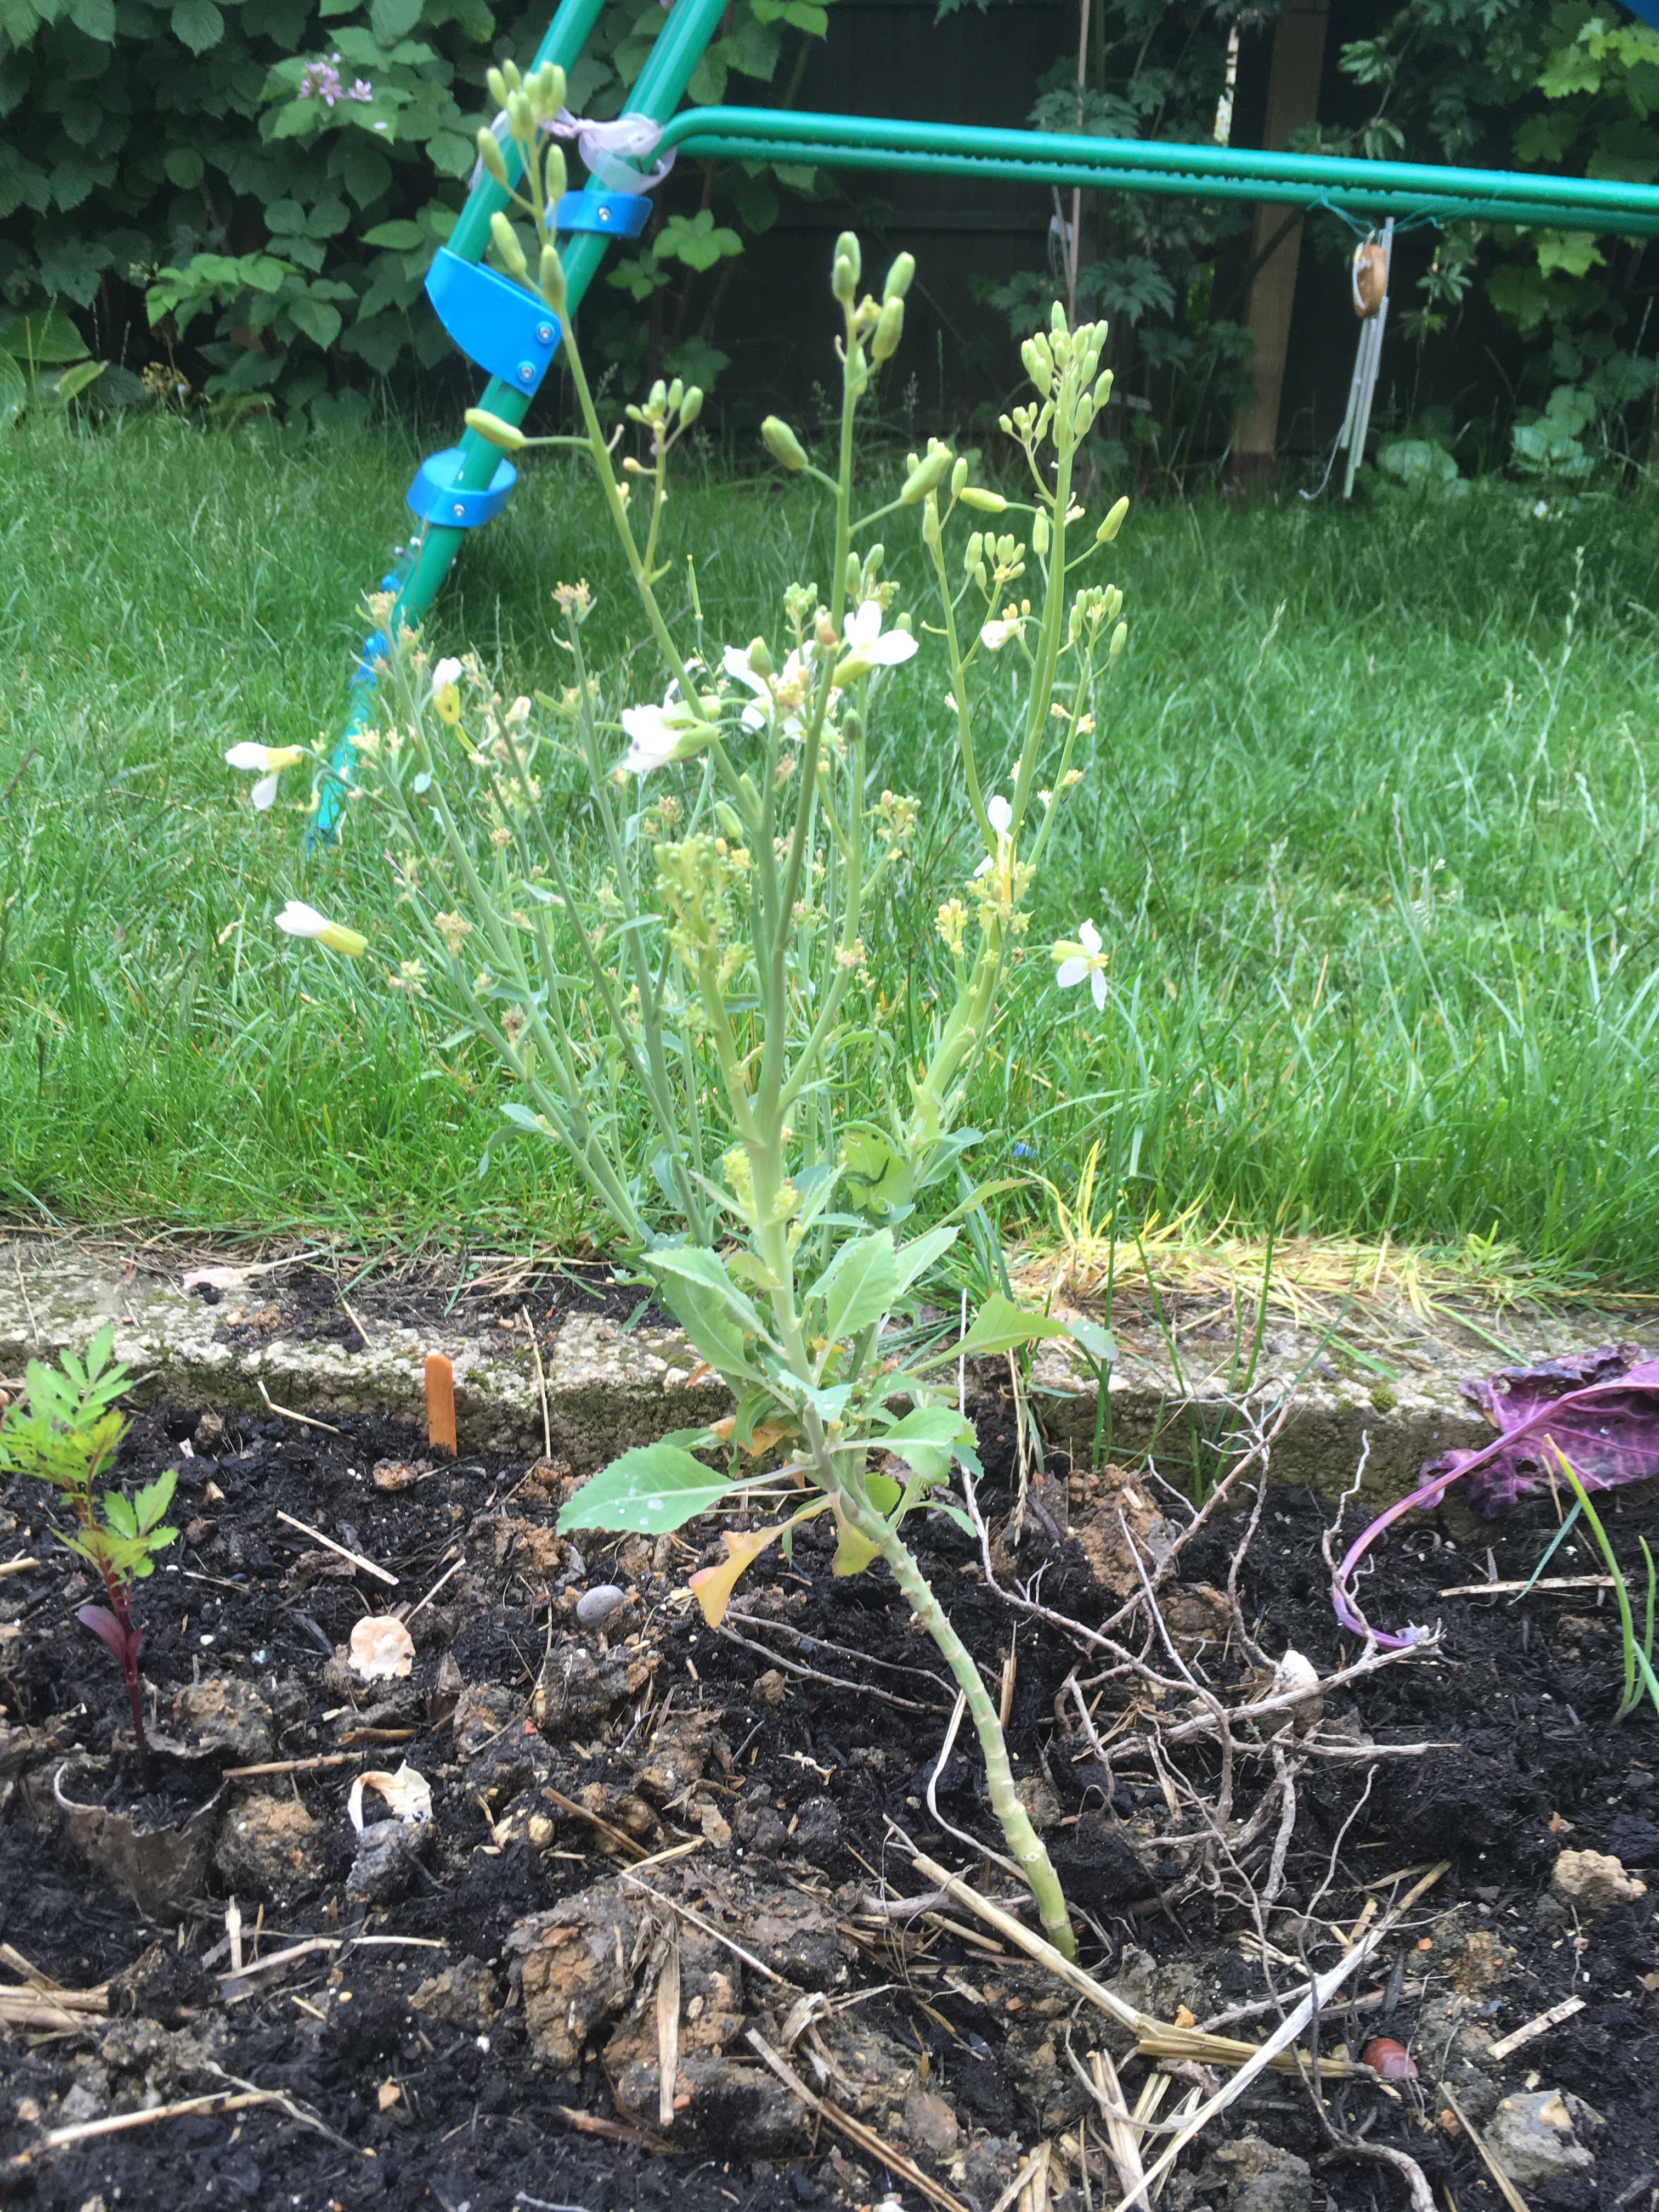
Growth then slows down with colder weather, but there is still enough growth to feed you over winter. Kales and collards are hardy and after a frost they are sweeter. Then as the weather warms up the plant will attempt to flower to make seeds. When this happens to Cavelo Nero it is a bonus. The plant will send out masses of tasty tender flower shoots. These need to be cut off because once kales ‘goes to seed’ they die. However, if you keep cutting back the flower shoots more (albeit thinner ones) will grow to replace the ones you cut off. You do eventually give up as the flower shoots becomes so thin that you can’t see the point in trying to cook them.
It’s hard to see but in this photo the brightest green parts are the flower shoots just beginning here in March. They form at the base of the leaves and have their own mini leaves. They kept us in tender greens till the end of April.
There is a large number of varieties, but these are ones that
I have grown and would recommend.
Cavelo Nero leaves makes great kale chips or shredded in dishes. These were planted late summer and this is end of Jan. By end of March see the photo above.
Pentland brig has a slight tang that reminds me of pak choi. It has a sweet kale flavour but can have a hint of bitterness in the aftertaste.
Teddie Tree Collard, top left, is not particularly tender but it is sweet and tastes slightly nutty and buttery. Red Russian, bottom right, is more buttery/creamy but has the slight bitter after taste. All bitterness disappears after a cold spell.
If anyone has any favourite kales that they would like to recommend or know of any kales that have yummy flower shoots like Cavelo Nero, please do post in the comments.
The Perennials
The perennial kales and collards are harder to get hold of. There are no seeds. The reason why these are perennial is that they don’t flower or make seeds for a few years. Even if a plant does flower and seed (and then, of course, die), because of the ease of cross pollination you couldn’t be sure that the offspring would be perennial. This means that you must get a cutting. This was something that I found quite difficult. These websites either have them or have a waiting list:
Non-variegated at 5 months from receiving the cutting
Variegated at 5 months. The cuttings came not long before Christmas so they weren’t going to grow much in the cold months.
I ended up getting my Daubenton’s kale from ebay. I bought 2 variegated and 2 non-variegated. The variegated does better in my garden and the cuttings root more easily. If you’ve looked at the websites, you may be shocked at the prices. I was too. Now that I’ve been growing mine for a year and a half I think the pricing is fair. The plants are still quite rare. They’re not something you’ll be likely to see in your local gardening centre. Apparently, they used to be more common but commercial cultivators in the past shunned perennial brassicas in favour of annuals that they could sell seed for year after year.
If they’re hard to get and expensive surely they’re not
worth it, right? Well:
We get year-round abundance.
They’re expected to continue to do so for years.
They fed us through winter and the hungry gap.
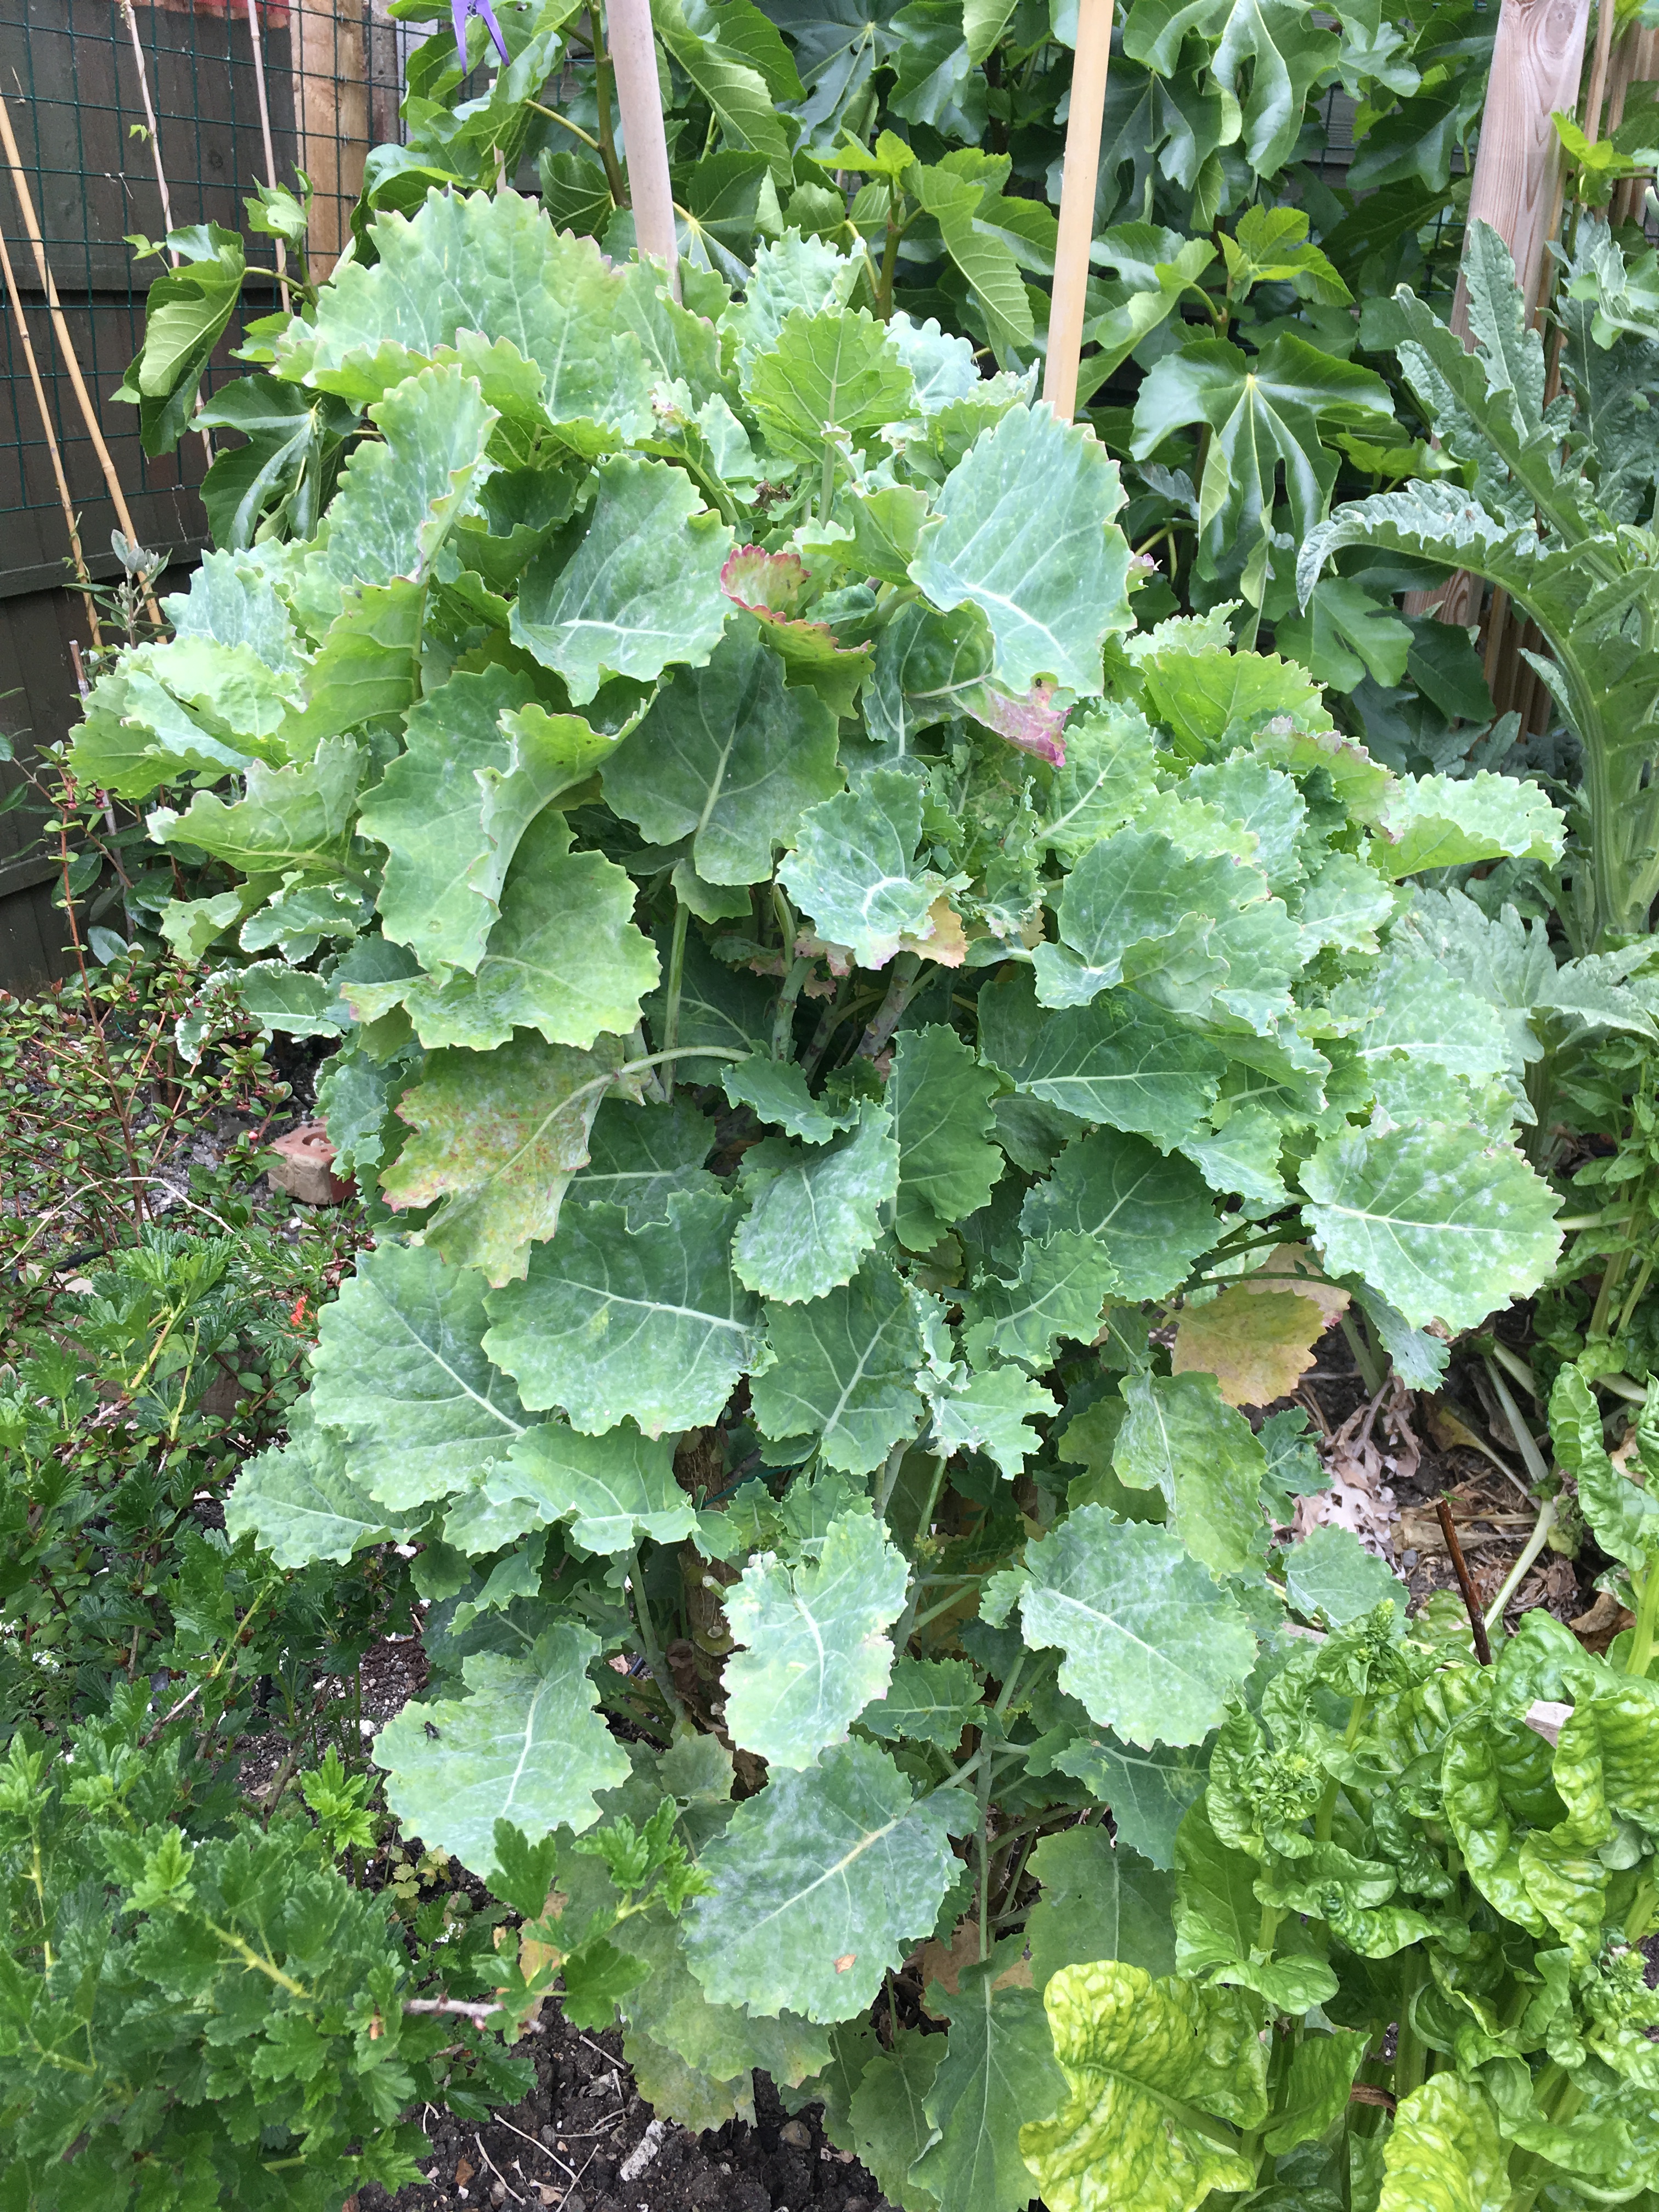
Even now in June it is growing vigorously and with asparagus season over and our sugar snaps just starting, the Daubentons provide our family of 3 with a vegetable side dish every other day.
We’ve gotten plenty of new plants from the original 3. Some have been kept and grown and some given to friends. It’s not just a desire to get everyone growing it, it’s also like insurance. If I manage to kill all mine off hopefully there’ll be someone I could beg a cutting from.
They are mostly left alone by pests.
Most importantly, they taste yummy. I’ve had no bitterness at any point of the year. My very fussy 3 year old absolutely loves it just simply fried in oil with a bit of salt. She won’t eat shop bought curly kale.
The smaller leaves are tender. The large ones are tougher but still tasty.
5 months
A year. 2 feet tall.
A year and a half. 4 feet tall and has been eaten all winter
That’s a lot to ask of a plant that cost you about a tenner.
Maybe it’s because cuttings are small. Most people wouldn’t think twice about
paying £10 for an apple tree.
Purple Tree Collard
6 months old and 3 feet tall.
It wasn’t till December last year that I finally managed to
get hold of a purple tree collard (from The Backyard Larder). I have much less
to say about it because I’ve only had it 7 months. Still, I’ve eaten from it three
times so far and its taste is similar to the daubentons but is slightly nuttier
and sweeter. It also requires a bit more chewing. My 3 year old has yet to
touch it.
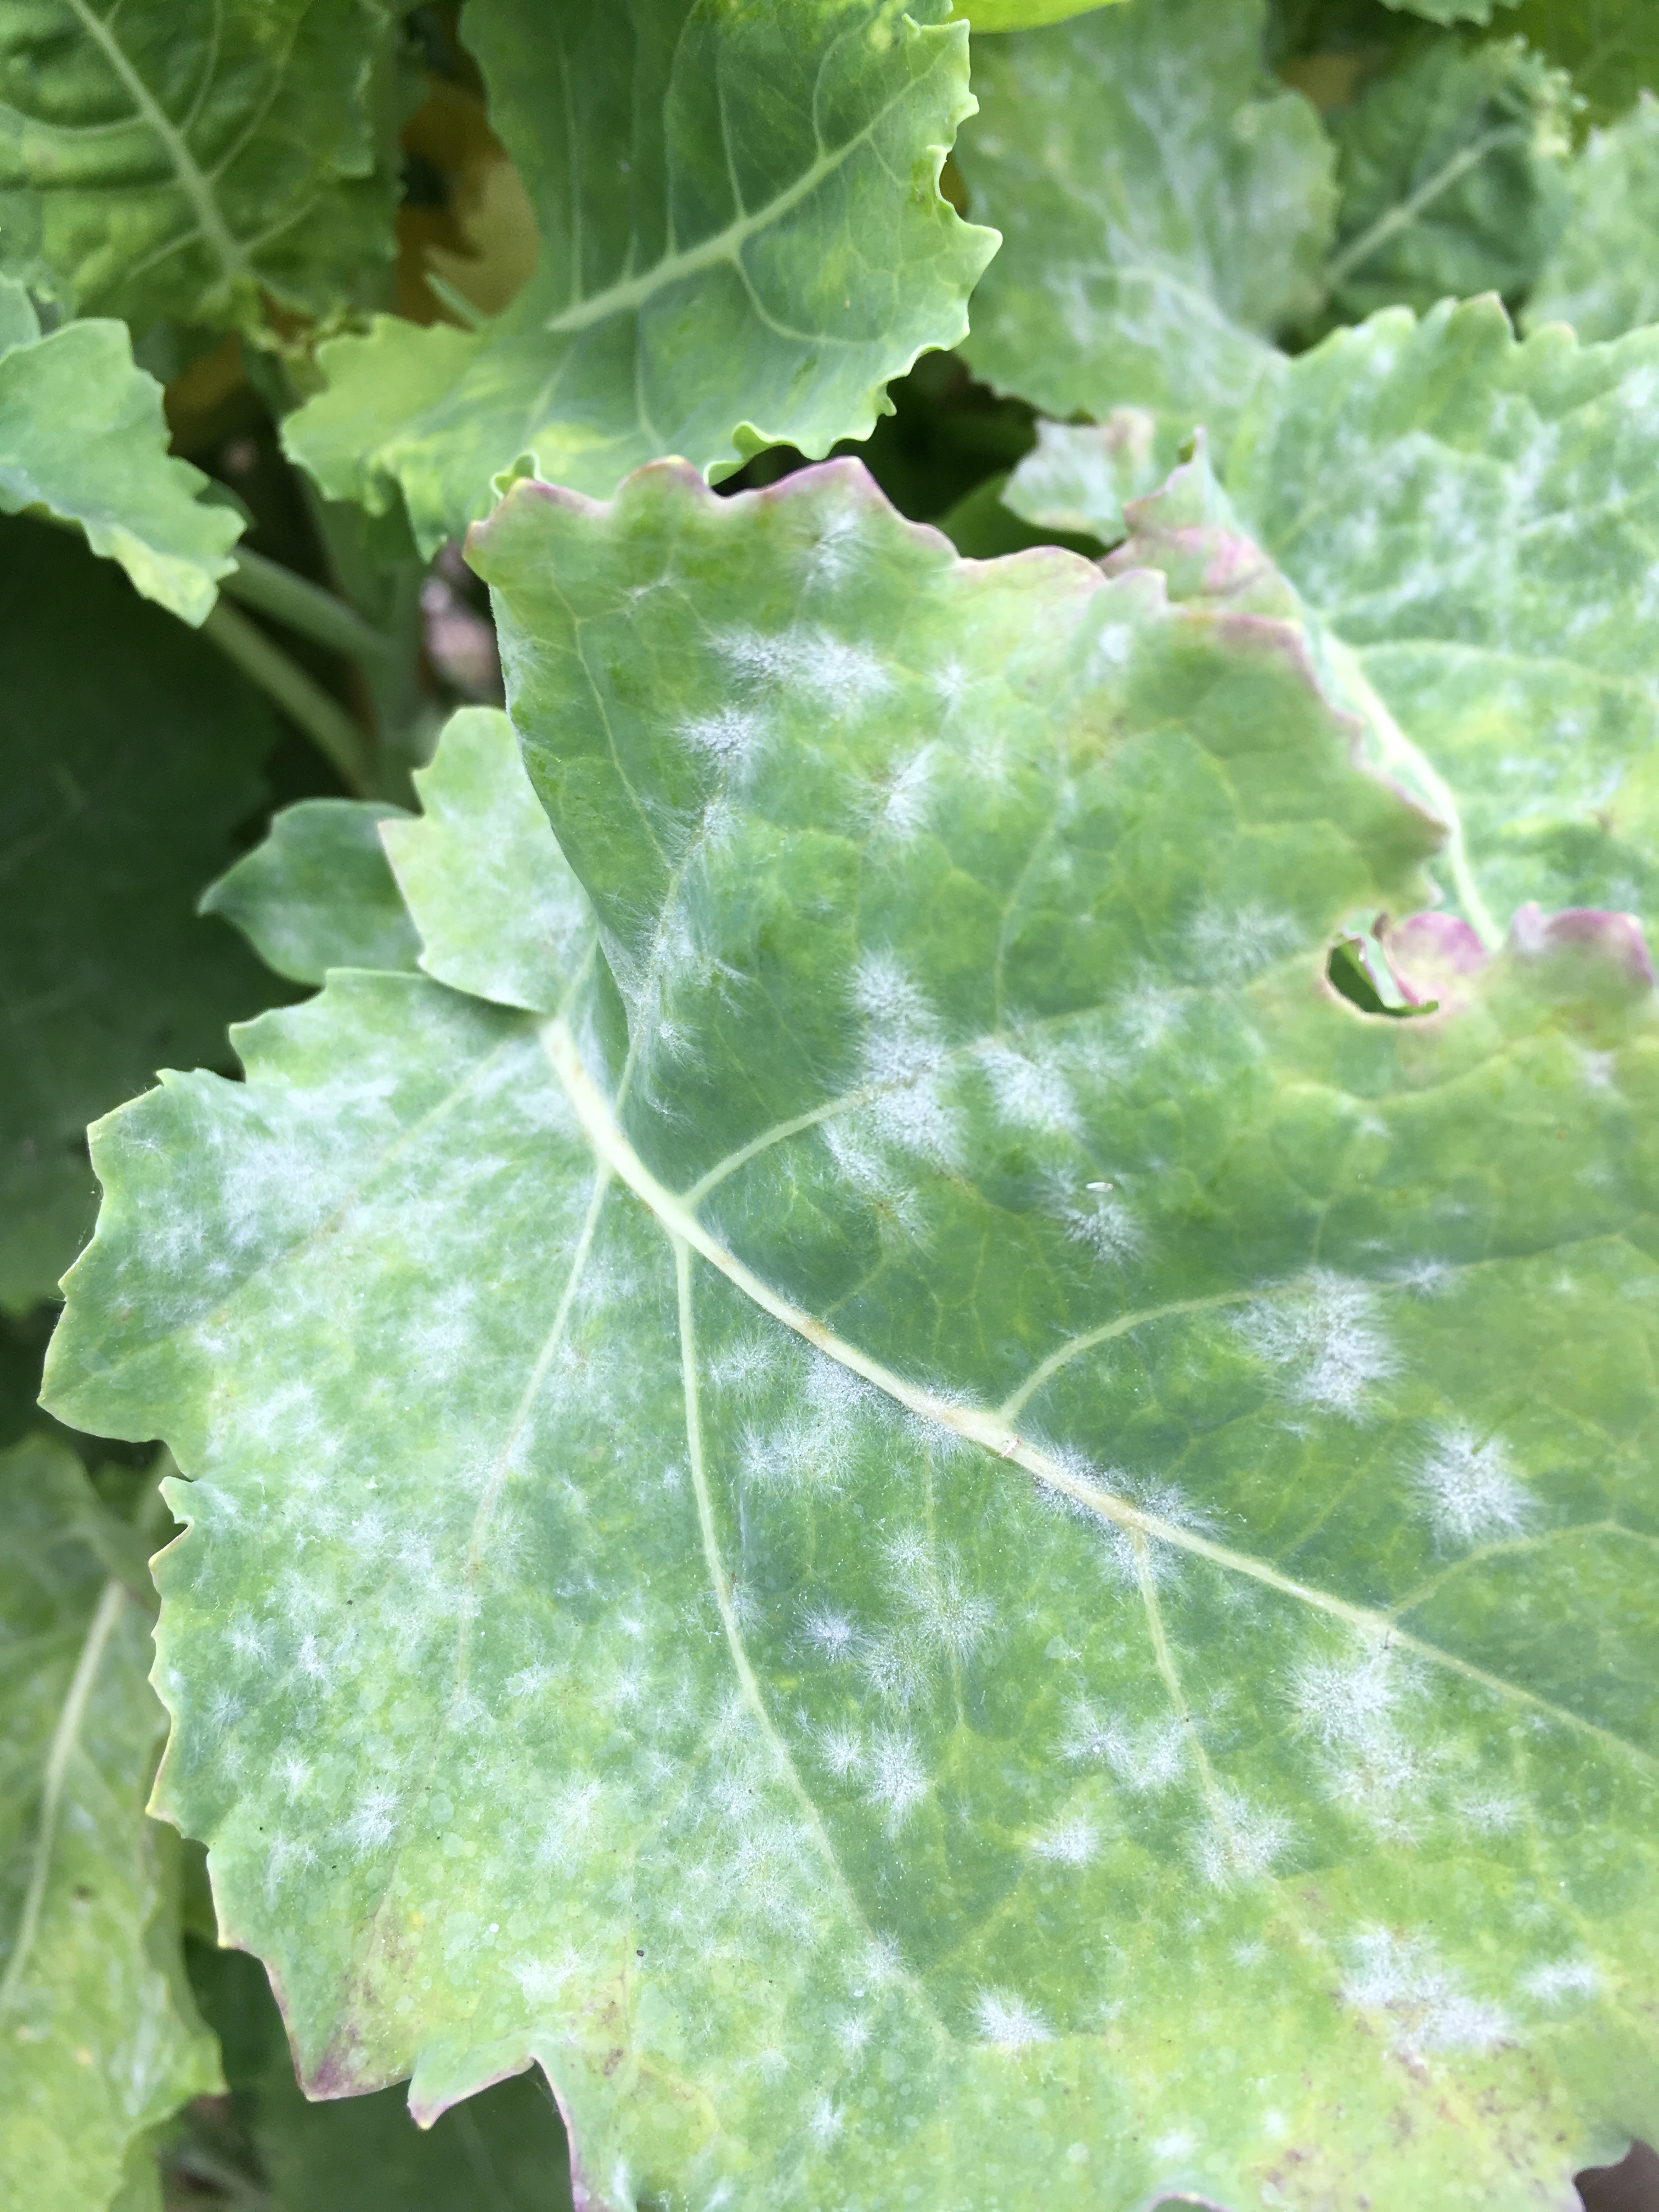
All my kales and collards, perennial or otherwise have few problems with pests beyond the occasional hole. The only thing that has been an issue has been powdery mildew. If it happens removal all the affected leaves and spray with a mix of a litre of water, a few drops of soap dish, a few drops of vegetable oil and half a teaspoon of bicarbonate soda. If caught late then it’s the same thing but you’ll be removing almost all the leaves. Whenever I have done this the plant has always sprung back after a month or so. It only happens in the hotter months when the plant is stressed from lack of water. The spores are spread by disturbance during rainfall and are specific to brassicas. So they won’t infect plants of other species and plants of other species with their own powdery mildew won’t infect your brassicas.
Because of this powdery mildew…
…this was turned into…
… this very scraggly thing.
Two weeks later it doesn’t look so bad.
Other Brassicas
Last year I tried kohl rabi for the first time. I neglected them and past harvest time they had holes munched into the leaves and swollen stem. I luckily tried to recover what I could. I’m so glad I did, as they were very sweet, tender, almost juicy and slightly nutty. It was better than any that I had bought from a shop before.
The nine star broccoli is apparently a perennial cauliflower, despite its name. I wouldn’t know as mine is pathetic. I’ve removed the flowers in the hope that it will then divert its energy to plant growth. Time will tell. I’ll let you know if it works. This is 6 months old and a pitiful 8 inches. It does not look anything like cauliflower.
Kai Lan (Chinese broccoli) is apparently perennial but I’d
never know as every time I’ve tried (and I’m Chinese … so I’ve really tried)
pretty much everything is devoured by something that isn’t me. I think the
slugs and snails gang up with the caterpillars for these.
So, in conclusion brassicas are good vegetables to grow for eating through winter, are shade tolerant and do well in alkaline soil. Out of the brassicas the collards and kales are less affected by pests. The younger leaves are tender but the older leaves less so. Harvesting can happen over a lengthy period. For the easiest option perennial kales and collards are edible all year round, including the hungry gap and requires none of the faff of yearly sowing, thinning, planting out and crop rotation. In small spaces a perennial kale is the most efficient use of space and time for growing food.
I cannot recommend Daubenton’s kale enough. I think it may be our family’s favourite green. It’s not easy to get hold of but I think it’s well worth the effort.
In the interest of experimentation I need to try another perennial kale. I have my sights set on Taunton Deane and I WILL find a space in the garden…. Er… somehow.
I’d like to show you how we built the easiest and most convenient one. The others, in more detail at the end either require either more than one pallet, a lot more work or can be more difficult to maintain once finished.
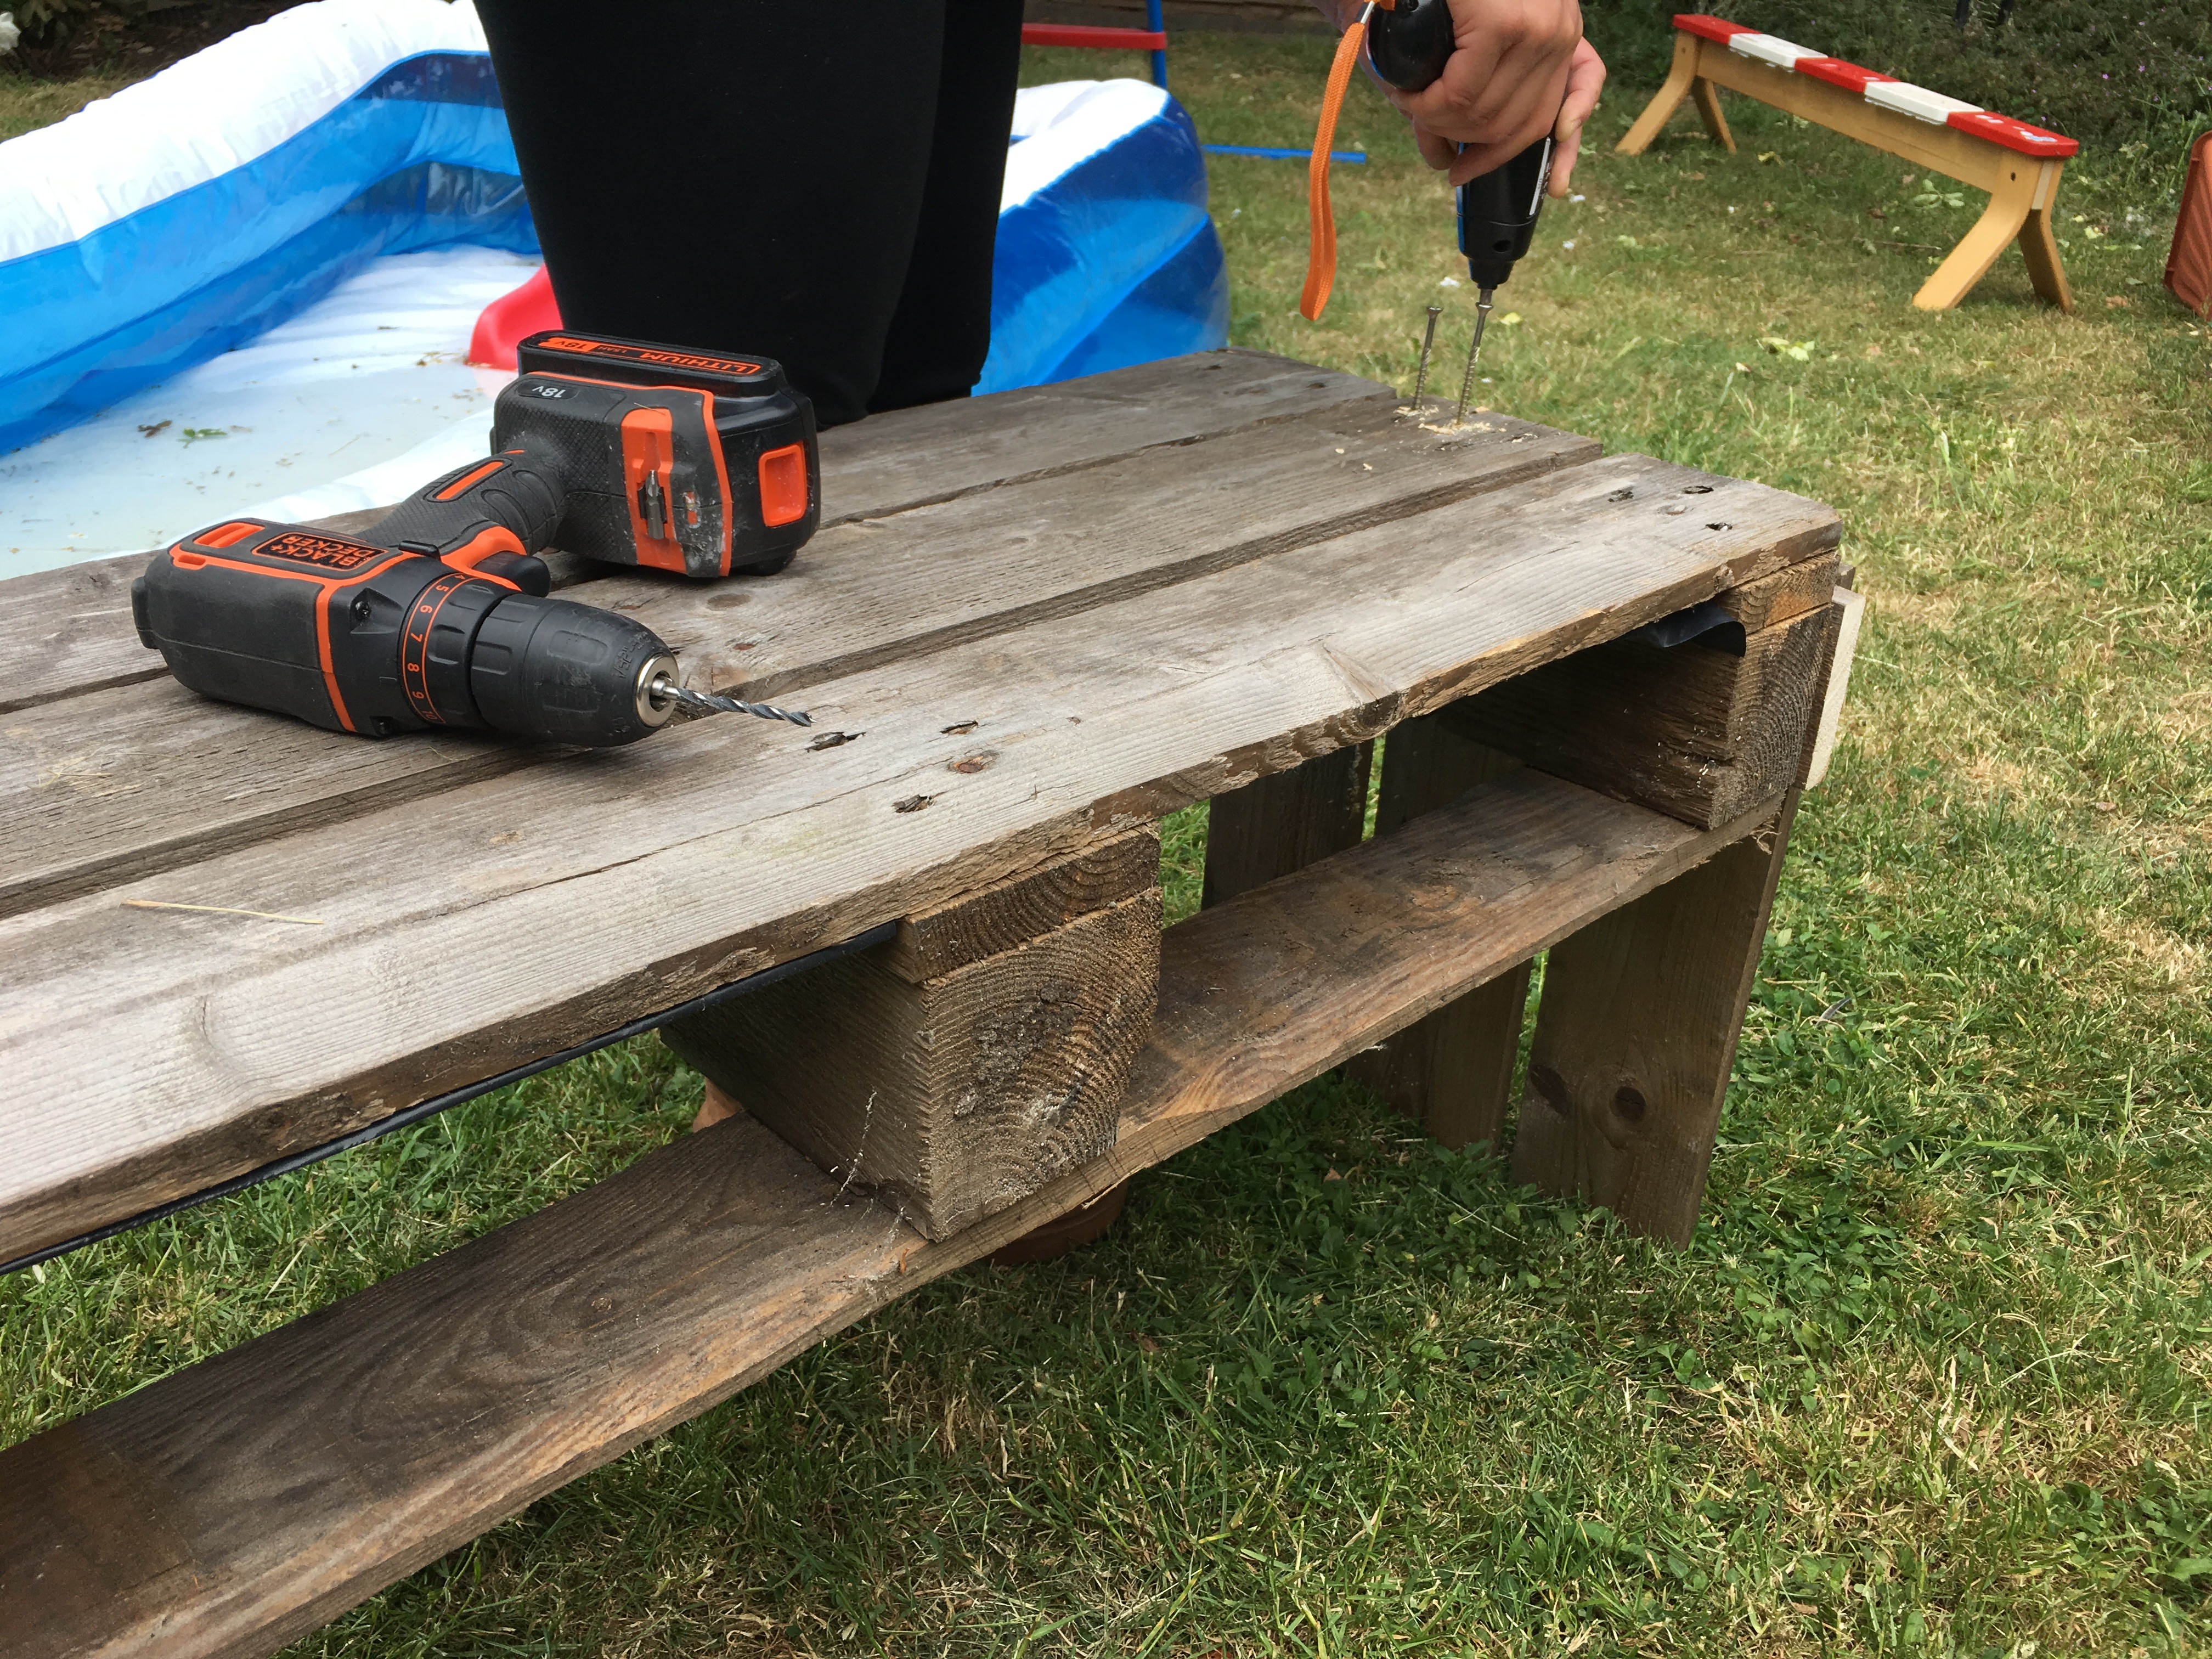
Materials:
One Pallet Check for safety. Generally if they have no markings then they have not been treated. Markings like DB – debarked, KD – kiln dried, HT – heat treated are all safe. MB means treated with methyl bromide and is to be avoided. Check for spillages on the pallet. If you can’t identify the spill then be aware it could be an unsafe chemical.
Screws – length and number depends on your pallet and how many pieces of wood you need to go through and how you’re putting it together. The pallet you have may be very different to the one I used. Here’s your chance to get creative! If in doubt about 30 self tapping wood screws around 5cm in length should do. They will typically be phillips (cross head) screws. Self tapping means you shouldn’t need to drill a thinner hole into the wood first.
Optional Extras:
Landscaping fabric or plastic sheeting – thick black bin liners or rubble bags will also do for plastic sheeting. Landscaping fabric won’t help protect the wood from rotting but may feel more natural.
Staples
Tools:
Hand saw
Electric screwdriver with a Philips screw bit – I’d call this essential as a manual screwdriver will have driven you insane after the first two screws and you’ll give up unless you’re really tenacious.
Hammer
Protective gloves – why get avoidable splinters?
Optional extras:
Circular saw (with safety goggles)
Crowbar
Scissors
Staple gun
Electric drill
(or wood drill bit that can be swapped in for your screw driver head)
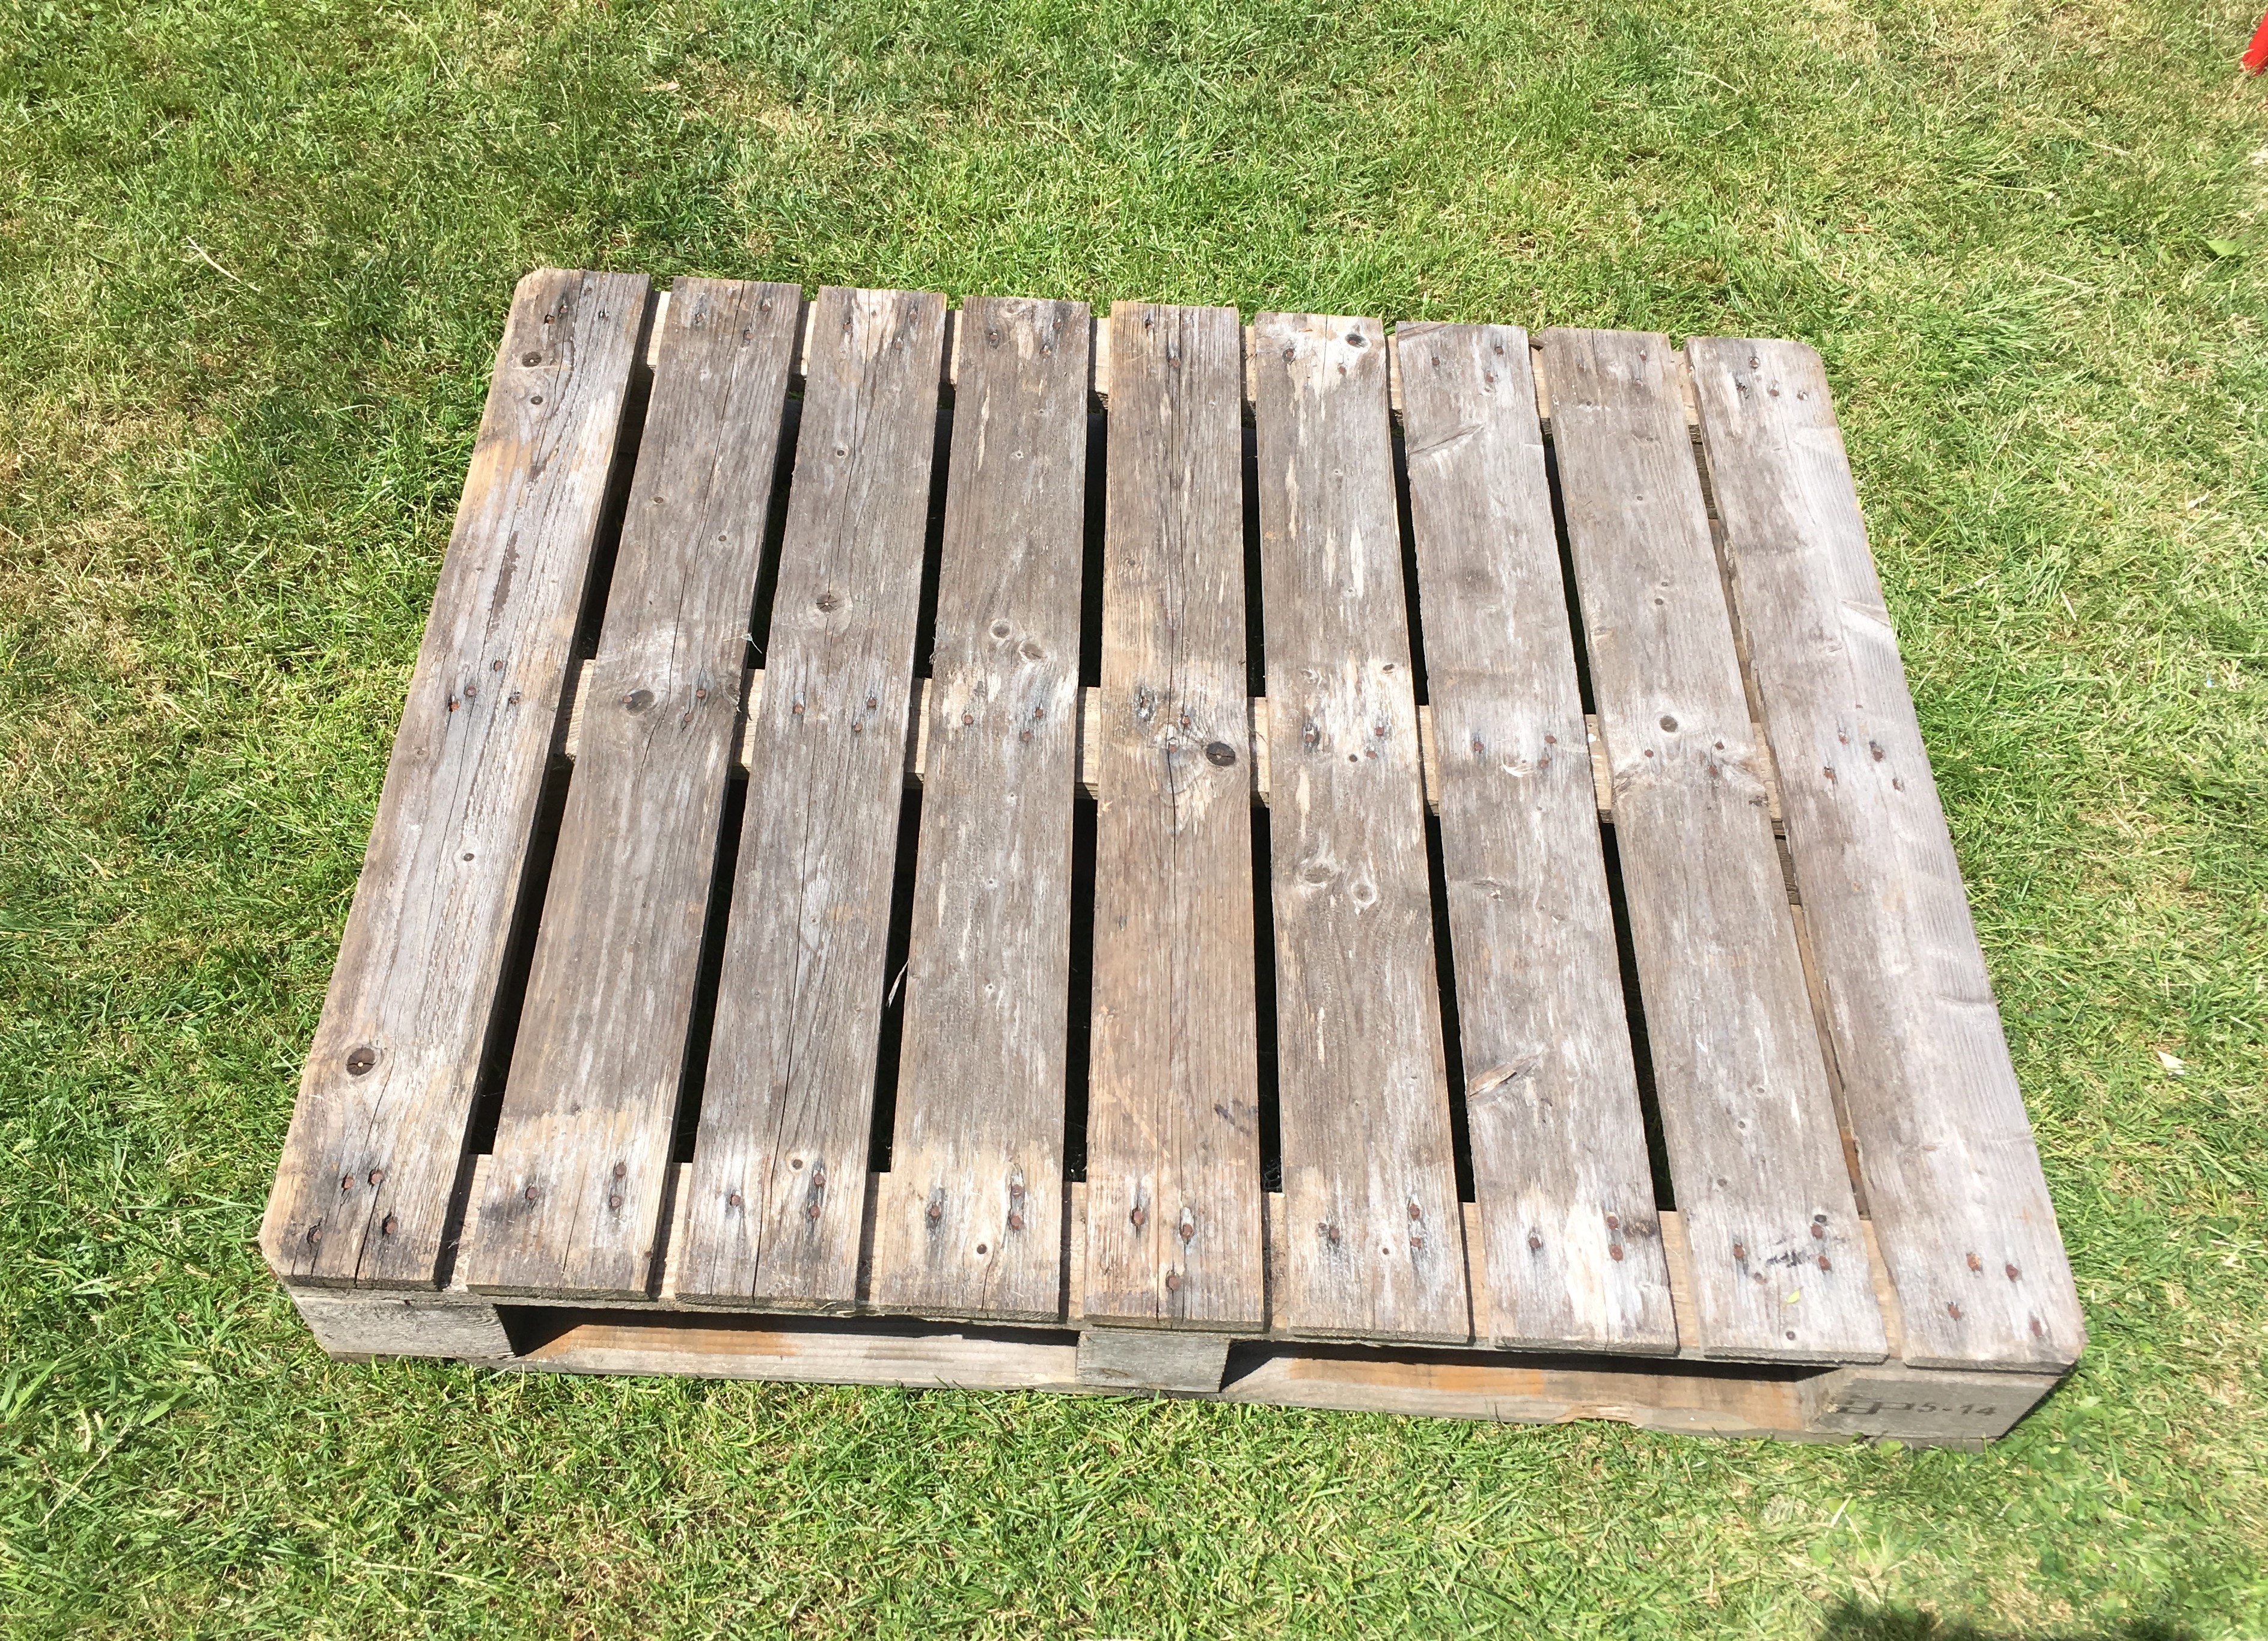
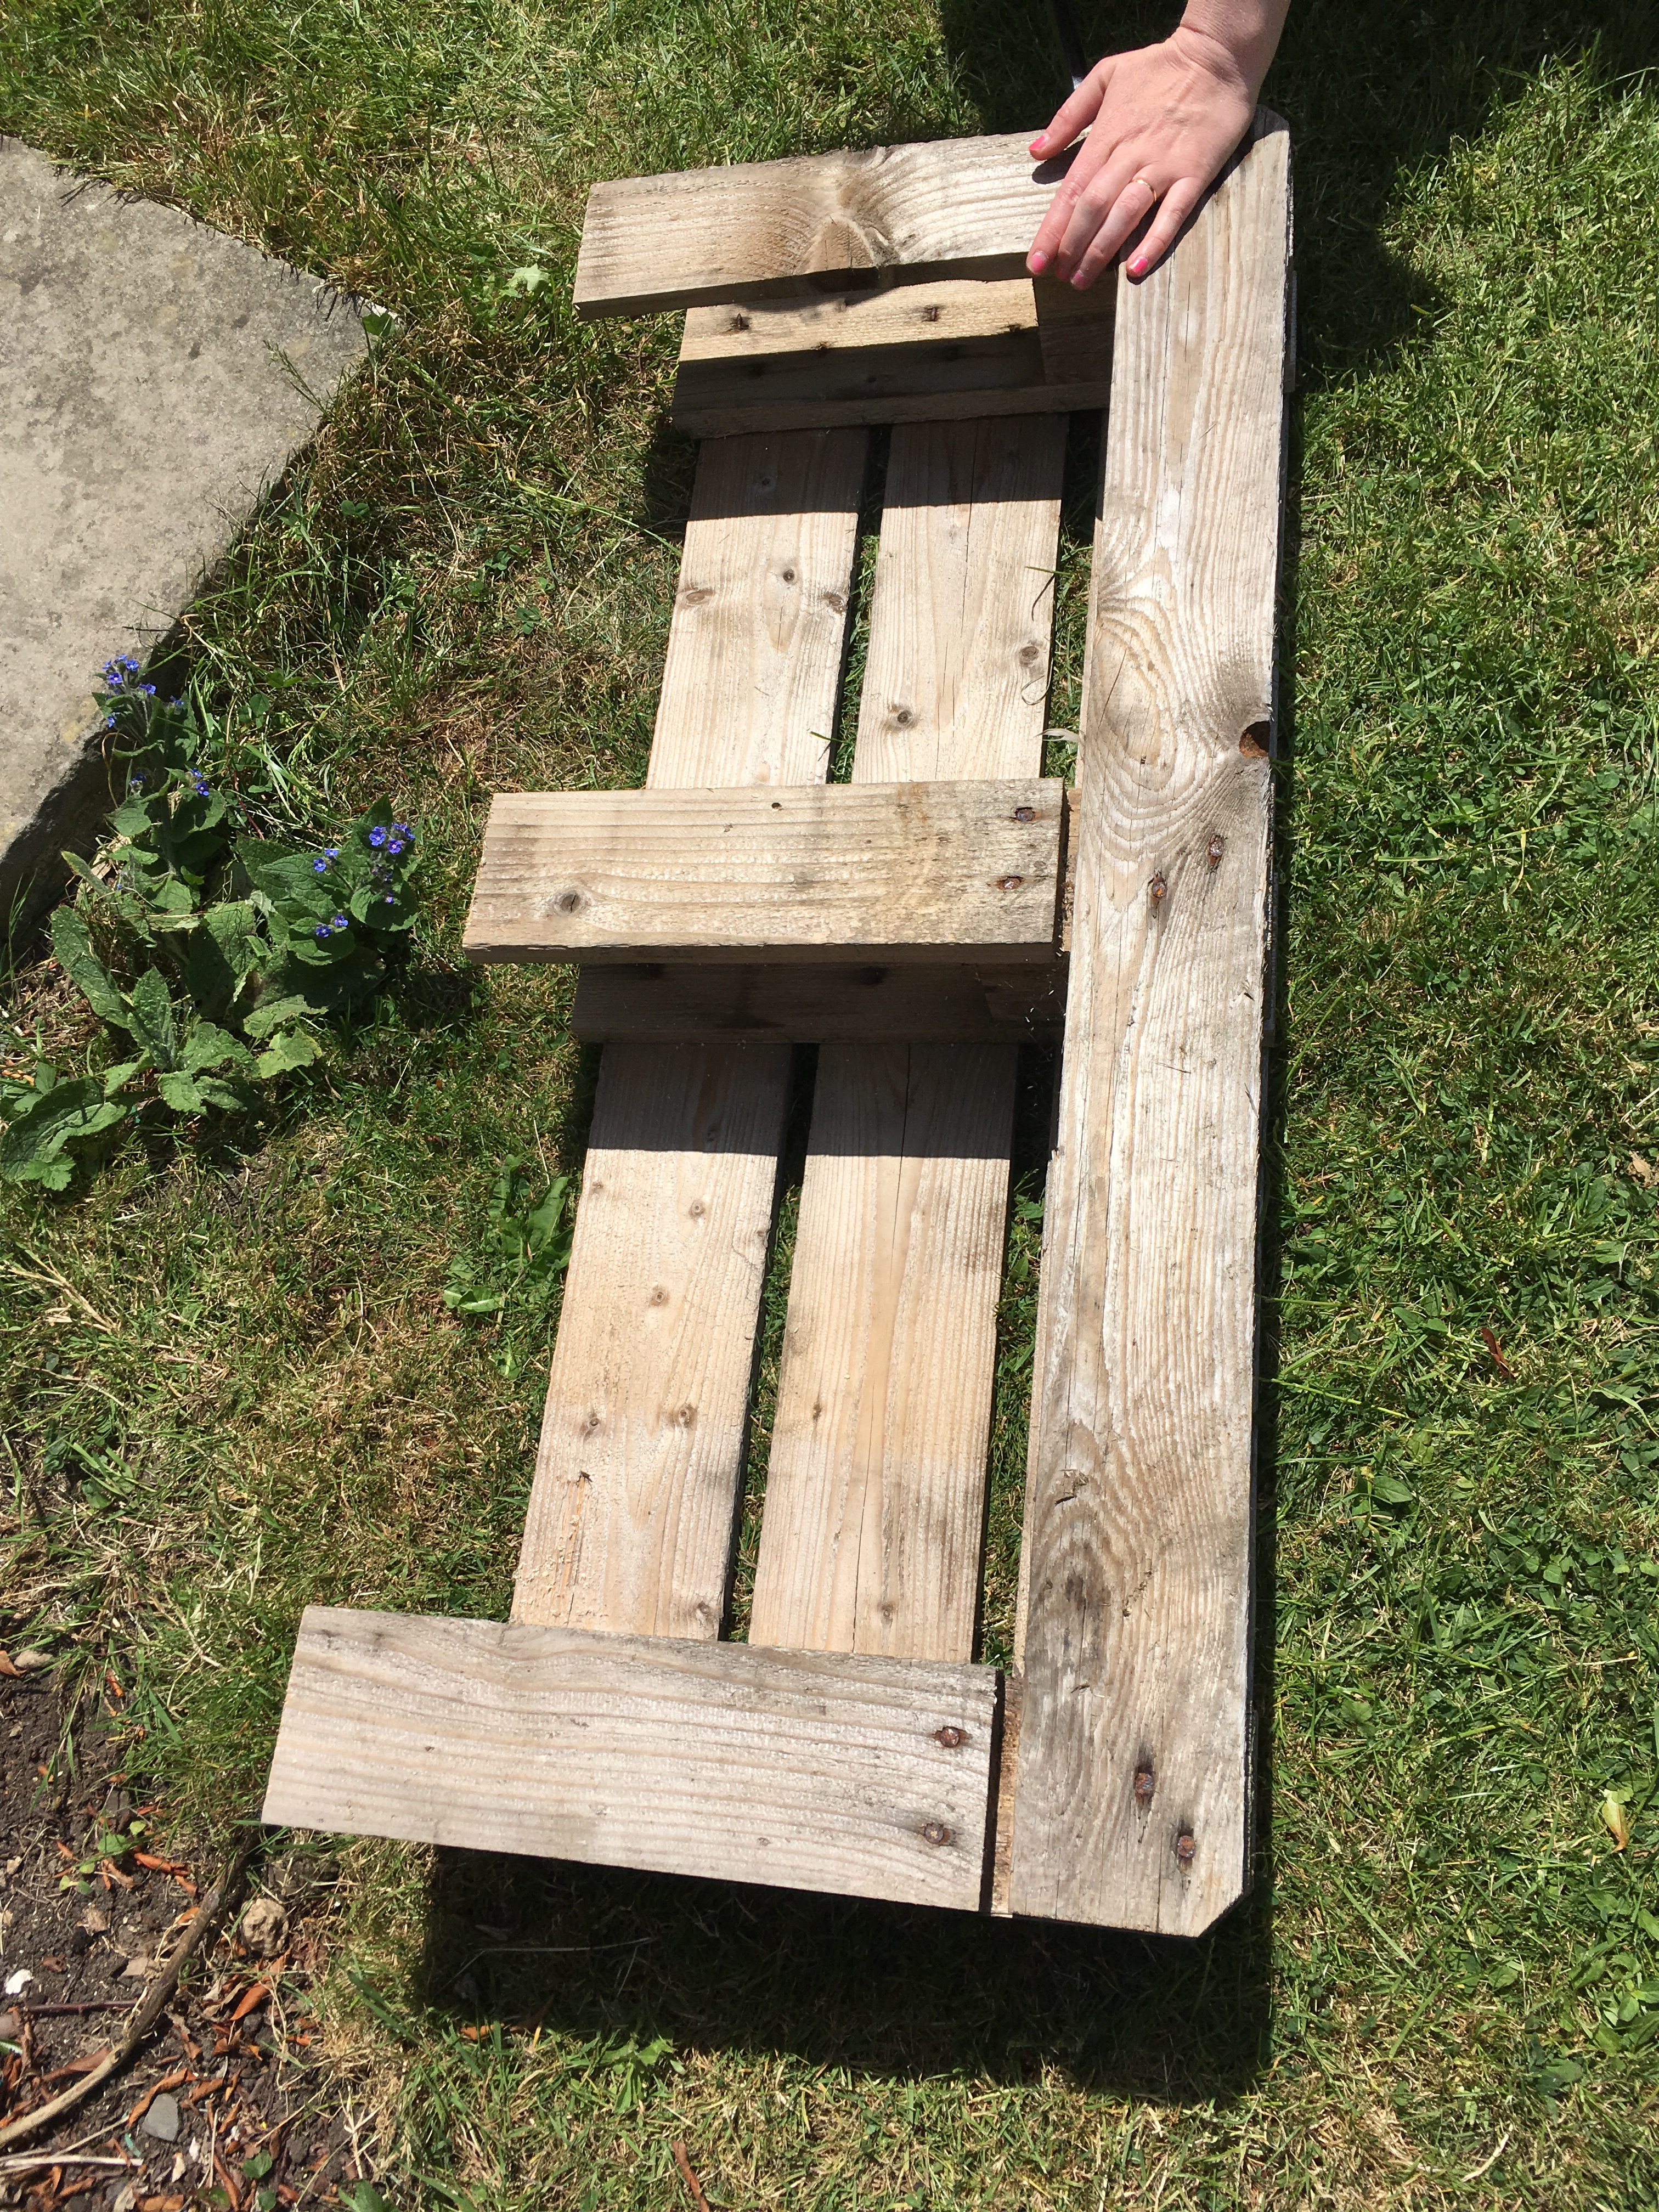
Step 1 – Get a pallet
If you don’t have your own have a look around your local streets for anyone who having works done. I have seen them left outside people’s houses for the taking. This seems to be the new unofficial London way of reusing. For anyone unfamiliar with the practise, residents leave unwanted but still usable things outside on the street and anyone passing can help themselves. Sometimes it will have helpful note attached.
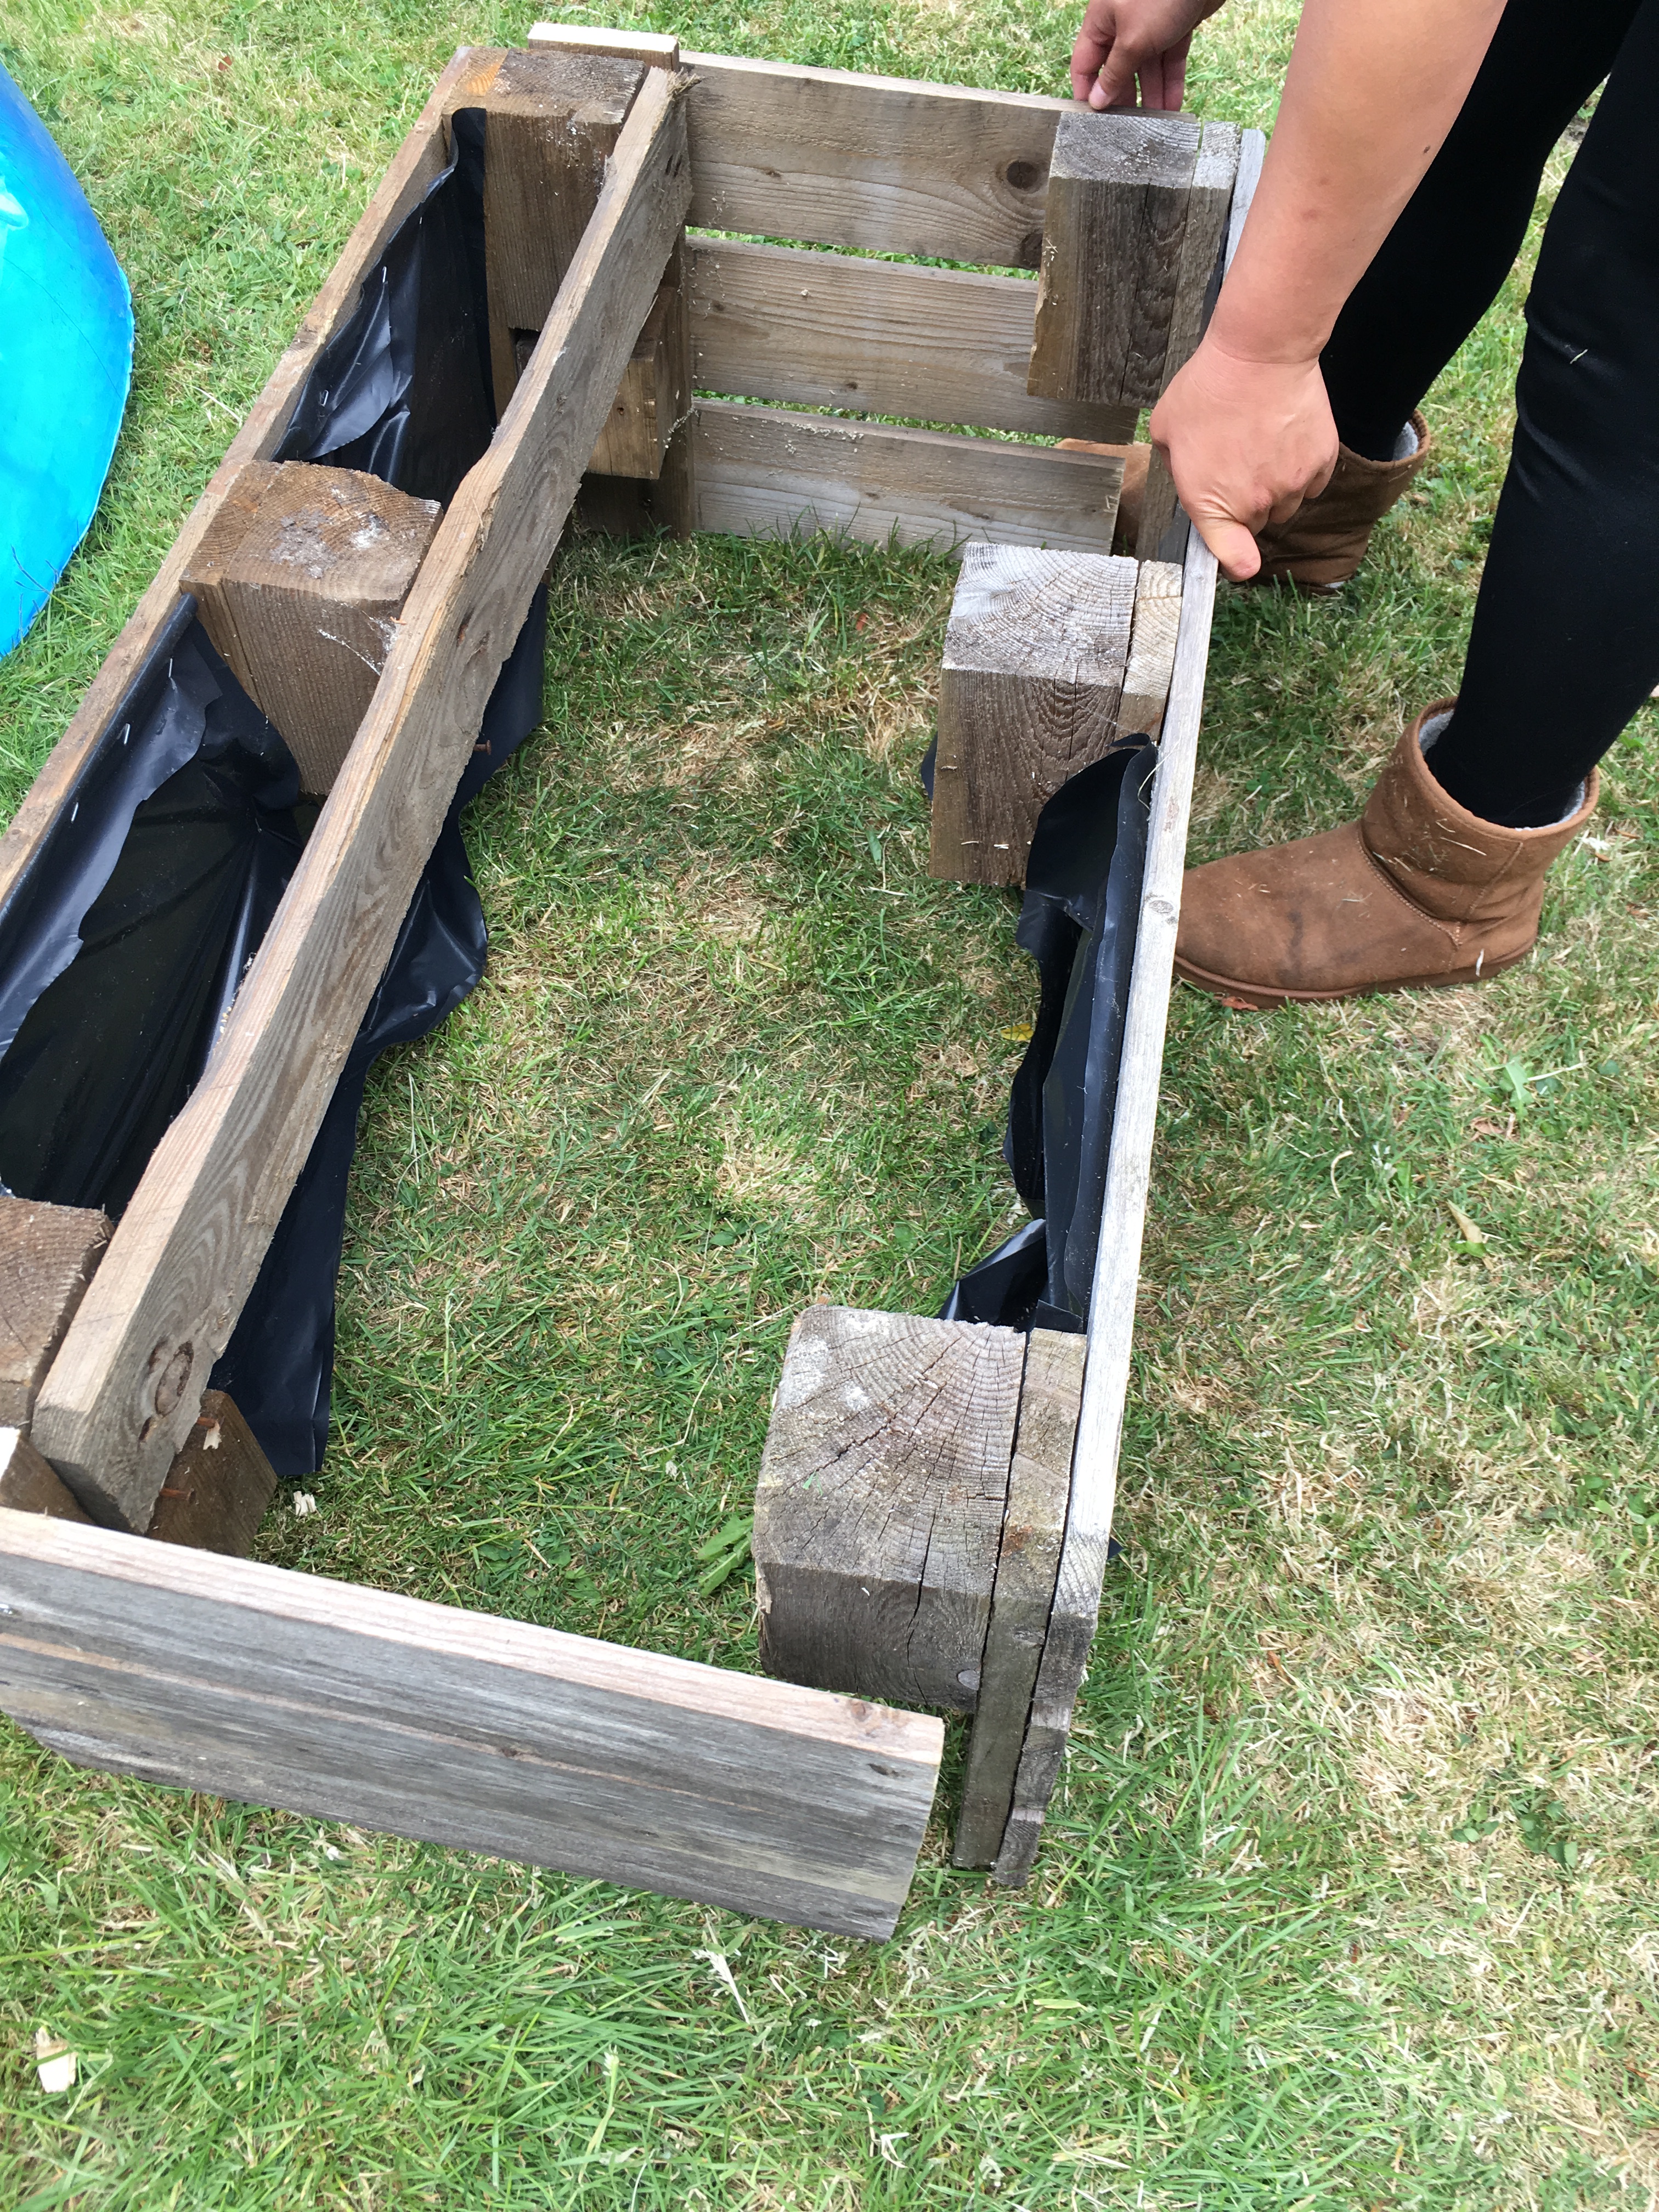
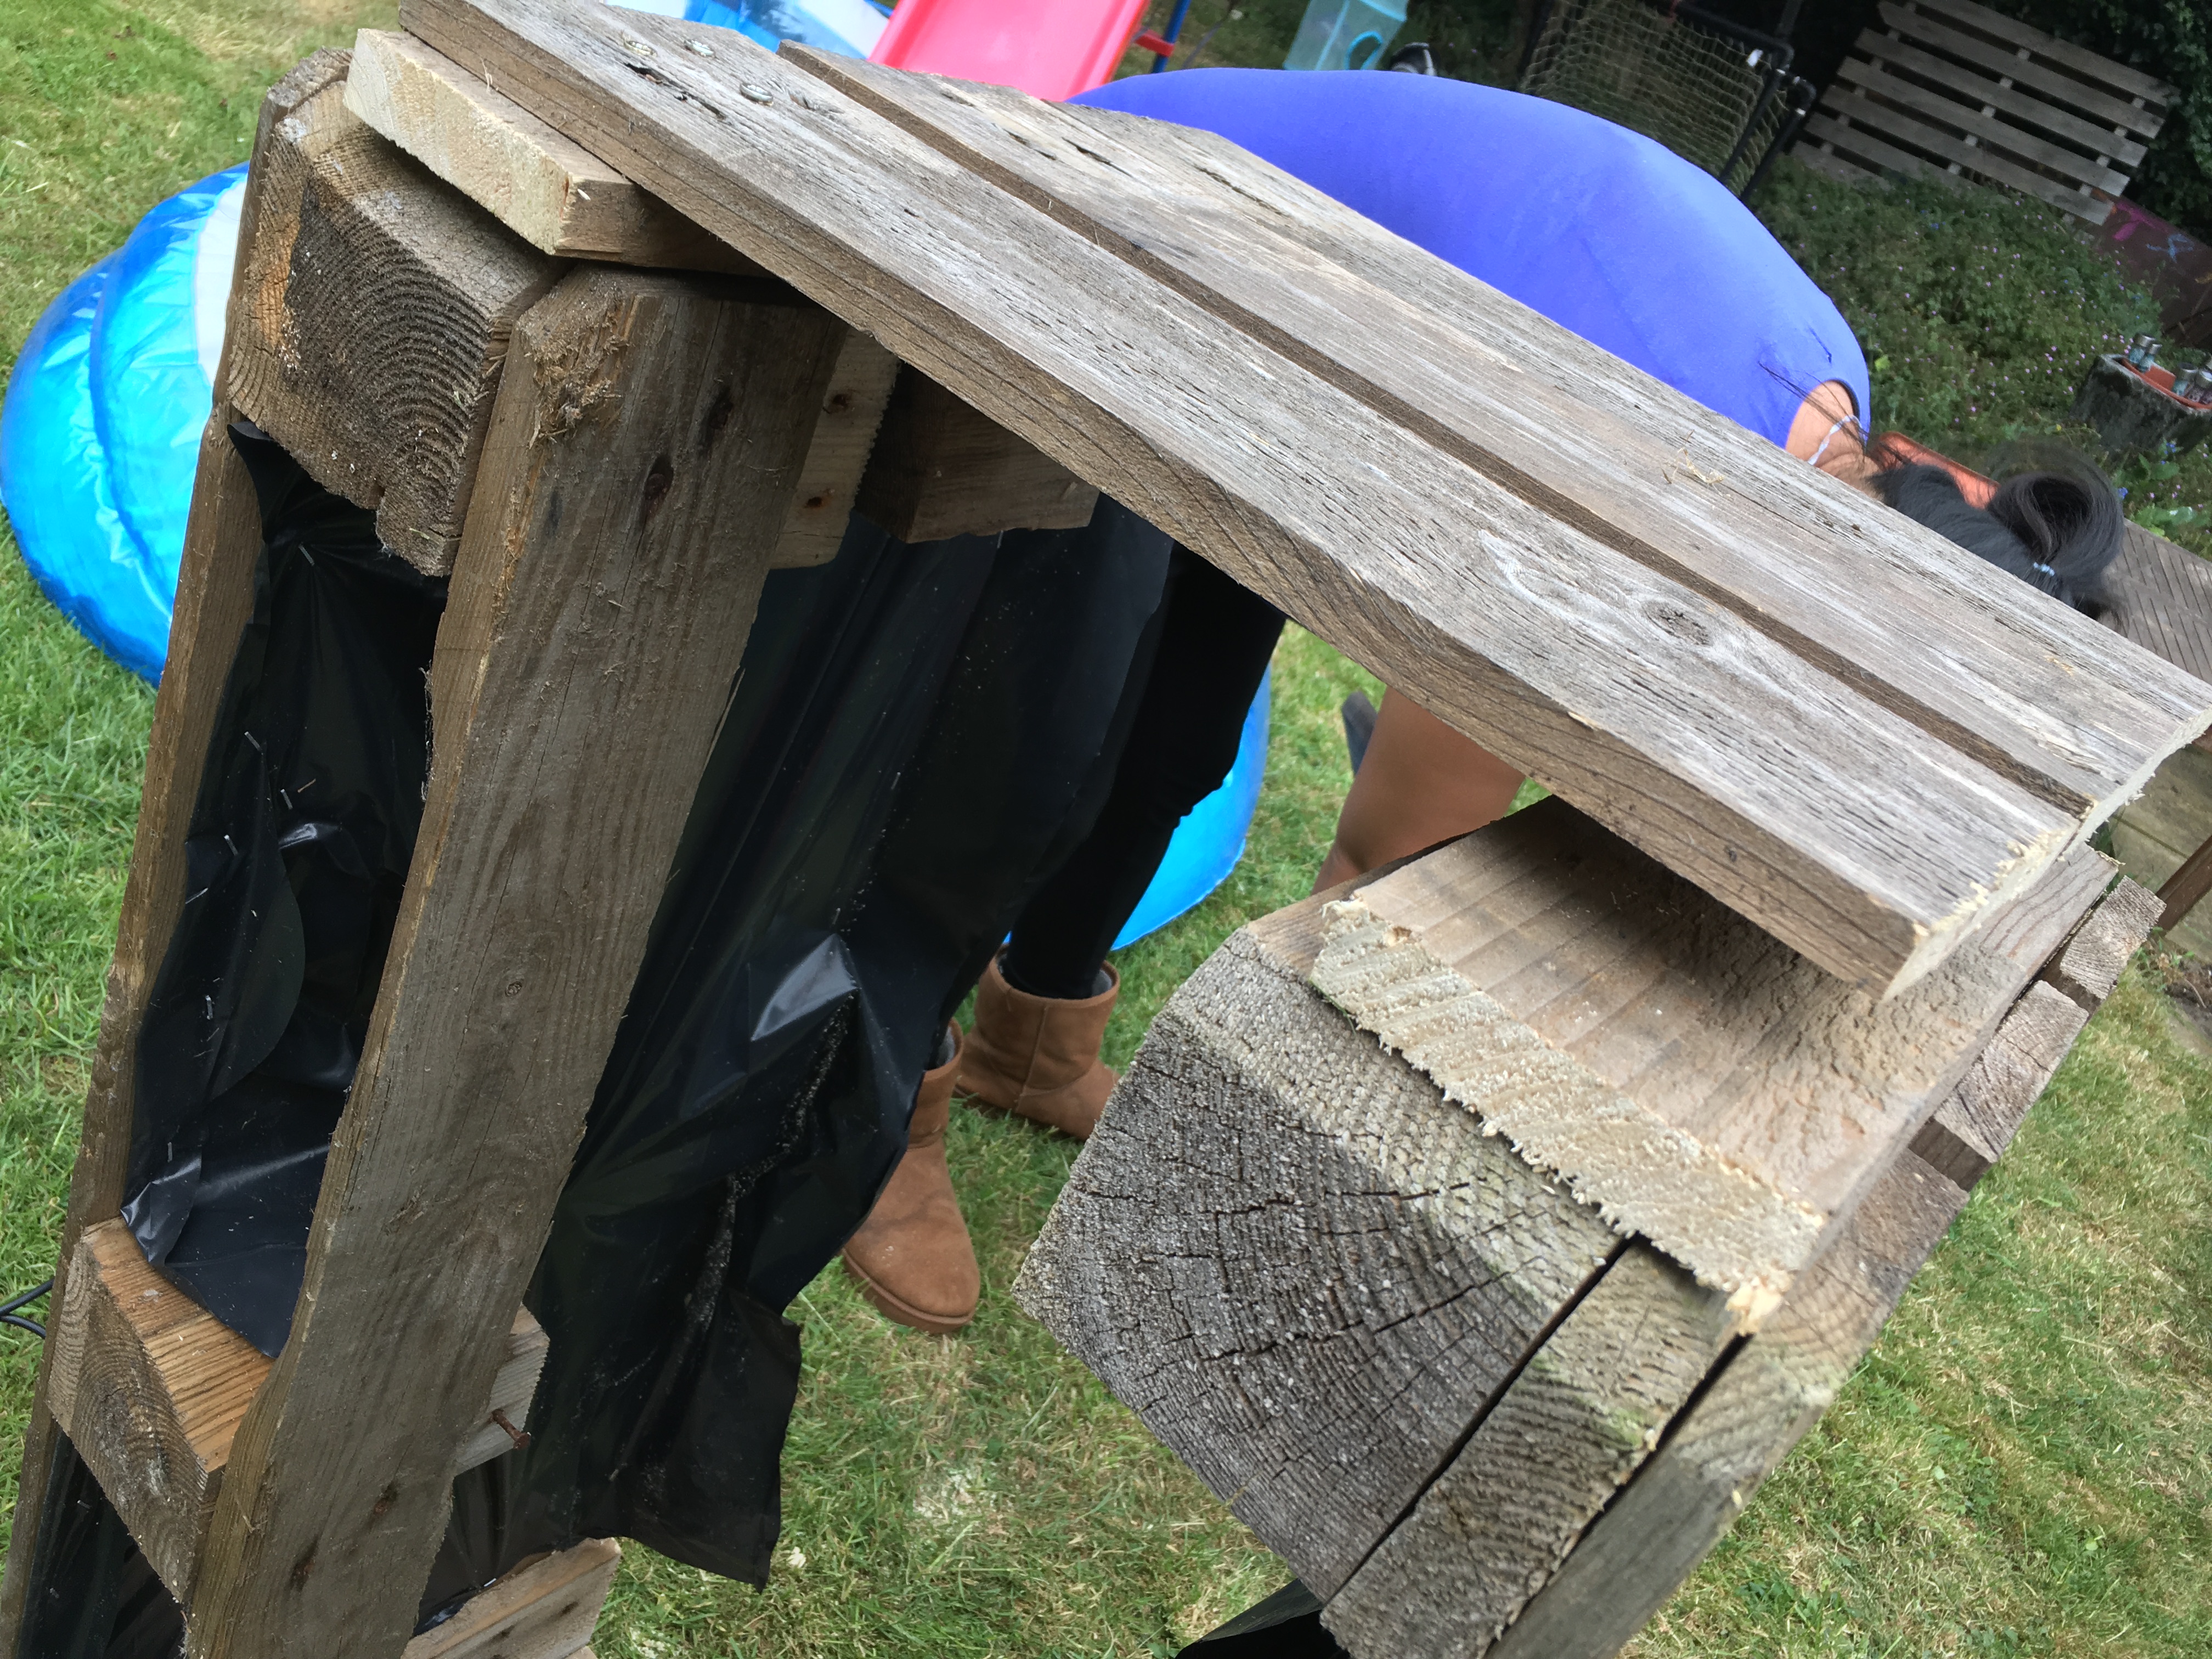
Step 2 – Plan and cut the pallet
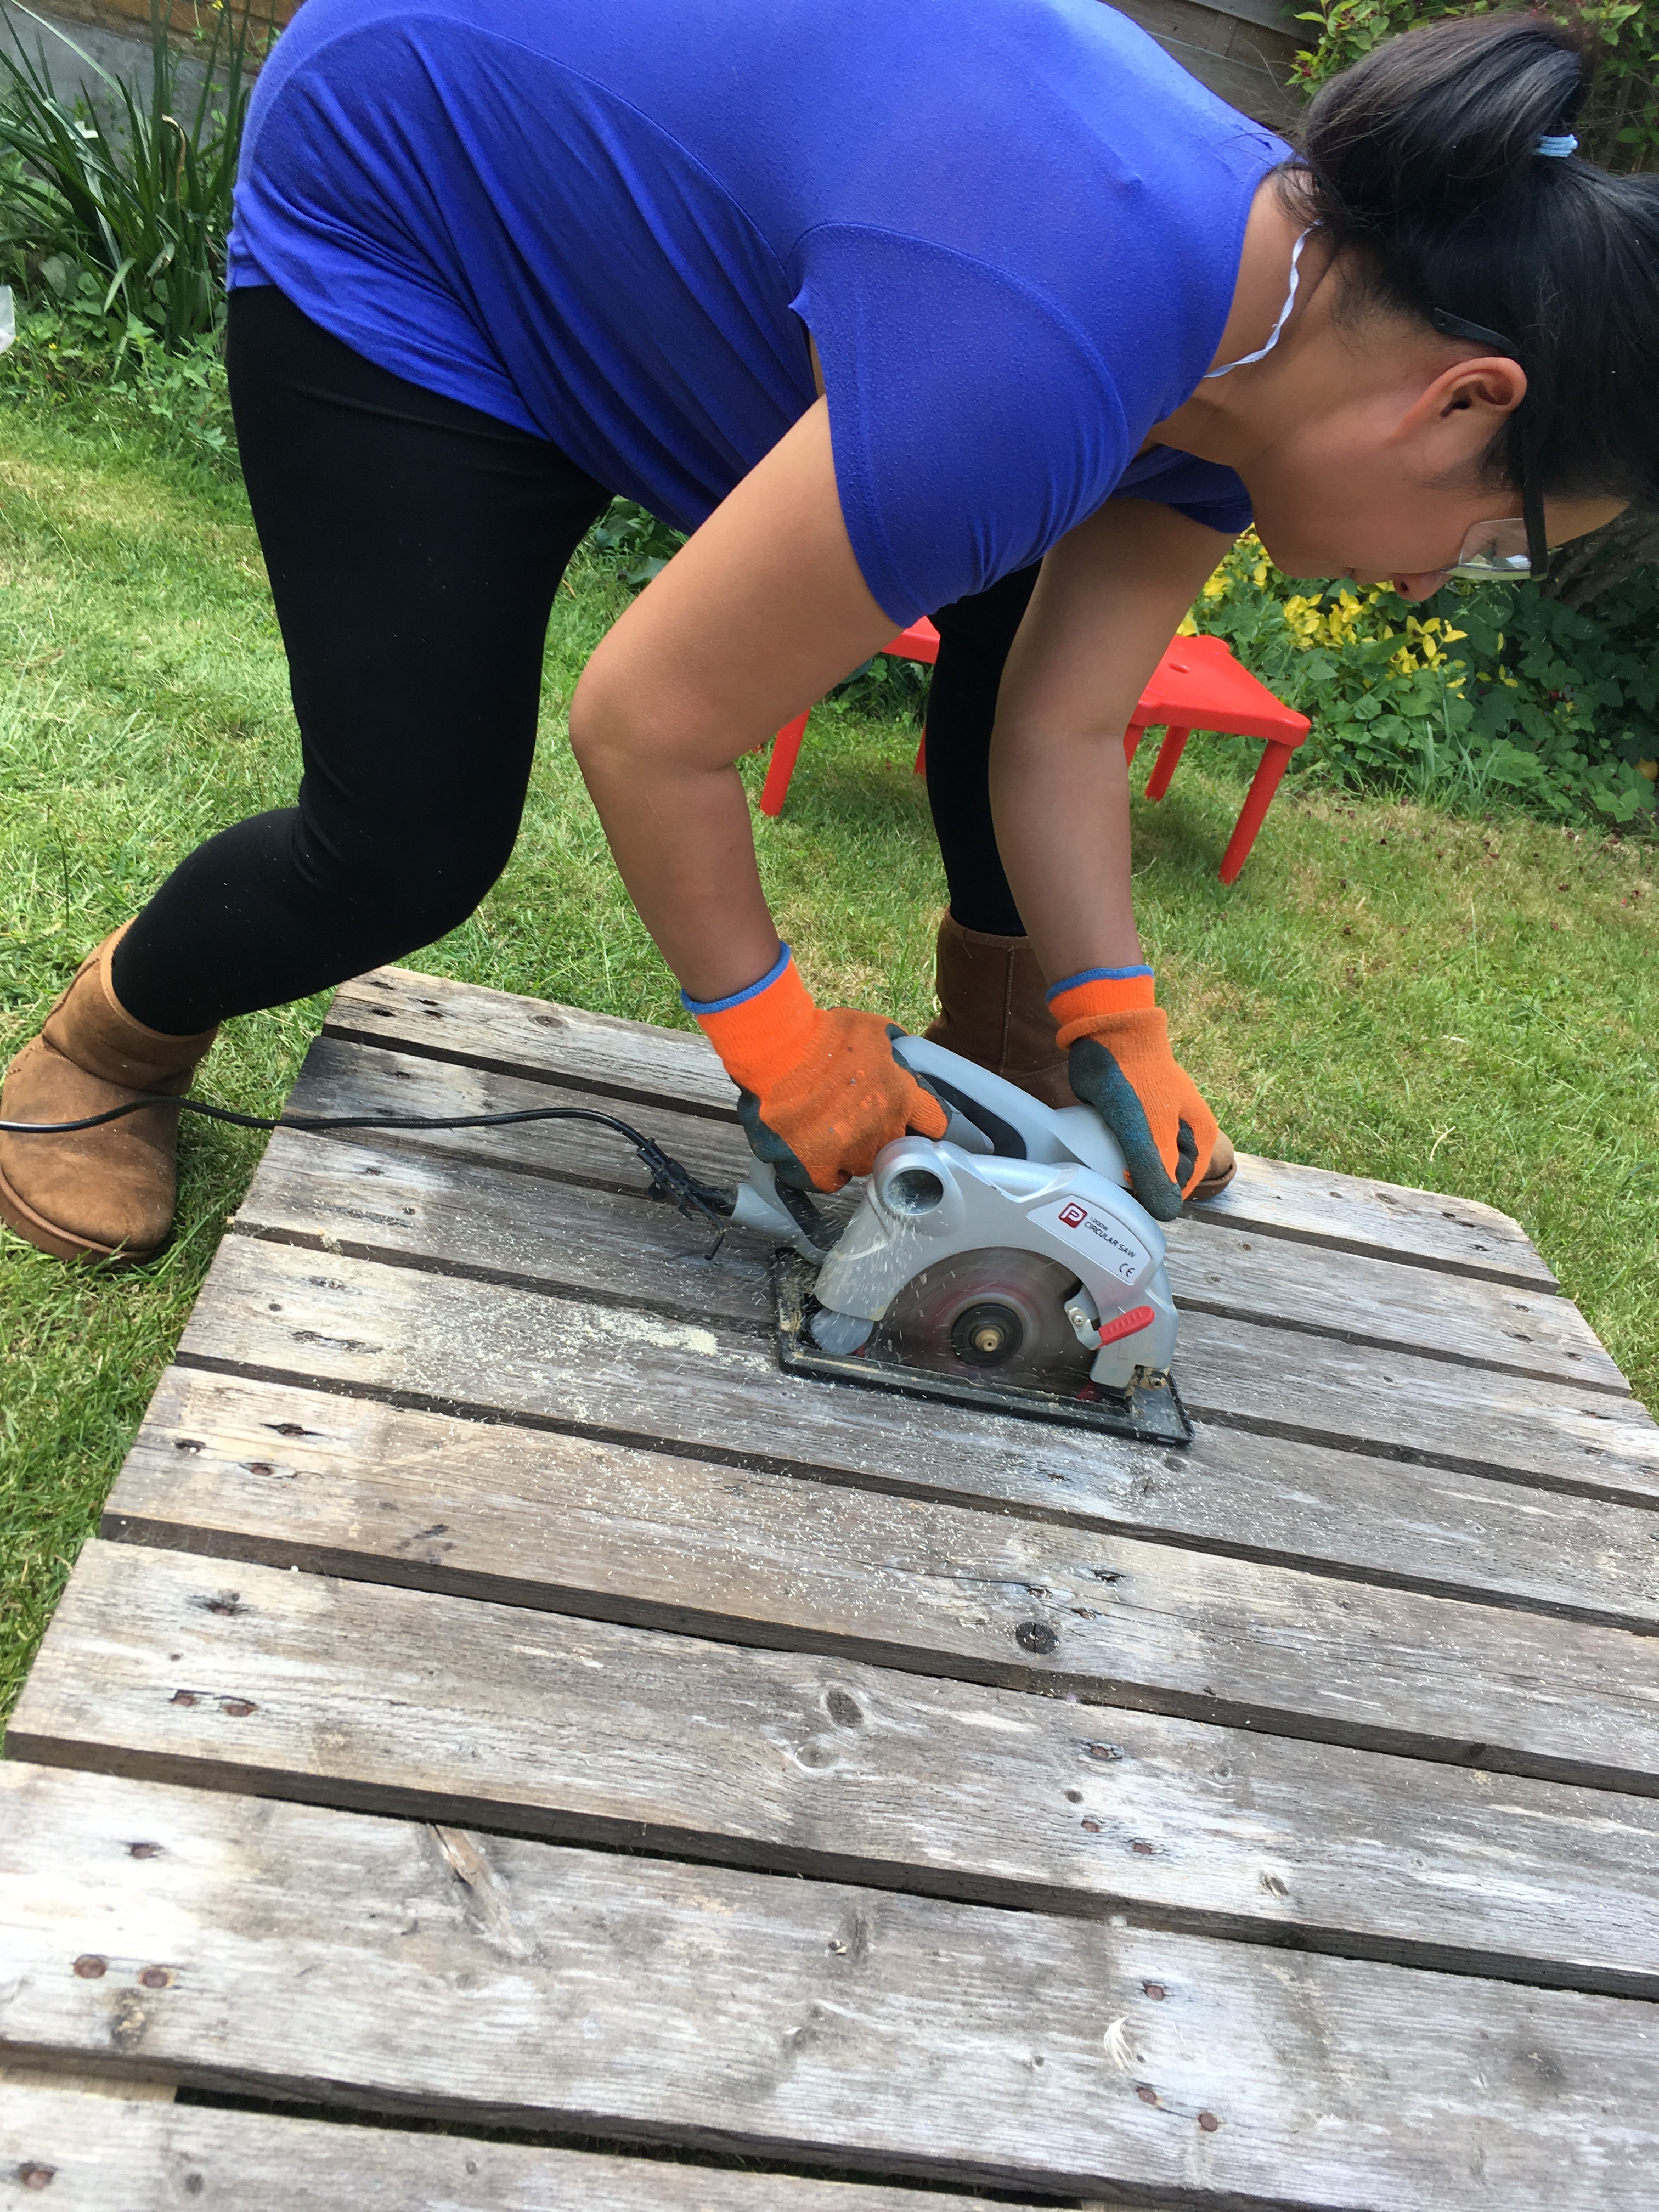
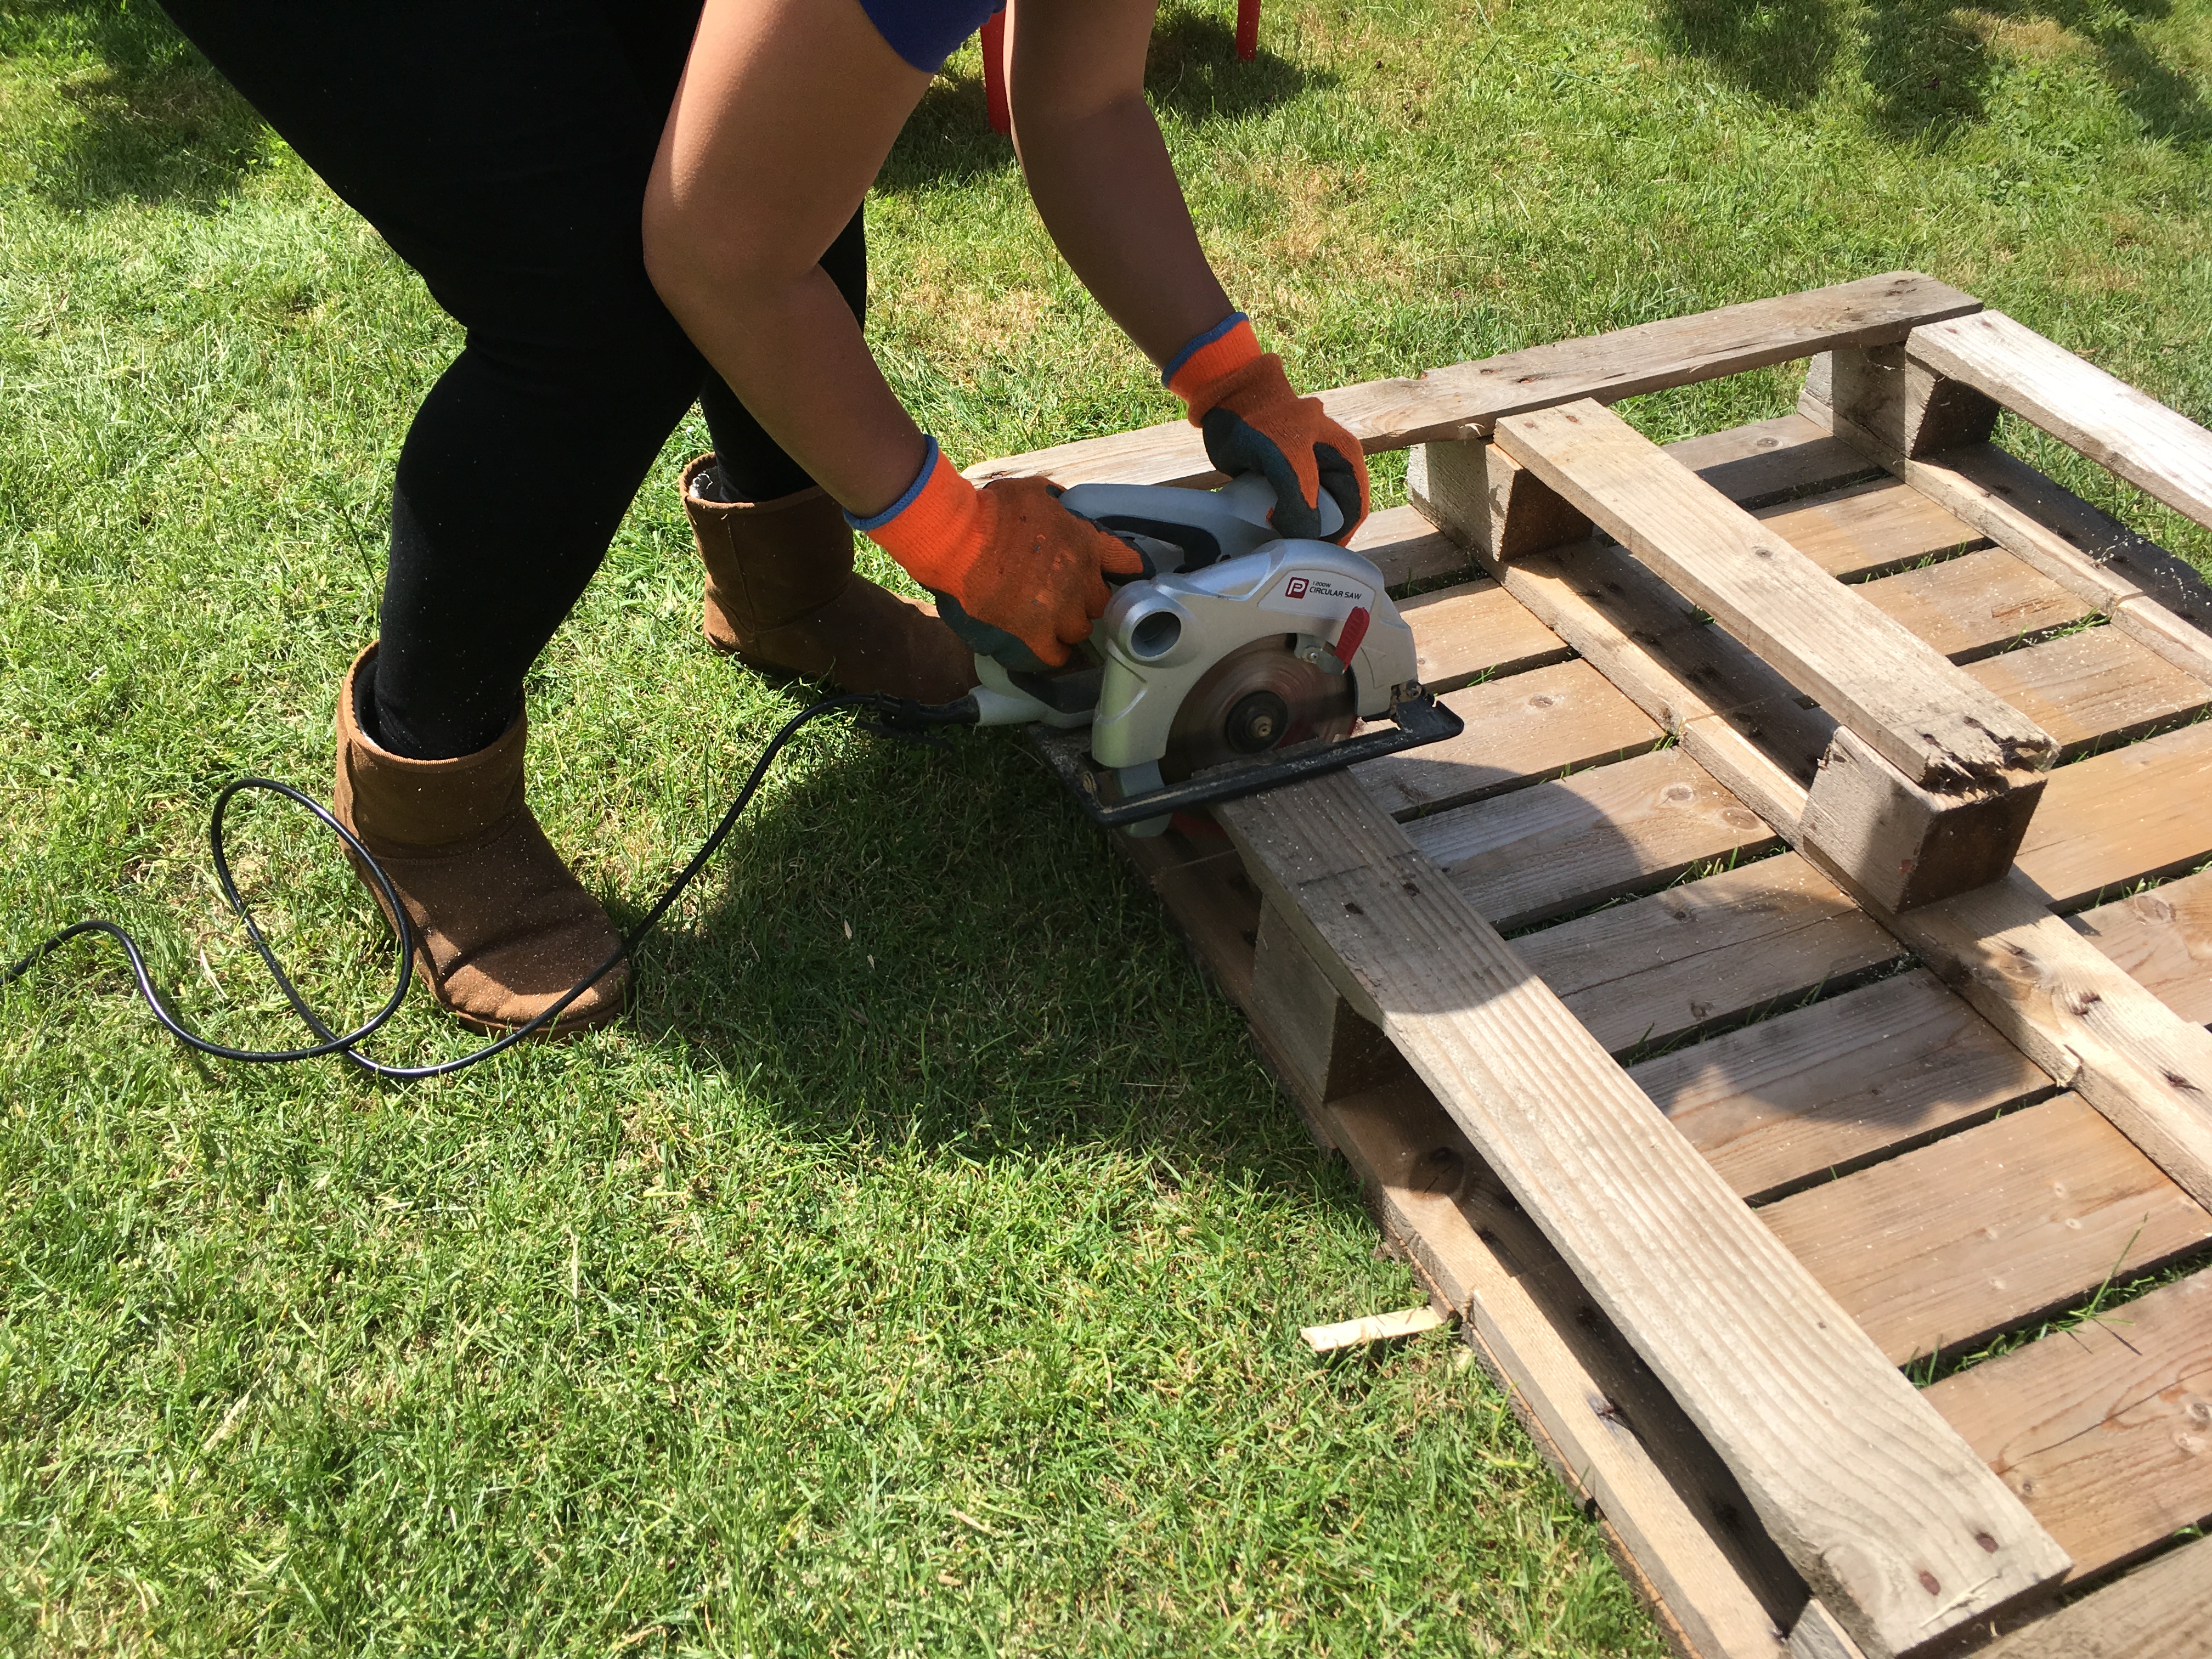
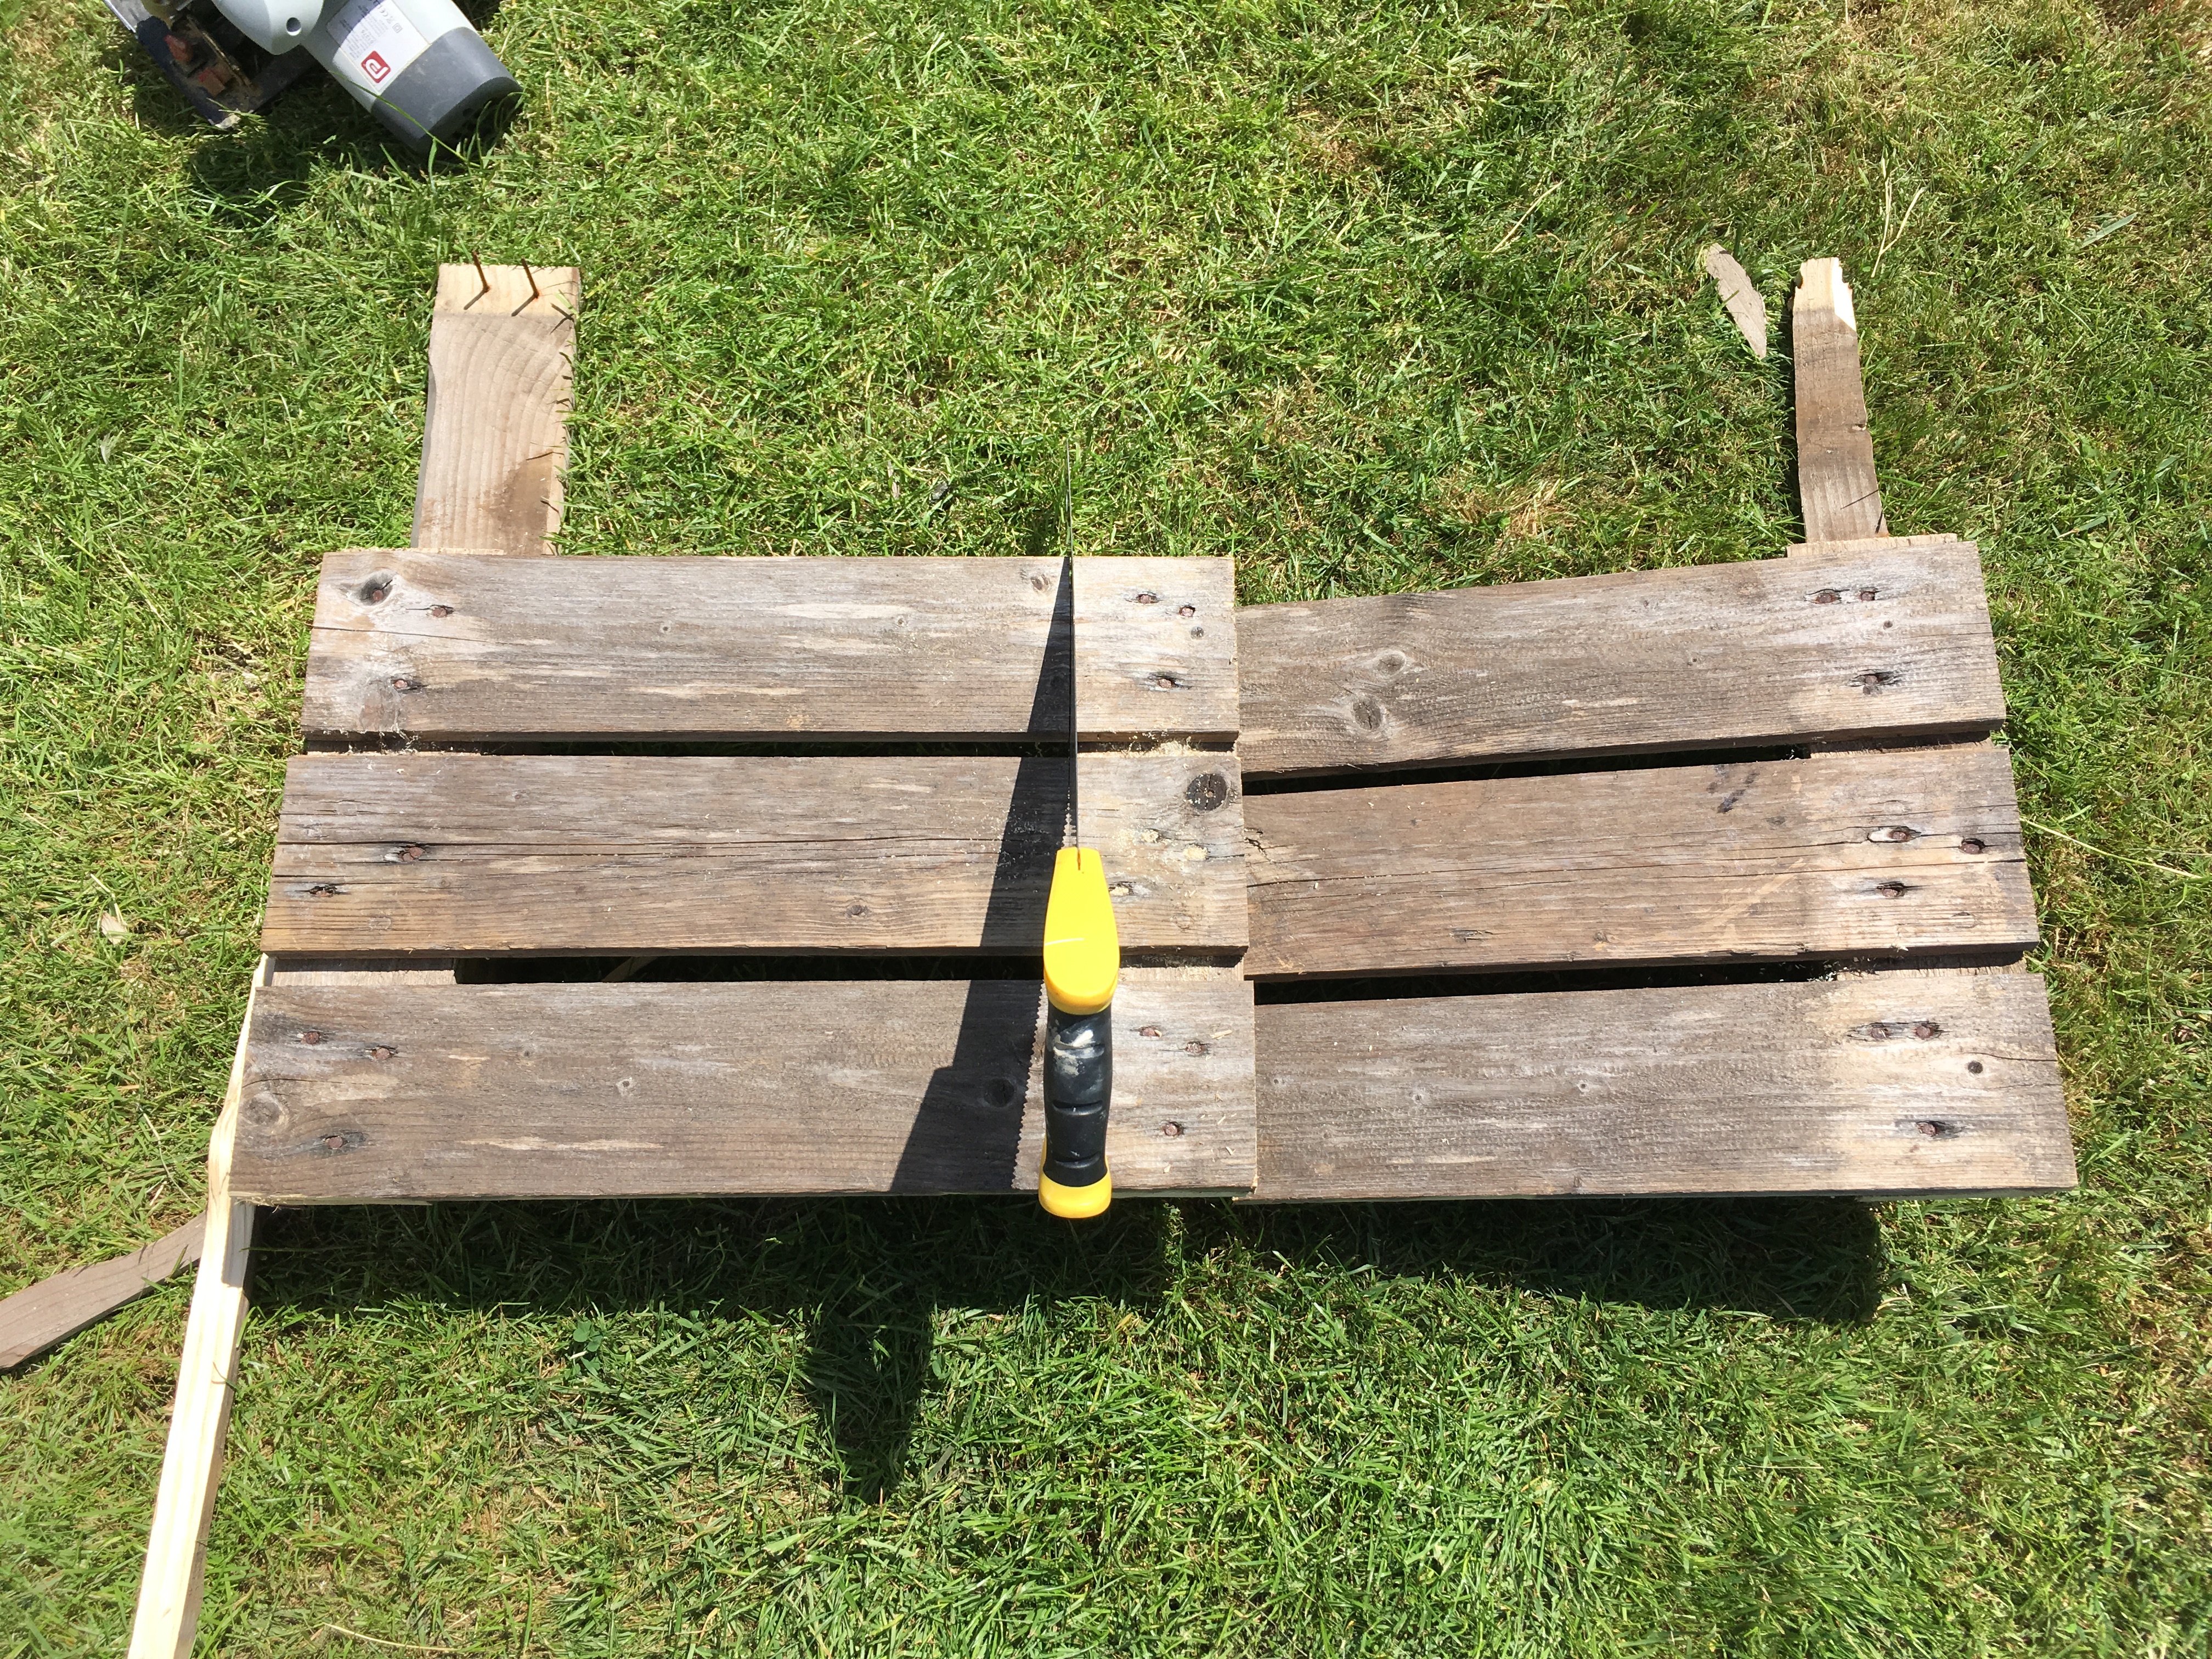
With this particular pallet there were 9 slats so it was perfect for cutting into 3 sections. The top and bottom thirds made the front and back and the middle section provided the two sides. It should go without saying, but please be extra careful here if you’re not used to DIY. If you’re using a circular saw, make sure you use eye protection.
3 slats per section
The supports at the back also need cutting
You get 2 of these
Cut the middle section into 2 – but here it was easier to saw the middle section out rather than to pry it off and then sawing in half
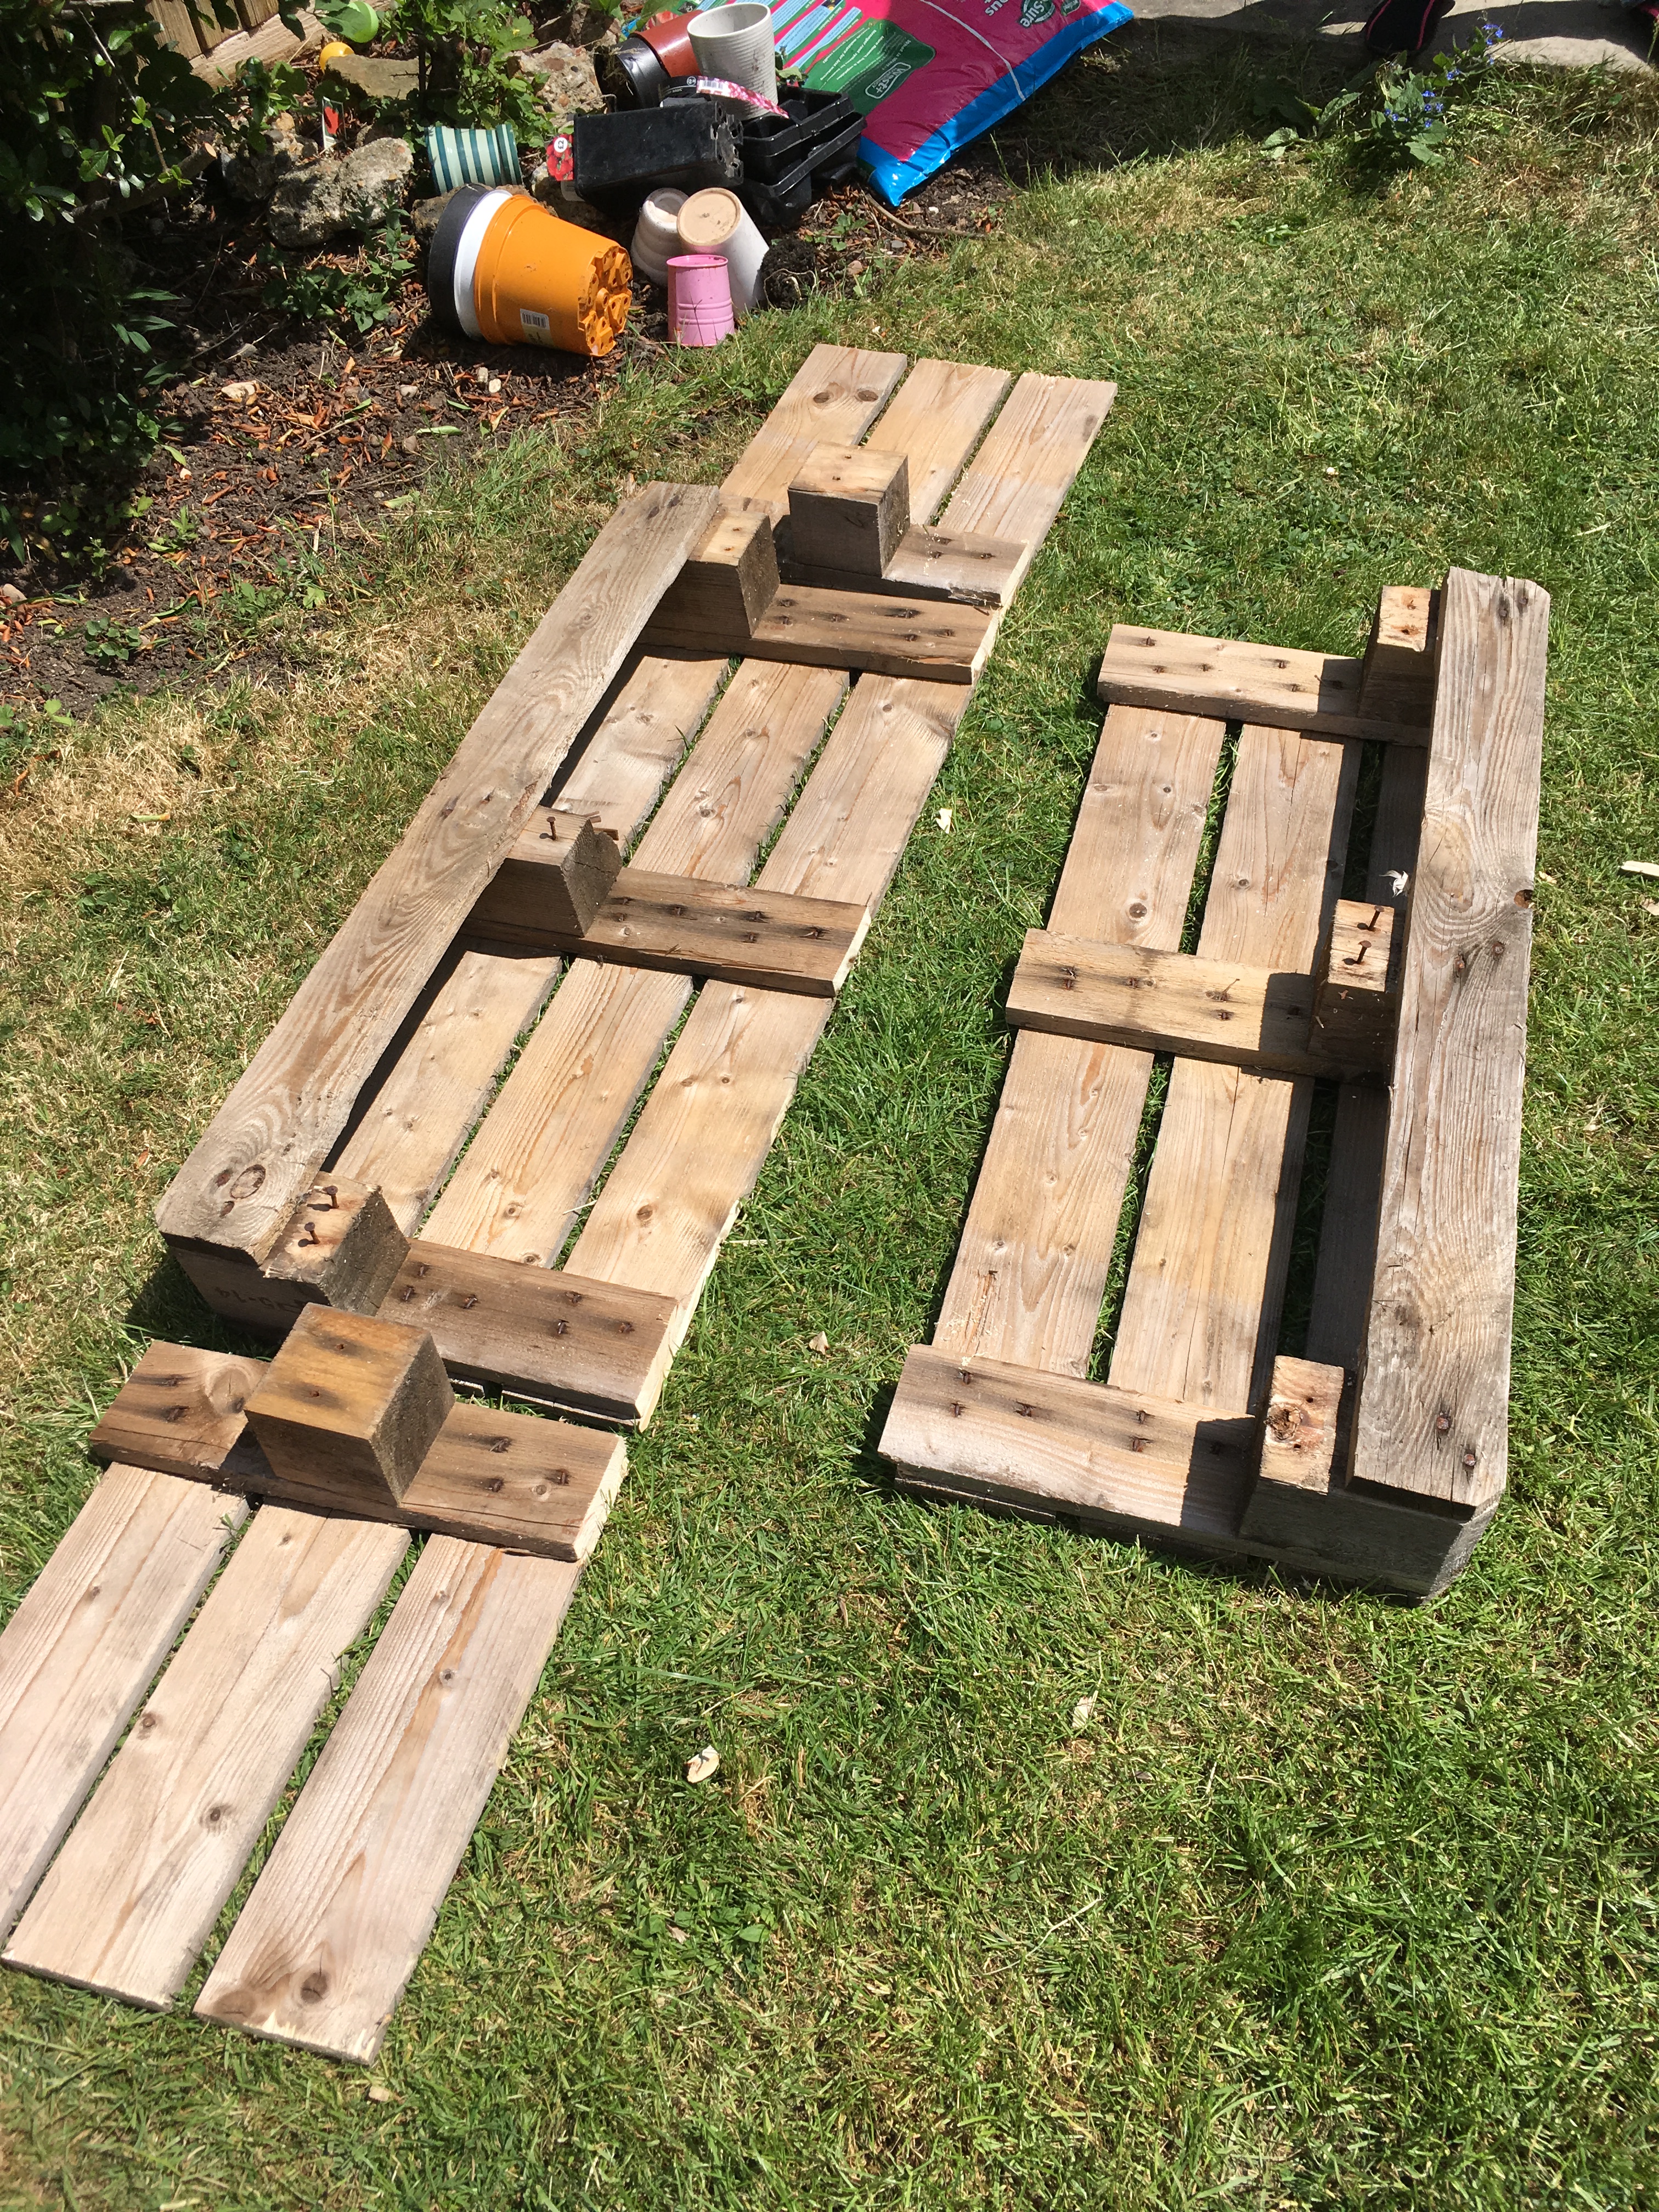
Step 3 – Remove unwanted bits
Use a crowbar or hammer to remove bits that stick out but be aware the wood may splinter so eye protection is advisable.
Remove any exposed nails or knock them in with a hammer, if easier.
All the parts, tidied up, lined up and ready to go.
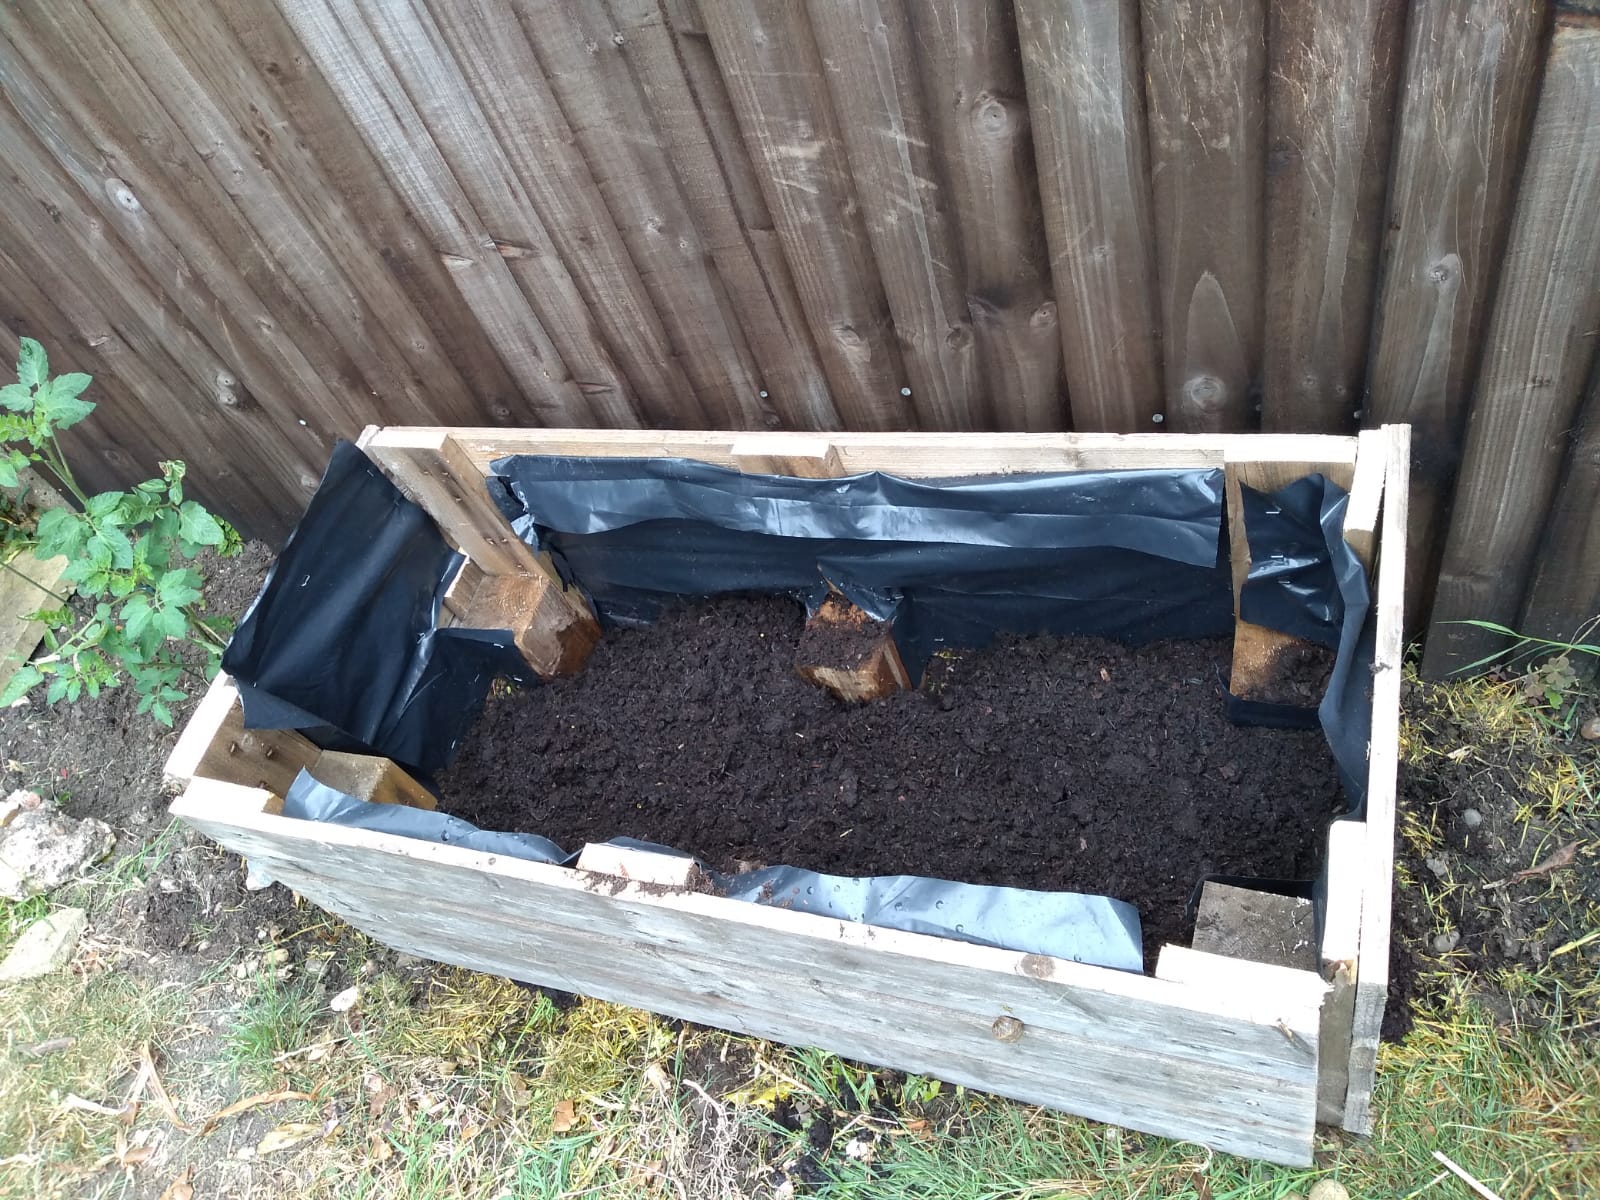
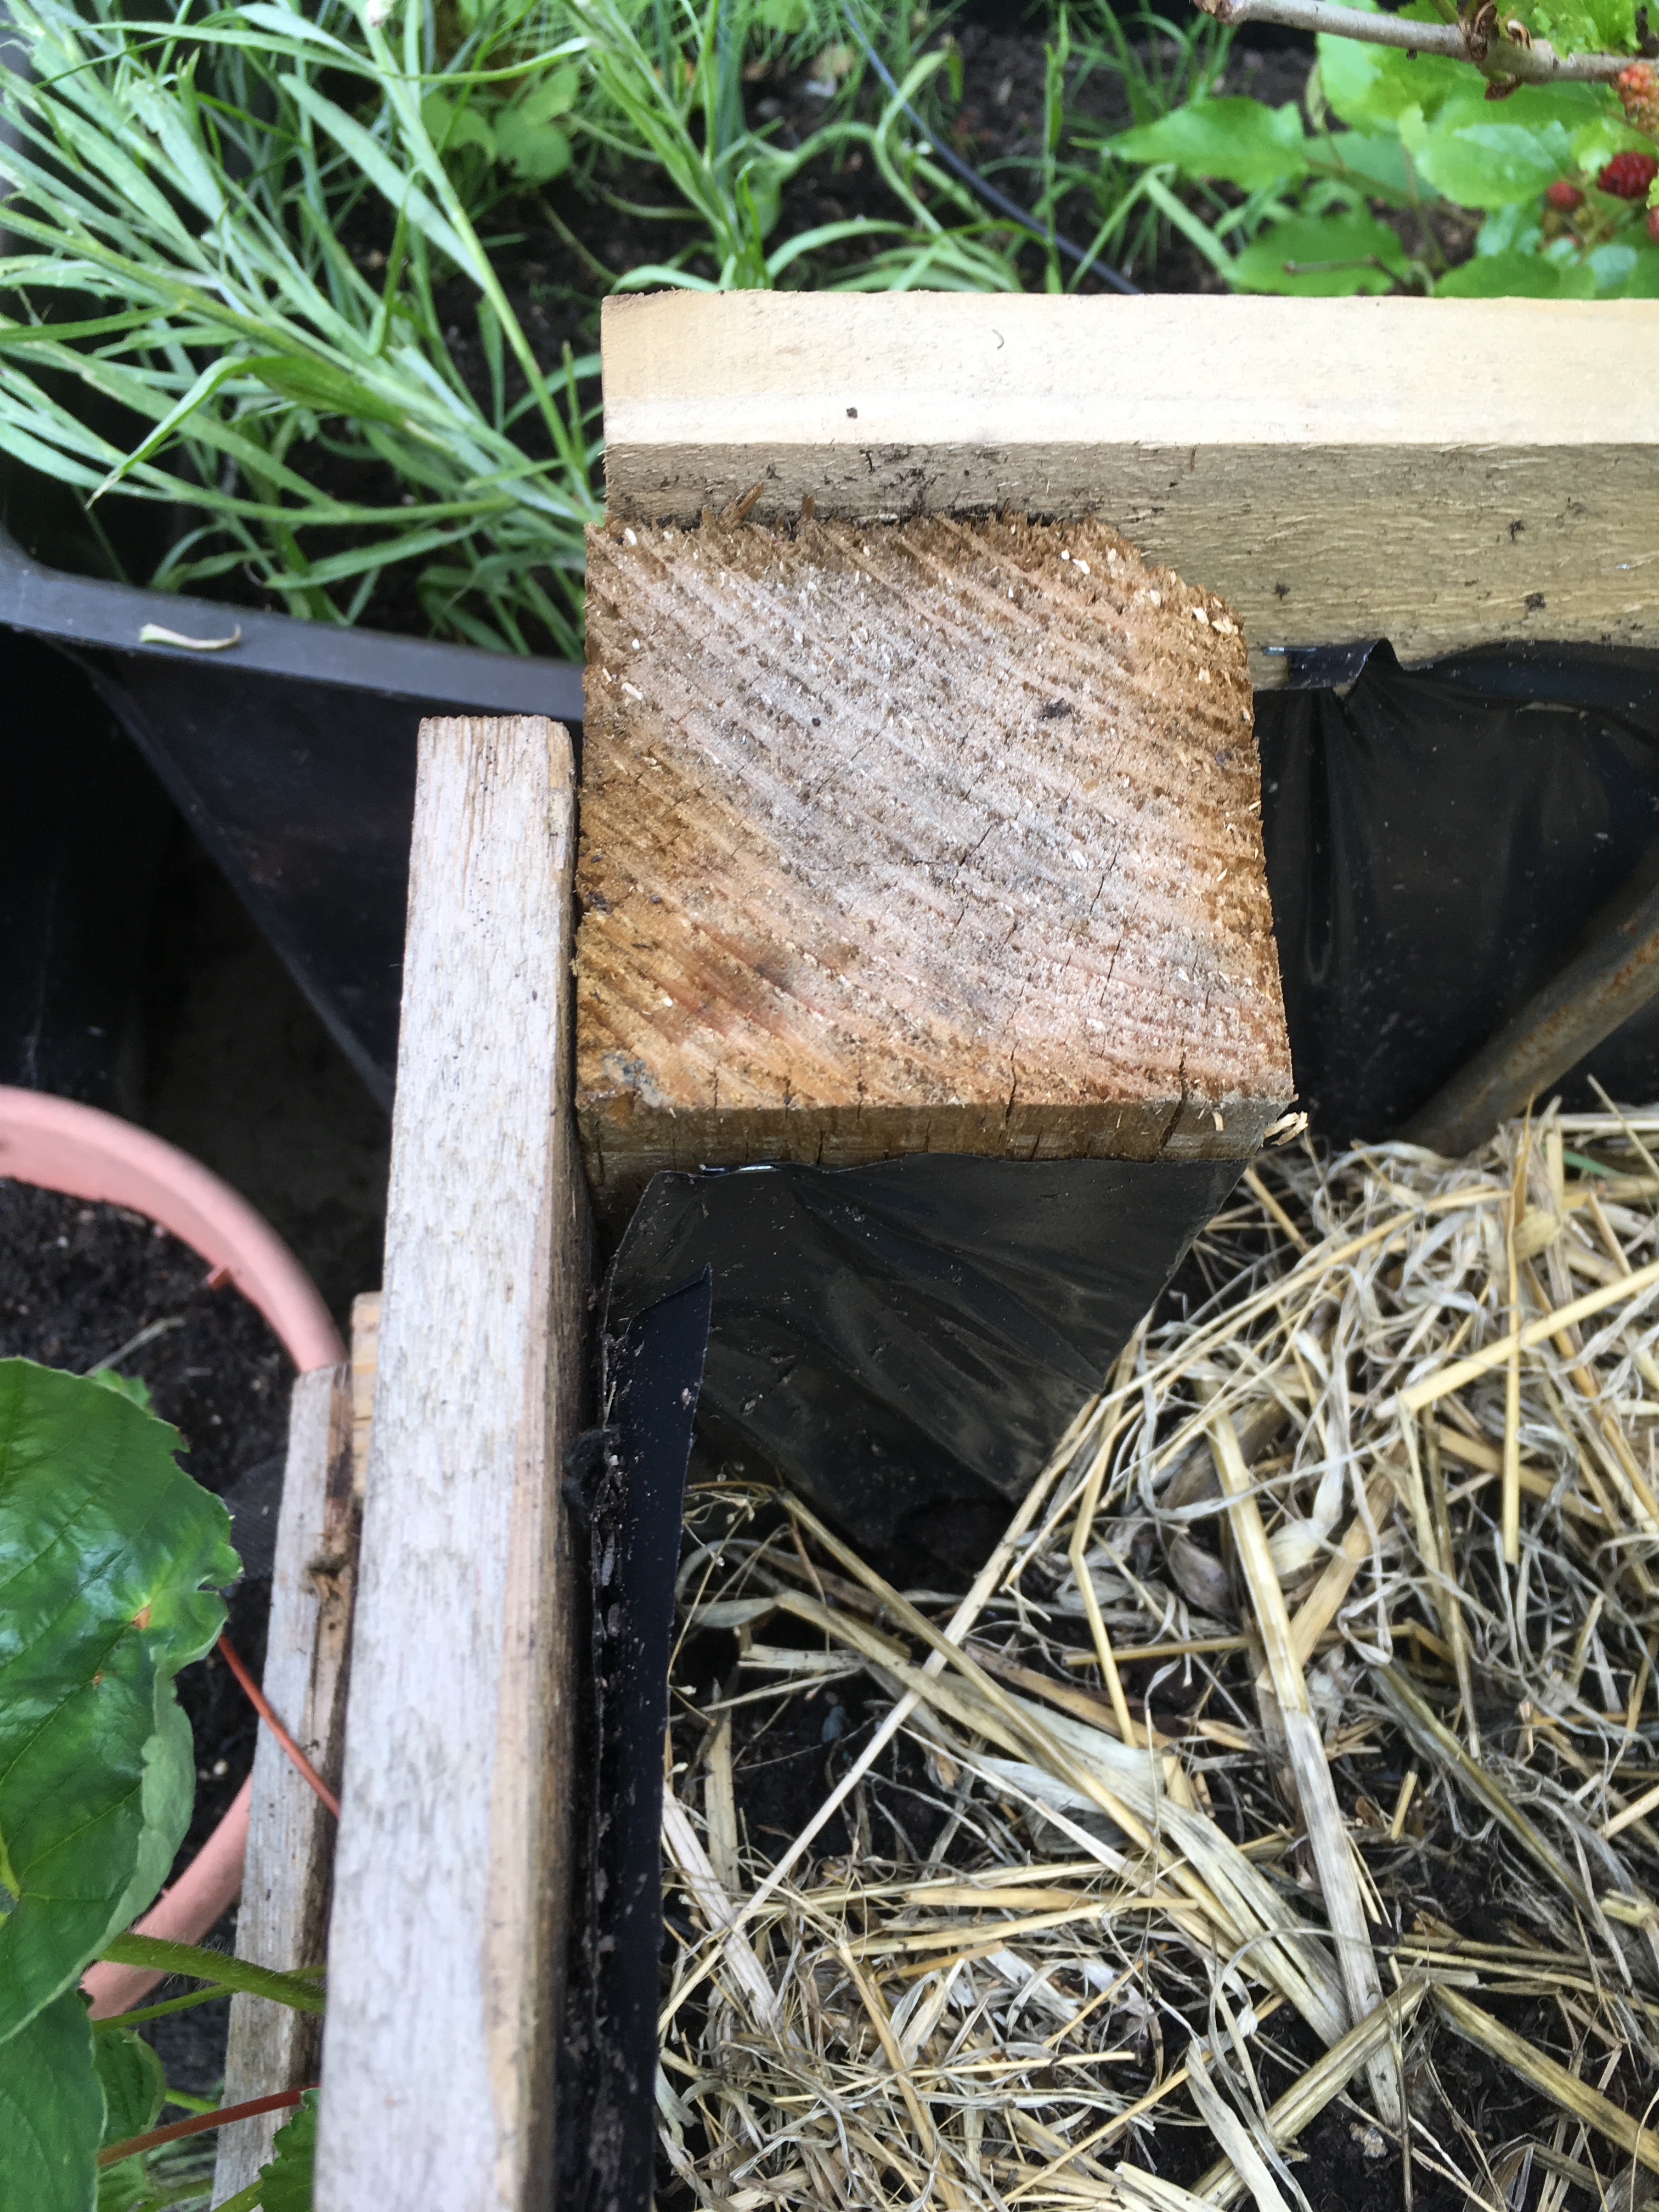
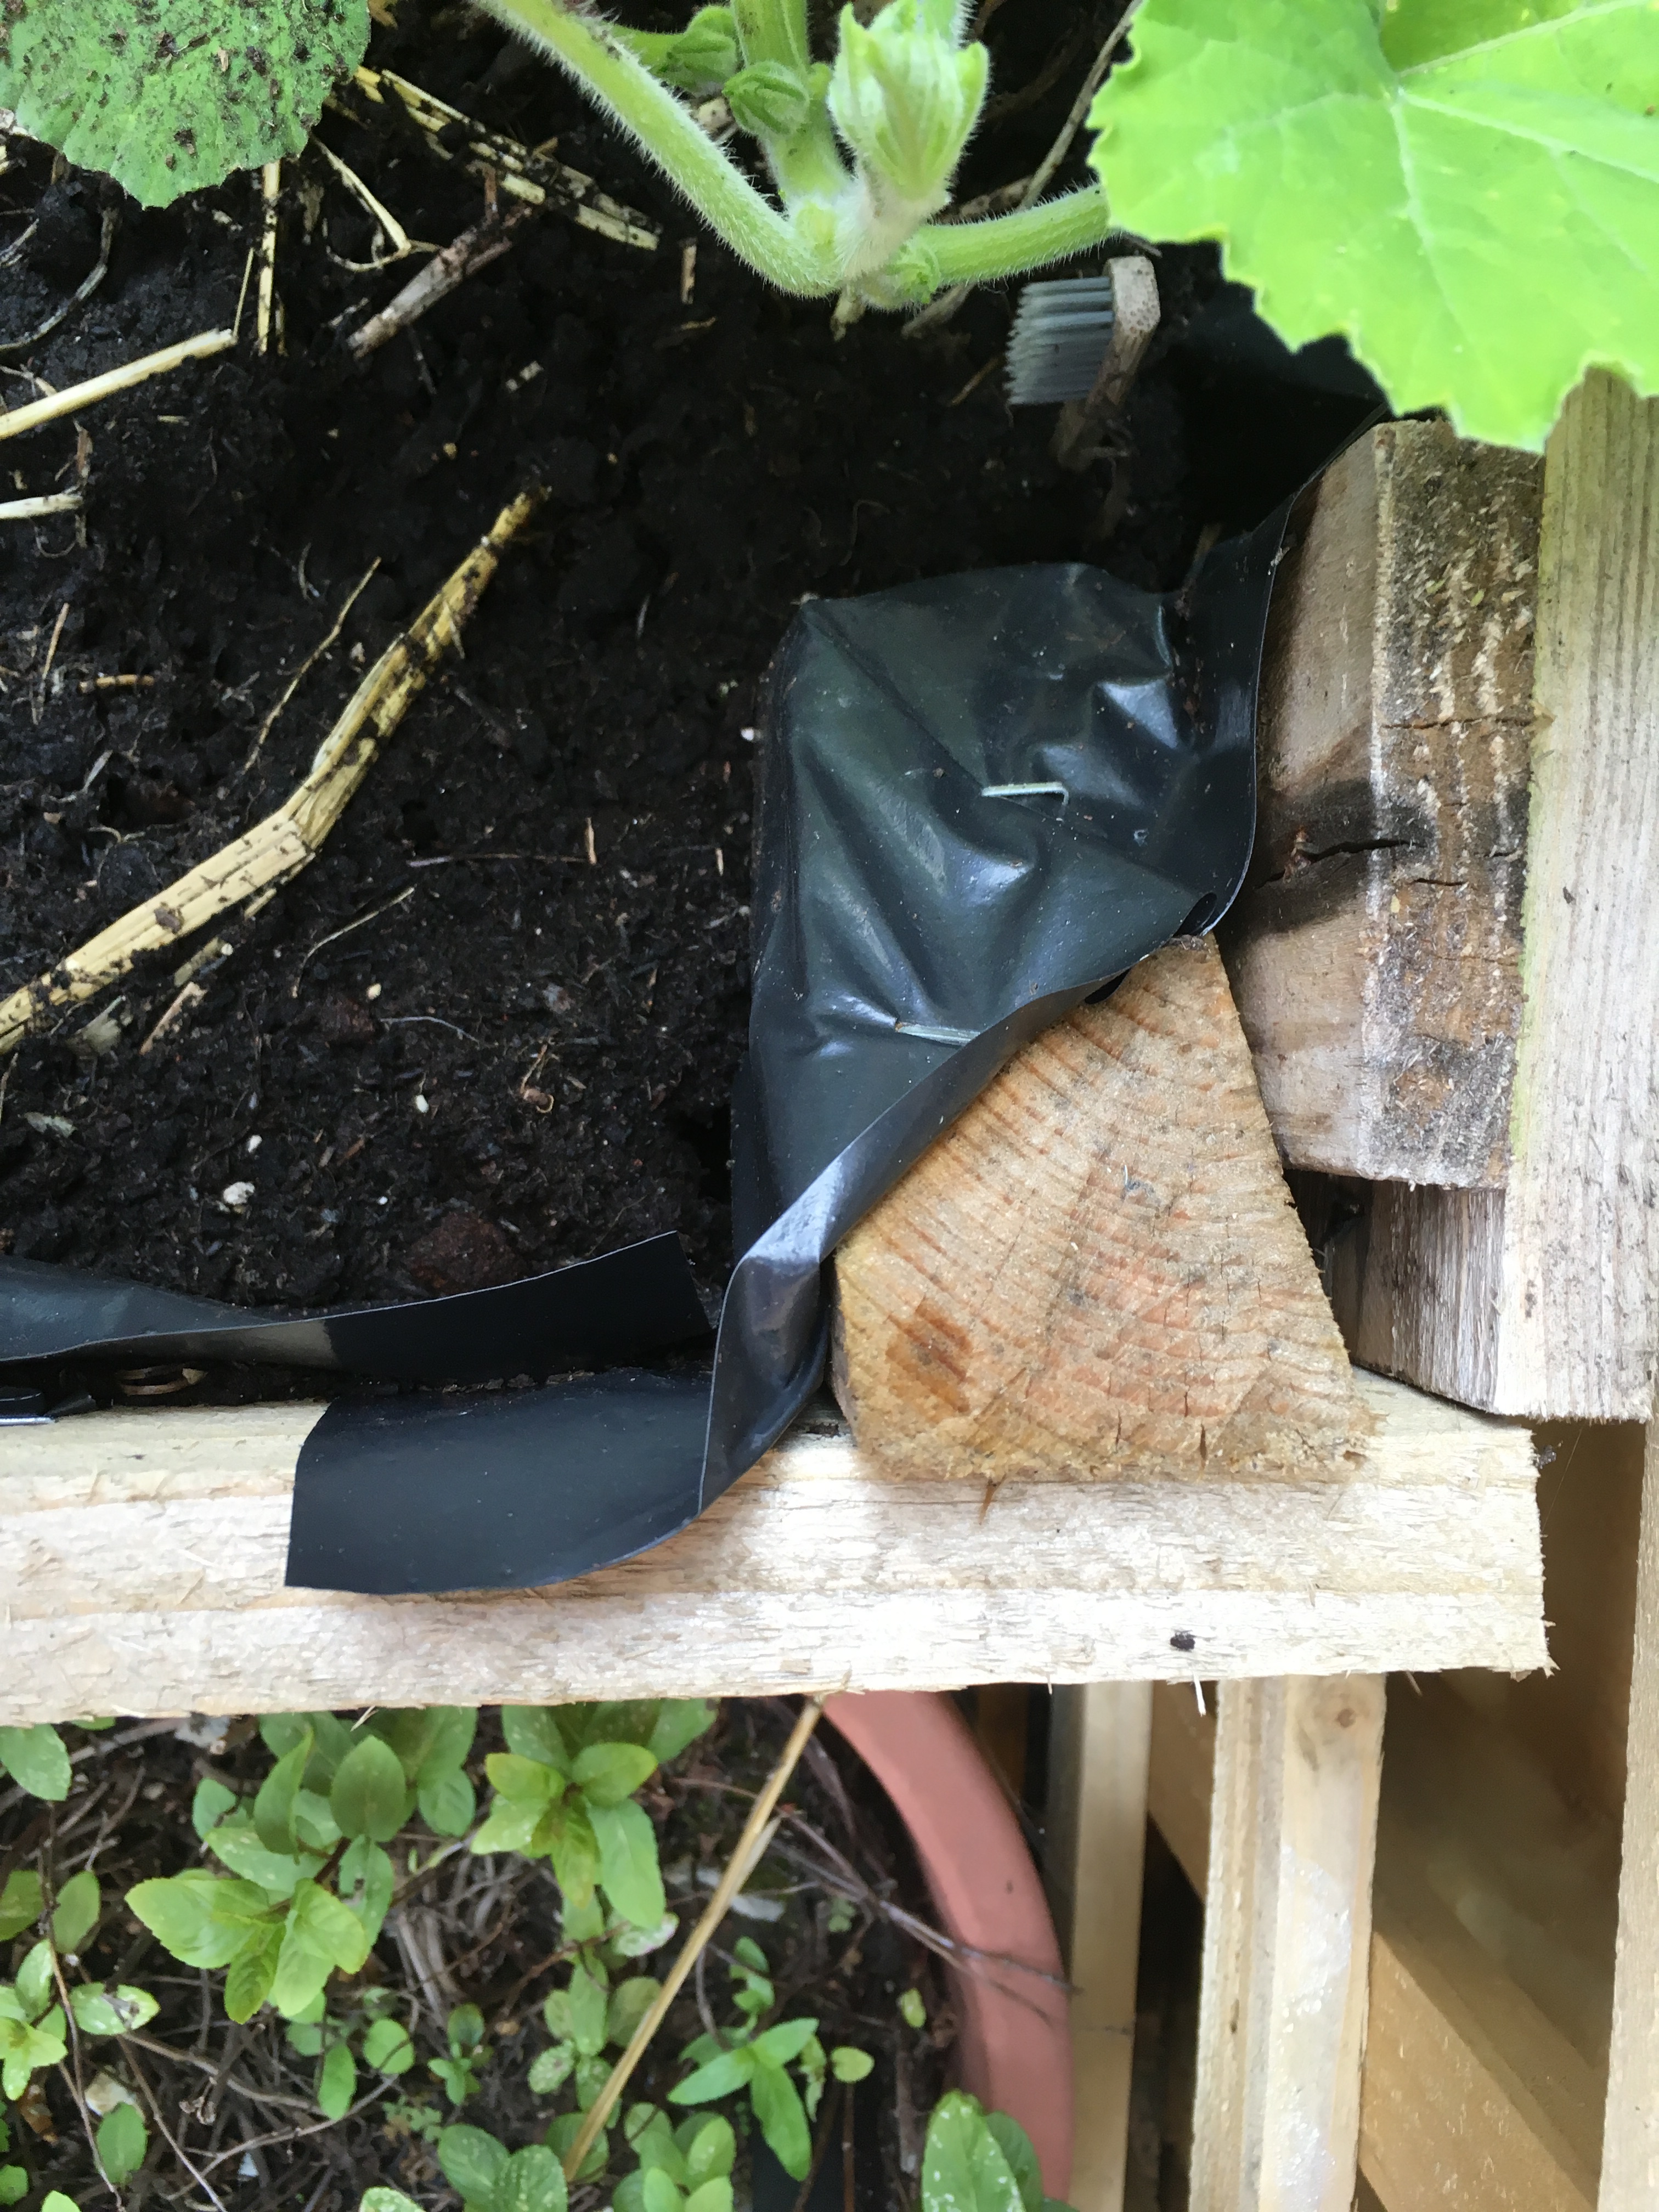
Here we removed most of the bottom frame of the pallet. We kept 2 edges to support the base, but also mostly because we were too lazy to remove them. We kept all of the blocks for something to screw into during assembling.
Step 4 – Line the planter
You can line with plastic to keep the moisture in, protect your wood, if the slats are too far apart or if you feel uneasy about the source of the pallet. You can line with landscape fabric if you want a more organic feel whilst keeping the soil in. It won’t be a moisture barrier though.
Here we used 2 rubble bags cut with scissors ,
lined up the plastic
and stapled it round the edges with a staple gun
As we weren’t worried about the pallet and the slats were very close together, we just did it to protect the wood a little, so we didn’t ensure full coverage of the insides. Lining the pallet can be done at the end too, but it can be difficult to get a good angle with the staple gun.
Step 5 – Assemble your planter
Decide which is going to be the bottom and try and keep that bottom edge level. Start with a corner and attach them together. Assistance with holding things in place helps to speed things along. Try to screw into some nice thick wood. We kept the blocks in the middle of the pallet for this purpose. I’ve used a random assortment in previous pallet planters.
Blocks in this current project
I’ve used old fence posts before
This was a left over bit of 2 by 4
Where was this bit even from?!?!
If you have good self tapping screws you can screw straight into the wood. If you’re worried about splitting the wood or getting stuck part way then feel free to drill a pilot hole with a wood drill bit that is thinner than your screws.
This helps to keep your screw going in the direction you want and avoids this:
Basically here the screw would no longer go in and the cross in the head began to shear so the screwdriver was turning but no longer gripping the screw. I gave up when the screw would not go in and wouldn’t come out either. When this happens there really isn’t much you can do. To avoid it sticking out I used bolt cutters which then shortened it to a dangerously sharp, ankle height stump. I used a glue gun to cover it and then let the rosemary grow to hide it. One of my many garden failures that basically teaches me what not to do next time.
Put 6-8 screws in each corner. We put in 2 at the top and bottom of each side.
Repeat for all 4 corners.
Sometimes the ends don’t quite meet. A plank from left over wood has been slipped in here. We added 2 in the end.
When filled with soil and covered in plants you’ll realise that it never needed to be perfect.
Step 6 – Place in situ
I recommend on top of soil. Doesn’t have to be bare and weeded. If you put it on top of turf, as long as the planter is deep enough, the turf will die from lack of light and provide you with some organic material at the bottom. On top of soil, though, means that the roots of the planter are not restricted to just the planter. It can grow down and then have access to the water table so your plants may not need as much watering. If you’re placing it on the patio or on a hard surface you may want to add a bottom to your planter but ensure, if you line it with plastic, that you pierce the plastic in several places to allow for water to drain. Personally I see very little point to adding a bottom as the wood at the bottom will be moist most of the time and rot fairly quickly. Even if you wanted to move the planter at a later date it’ll be very heavy, especially if it’s full of plants.
Step 7 – Mix in composting waste
Vegetable waste from the kitchen and grass clippings or old un-diseased plants are good. Just chuck it all in and mix it up a bit with the soil at the bottom to introduce some microorganisms. Feel free to skip this step but I like to do this because:
It’s a good use of uncomposted kitchen waste
It provides more organic material for the plants later
It’s the laziest form of composting, even better than hole composting (there’ll be an article or video on this soon)
You use less actual compost to fill the planter
Don’t do this if you planting something quite deep (or if the planter is very shallow) as your plants may compete with the microorganisms for nutrients while the breakdown process is happening. Typically though, when microorganisms and worms have access, it will break down fairly quickly. By the time the roots reach it, it should be ready to fertilise.
Step 8 – Fill with compost
If you’re going through the effort of building a planter then you may as well provide the best start, especially if you’re using a planter as a raised bed because your soil (like mine) is pretty pants. We made this one as a raspberry bed and it was filled with shop-bought ericaceous (acidic) compost. I don’t have the right chemicals/products and am far too lazy to make pre-existing soil acidic enough to make raspberries happy.
Other planters
Single pallet planter
Holes were poked in the landscaping fabric and from the top right the new plants from the runners were being coaxed into the gaps. The first photo on this page shows it after a year.
Another pallet after a year. The lettuce at the top had died and the plants in the first 2 rows couldn’t handle the hot summer.
Potential:
Very simple.
It’s good for pallets with wide spaces between
the slats.
For more growing space in small foot print.
Construction:
Staple landscaping fabric to the inside of the front first. Then wrap either a double or triple layer around the back and staple it at the front (you can see the fabric folded over and stapled at the left and right edges in the right photo above). If you have spare planks of wood (we used two old floor boards) it’s a good idea to screw these in place over the back AFTER stapling the fabric to support the weight of the compost on the fabric. Fill with compost. Put plants at the top. Poke holes into the landscaping fabric. Squish plants in. Here strawberries worked well, as did perennial rocket, Egyptian onions, sorrel, chives and especially watercress, which went crazy at the bottom. Salad Burnett did really well here but I discovered that none one in the family (including me) liked eating it.
Problems:
Fiddly to put plants in the gaps. So annuals (plants that die within a year) are hard to grow. If you start with it lying down it’s easier to put the plants in and they settle their roots better, but it’s very heavy to put into place once it’s full of compost and plants. Also when it goes from horizontal to vertical the compost shifts down and can pull some of the plants down inside through the gap.
You can water the top easily and it will find its way to the bottom (our watercress loved this), but the flat surface dries up very quickly and the vertical wall is hard to water without washing the compost out.
Watering eventually had to be done in summer with a spritzer – which, as you may have guessed, was very tedious.
The second year, when the plants are re-growing, sometimes shoots grow behind the fabric rather than out the front. You just have to check every now and then and tease them out.
As you can see from the gaps, as things died in the summer it was really hard to replace them as the dry compost couldn’t be made damp enough to support new young seedlings.
Must be fixed in place as it’s pretty heavy and could do serious damage if it fell on someone.
Wonky Planter
This is pretty much the same as the planter in the main body of the article but the pallet had large gaps in the front so rainbow chard is planted in the gaps at the front.
Potential
Makes a large planter which retains water better
Don’t be afraid to play with shapes. This one is tapered to one end to fit into the space better.
The plants in front don’t dry quickly like the single pallet planter
This won’t apply to many people but this planter and the one next to it are also helping to stabilise the fence panels behind by breaking up the flat surface that the wind pushes against and because the planters are also screwed to the fence, they provide a large weight to hold the panels too.
Construction
Much the same as the main planter in the article but used
additional wood left over from building a raised bed.
Problems
Needs more than one pallet or some extra wood.
Need to be choose plants that don’t grow too tall or bushy in the gaps otherwise they overcrowd what is in the main body.
Slanted Slat Planter
The front of this planter has slats at an angle.
Potential
Makes a large planter which retains water better
With the slanted slats providing ‘pockets’ for the plants they get a better purchase and it is easier to water.
When using both the front and the top you can grow loads of different plants in a small foot print
The strawberries hang so they don’t lie on damp soil and go rotten
Construction
Much the same as the main planter in the article but the
front side has slats pulled off a pallet. Screws go through the slat, through
triangular bits of wood and into a support in the corner. The plastic sheet is
slit to allow roots to grow into the main body.
Problems
Needs more than one pallet or lots of extra wood
Those triangles are a major pain in the backside for someone like me who isn’t a carpenter and doesn’t have the fancy tools.
I stupidly cut the plastic sheet all along the whole length of the slat so compost kept pouring out onto the strawberry plants in the front. I’ve had to prop it up with bits of bamboo canes.
Big Block Planter
Please ignore me smiling like an idiot but when the photo was cropped you couldn’t see how deep the planter was.
This is how big everything grew. You can see the tomato plant on the left has been shoved over by the window opening.
This is the first pallet planter I made about 7 years ago. It was in our previous house which just had a paved ‘yard’ and not much growing space. Everything was in pots. I’m afraid these are the only photos of it and the quality is pretty poor.
Potential
Grow a blimmin’ tree! Our climbing squashes and tomatoes went crazy in this.
Retains lots of water and had plenty of nutrients
Construction
A pallet at the front and another the back. The sides were 2 planks of wood on each side holding the pallets together. 3 layers of landscaping fabric were wrapped around the sides and stapled to the back and front to hold the compost in.
Problems
You need 2 pallets and, realistically, more than 2 planks of wood on each side. After I realised how flawed this design was I had to keep shoring it up with more spare bits of wood as they became available (I try not to buy wood if I can avoid it and use old shelves and random planks left over from DIY projects).
Took about a 5 huge bags of compost to fill it.
You feel like the compost at the bottom is just wasted, unless you really do plant a tree.
The plants in the front grew so well that they choked each other out.
The plants in the top grew so well and choked each other out. Maybe that’s a win…?
It was so tall I had to hang out of the window to harvest some of the stuff, and of course opening the window damaged the plants.
A cat decided to use it as a scratching post until it started leaking compost.
So that’s it. Hopefully you’ve learnt what not to do from reading about my mistakes and I’ve given you a few ideas about what you can do. I also hope that this articles illustrates that you don’t need a big garden, or even any bare earth to grow things. You don’t have to buy a raised bed, though I guess you do need to pay for screws and compost. All the plants in the photos, except for the strawberries and the yacon, were raised from seed – which isn’t expensive and you get hundreds in a packet. Do a seed swap and save money there too. It does seem like quite some hard work but the planter in the main article took less than two hours and once you’ve made it you’ll have it for years.
Let me know in the comments if you have any questions or feedback and thanks for joining me!